
Desserts
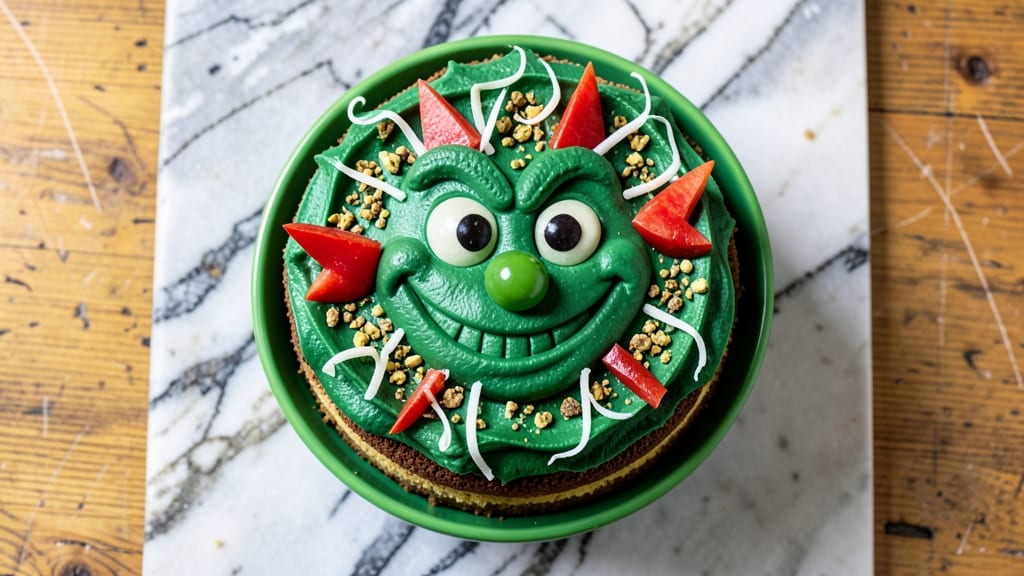
This Grinch cake recipe brings holiday magic to your kitchen with its vibrant green frosting and classic vanilla flavor—perfect for Christmas celebrations. The secret lies in a smooth, creamy buttercream that stays luscious while holding its signature color, achieved through natural food coloring and precise mixing techniques.
I’ve baked this cake for years, and it never fails to impress, whether for a festive gathering or a whimsical dessert table.
The recipe starts with a simple vanilla cake base that’s light yet sturdy enough to support generous layers of frosting.
What makes this cake special is the whimsical green frosting, which can be tinted with either green food coloring or natural alternatives like matcha powder for a more organic look.
The frosting is thick enough to pipe decorative borders or create a Grinch-inspired face with candy eyes and a red-and-white striped hat.
By the time you’re done, you’ll have a showstopping cake with layers of tender vanilla cake and velvety green frosting, ready to be decorated with holiday-themed toppings. The frosting holds its shape beautifully, making it easy to create Grinch-inspired designs or simple festive swirls.
This cake is foolproof, with clear instructions for mixing, baking, and decorating—ideal for both beginners and experienced bakers.
Serve it at your holiday party or save it for a cozy family dessert night—this cake is sure to become a holiday tradition. The recipe includes tips for adjusting the frosting color and decorating ideas to match your festive theme. Let’s get baking!
Ingredients for grinch cake
Twelve ingredients transform into a holiday showstopper with vibrant green frosting and classic vanilla layers.
| Ingredient | Amount | Notes |
|---|---|---|
| All-Purpose Flour 🌾 | 3 cups | Sifted for light texture |
| Granulated Sugar 🍚 | 2 ½ cups | Divided for cake and frosting |
| Unsalted Butter 🧈 | 1 ½ cups | Room temperature, full-fat |
| Large Eggs 🥚 | 4 whole | Room temperature, separated |
| Baking Powder 🧂 | 2 tsp | Aluminum-free preferred |
| Salt 🧂 | ½ tsp | Diamond Crystal kosher |
| Pure Vanilla Extract 🍯 | 2 tsp | Bourbon-infused preferred |
| Milk 🥛 | 1 cup | Whole milk for richness |
| Green Gel Food Coloring 🎨 | ½ tsp | Or matcha powder for natural tint |
| Powdered Sugar 🍚 | 4 cups | For buttercream frosting |
| Heavy Whipping Cream 🥛 | 1 cup | Cold for stable frosting |
| Red Hots Candy 🍬 | ¼ cup | Optional for Grinch hat stripes |
| White Chocolate Candy Melts 🍫 | ½ cup | For Grinch face details |
| Mini Marshmallows 🍬 | ½ cup | Optional for Grinch eyes |
The butter and eggs make all the difference here—use room-temperature ingredients for a tender crumb. Whole milk adds richness to the cake, while Diamond Crystal kosher salt enhances the vanilla flavor. For the frosting, powdered sugar must be sifted to avoid lumps, and heavy whipping cream should be cold to stabilize the buttercream. I always grab Bourbon-infused vanilla extract from Trader Joe's—it adds depth without overpowering. The green gel coloring (or matcha powder for a natural option) needs to be divided carefully—too much and the frosting becomes unappetizingly bright.
No green food coloring? Spinach juice or avocado puree works in a pinch (trust me, it’s subtle). Running short on powdered sugar? Granulated sugar plus 1 tsp cornstarch mimics the texture. The cake layers can be baked a day ahead—they actually improve with time. For the Grinch face, white chocolate candy melts melt smoothly for details, while mini marshmallows make perfect candy eyes. The Red Hots candy adds that signature striped hat—skip it if you prefer a simpler design. If your frosting is too soft, chill it for 30 minutes before decorating.
Cake layers keep 3 days wrapped at room temperature or 1 week refrigerated. Frosting can be made 2 days ahead—just rewhip before using. For a Grinch cake that lasts, assemble the full cake and refrigerate overnight. The flavors meld beautifully, and the frosting holds its shape perfectly. Store decorated cakes in the fridge for up to 5 days, bringing to room temp before serving. Pro tip: Use parchment paper between layers to prevent sogginess—worth the extra minute.
Why You'll Love This Recipe
- Pantry Staples Only: I swear by this recipe because it uses what’s already in my cupboards—no specialty ingredients, just flour, sugar, butter, and eggs. Honestly, if I’ve got those basics, I’ve got a cake.
- Butter-Sugar Magic: That rich butter-sugar combo in the batter? It’s what makes this cake dangerously moist and tender. The eggs bind it all together so perfectly, you’ll forget it’s even a "simple" recipe.
- Birthday or Boredom: Serve it at a holiday party or when you’re craving something sweet on a Tuesday. Between us, I’ve taken slices to work for lunch—no one judges (okay, maybe they should).
- Leftovers? Better: This cake stays fresh for days, and slices reheat in seconds. I’ll be real: the second day is often the best day, especially with a dusting of powdered sugar. Budget-friendly too—no fancy ingredients wasted.
Step-by-step instructions for whimsical green frosting and vanilla magic
Here's where the magic happens—transforming simple ingredients into a showstopping Grinch cake.
Prepare the Vanilla Cake Batter
Preheat your oven to 350°F and grease two 9-inch round cake pans, lining the bottoms with parchment paper. In a large mixing bowl, combine the 3 cups all-purpose flour, 2 tsp baking powder, and 0.5 tsp salt. Sift this mixture together to eliminate any lumps and create a light, airy texture for your cake.
In a separate bowl, cream together the 1.5 cups unsalted butter and 1 cup granulated sugar from the 2.5 cups total until light and fluffy. This should take about 3-4 minutes with an electric mixer. The mixture should nearly double in volume and become pale in color. Add the 4 whole large eggs, one at a time, mixing well after each addition. Stir in the 2 tsp pure vanilla extract and 1 cup milk until fully combined.
Gradually add the dry ingredients to the wet mixture, alternating with the remaining 1.5 cups granulated sugar. Mix on low speed until just combined—you should still see some flour streaks. This ensures a tender cake rather than a dense one. Finally, divide the batter evenly between the two prepared cake pans. Bake for 25-30 minutes, or until a toothpick inserted into the center comes out clean. Let the cakes cool in the pans for 10 minutes before transferring to a wire rack to cool completely.
Create the Whimsical Green Buttercream Frosting
In a large mixing bowl, combine the 4 cups powdered sugar, 1 cup heavy whipping cream, and 0.5 tsp green gel food coloring. Mix on medium speed until the food coloring is fully incorporated and the mixture is smooth. Add the remaining 1 cup granulated sugar and mix again until fully combined. This step is crucial for achieving that vibrant Grinch green color without altering the frosting's texture.
Using a stand mixer fitted with the paddle attachment, beat the mixture on medium-high speed for 3-4 minutes, or until the frosting is light, fluffy, and holds its shape when piped. This is the moment that matters: the frosting should be thick enough to hold its shape but still smooth enough to spread easily. If it's too thick, add 1 teaspoon of milk at a time until you reach the desired consistency. If it's too thin, add 1 tablespoon of powdered sugar and mix again.
Assemble the Grinch Cake with Whimsical Details
Once your cakes are completely cool, place one cake layer on a cake stand or plate. Spread a generous layer of the green buttercream frosting evenly over the top, leaving a small border. Place the second cake layer on top and repeat the frosting process, covering the entire cake. Smooth the sides of the cake with a spatula, creating a clean, even surface for decorating. Chill the cake in the refrigerator for 30 minutes to firm up the frosting, making it easier to work with.
After chilling, use a piping bag fitted with a star tip to pipe stripes of frosting around the cake, mimicking the Grinch’s iconic hat. For extra whimsy, melt the 0.5 cup white chocolate candy melts and pipe on the Grinch’s face details, including eyes, nose, and mouth. Press the 0.5 cup mini marshmallows into the frosting for the eyes, and use the 0.25 cup red hots candy to create the Grinch’s signature red stripes. Finally, pipe additional frosting to fill in any gaps and create a seamless, polished look.
Final Touches and Serving
Let the cake sit at room temperature for 10-15 minutes before slicing to allow the frosting to set slightly. This ensures clean slices without frosting sliding off. Serve the cake immediately for the best texture and presentation. The contrast of the vibrant green frosting against the classic vanilla cake will make this a showstopper at any celebration.
For an added touch, garnish each slice with a few extra red hots candy or a sprinkle of mini marshmallows to keep the Grinch theme alive. Store any leftovers in an airtight container in the refrigerator for up to 3 days, though I doubt it will last that long!
Pro Tips For Making Grinch Cake
- MEASURE FLOUR BY SPOONING: Don’t scoop straight from the bag—that packs it too tight and throws off your cake’s structure. Instead, spoon the flour into your measuring cup, then level it off with a knife. I used to skip this, and my Grinch cake always came out dense. Trust me, a little extra effort here makes a real difference in texture.
- CREAM BUTTER AND SUGAR LONG: Let that butter and sugar sit in the mixer for at least 3 minutes until it’s pale and fluffy. I learned this the hard way—rushing this step means tiny air bubbles, and your cake won’t rise as well. Patience here guarantees a lighter crumb.
- DON’T OVERMIX THE BATTER: Stop mixing as soon as the flour disappears—overworking it develops gluten, and your cake turns tough. I’ve seen people beat this batter until it’s smooth, only to end up with a sad, dense result. Two minutes after the flour’s incorporated is plenty.
- USE ROOM-TEMP EGG WHITES: Cold egg whites can deflate your batter or leave pockets in the cake. Let them sit in warm water for 5 minutes before adding—this ensures they whip up properly and your cake rises evenly. Sounds small, but it’s the thing that matters most for that classic Grinch cake height.
Best sauces and condiments for grinch cake
Classic Green Buttercream
The star of this cake is the whimsical green buttercream, made with 4 cups powdered sugar, 1 cup heavy whipping cream, and ½ tsp green gel food coloring. I always use Wilton’s gel coloring for vibrant color without altering texture.
For a natural tint, replace the coloring with 1 tbsp matcha powder—it adds subtle earthiness. Beat the frosting until it’s light and fluffy (about 3-4 minutes on medium-high speed) for that perfect piping consistency. 🎨
Cream Cheese Swirl
For a tangy twist, fold ½ cup cream cheese (softened) into the buttercream after mixing. This adds a bright, creamy contrast to the vanilla cake. I like to pipe swirls of the cream cheese frosting through the green layers before chilling.
Use a Wilton 1M tip for elegant rosettes. The cream cheese keeps the frosting stable in warm rooms—ideal for holiday gatherings.
Chocolate Ganache Drip
Elevate the cake with a dark chocolate ganache drizzle around the base. Melt ½ cup dark chocolate chips with ¼ cup heavy cream, then let cool slightly before drizzling. The rich chocolate complements the green frosting beautifully.
For extra drama, add edible gold leaf or crushed peppermint for a festive touch. This technique takes 5 minutes but makes a huge visual impact. ✨
Caramel Glaze Finish
A salted caramel glaze adds a luxurious finish. Heat ½ cup granulated sugar until melted, then whisk in ¼ cup heavy cream and 1 tbsp butter. Drizzle over the cake while warm.
Sprinkle with flaky sea salt (like Maldon) for a sophisticated contrast. This glaze sets in 10 minutes, giving the cake a glossy, restaurant-quality sheen.
Spiced Whipped Cream
Serve with spiced whipped cream for a lighter option. Whip 1 cup heavy cream with 1 tsp cinnamon and ½ tsp vanilla until stiff peaks form. Pipe dollops alongside slices for a festive garnish.
The warm spices balance the sweet frosting, making each bite feel like a holiday treat. Store whipped cream in an airtight container for up to 2 days. 🍯
Nutrition facts
Frequently asked questions
Can I make this cake without green food coloring?
For a natural green tint, replace the ½ tsp green gel coloring with 1 tbsp matcha powder or blend 2 tbsp spinach juice with 1 tsp lemon juice. Both options create a subtle, earthy green that still looks festive. Just mix the tint into the buttercream before whipping to avoid clumps.
How do I keep the frosting from sliding off the cake?
Chill the cake for 30 minutes before decorating to firm up the frosting. Use a spatula to smooth sides gently, then pipe borders with extra frosting for stability. For extra security, add a thin layer of ganache between cake layers—it acts as a glue. Let the cake sit at room temp for 10-15 minutes before slicing.
What’s the best way to store leftovers?
Wrap slices individually in plastic wrap and store in an airtight container in the fridge for up to 3 days. For longer storage, freeze slices (without frosting) for 1 month. Reheat in the microwave for 10-15 seconds to restore freshness. The frosting may soften slightly after refrigeration—repipe if needed.
Can I make this cake gluten-free?
Yes, but use a 1:1 gluten-free flour blend (like Bob’s Red Mill) and add ½ tsp xanthan gum to the dry ingredients. Reduce the milk to ⅔ cup to prevent a dense texture. The frosting remains unchanged. Test the cake with a toothpick—it should read clean at 350°F for 30-35 minutes.
How do I make the Grinch face decorations last?
Use white chocolate candy melts for the face details—they harden quickly. Press mini marshmallows firmly into the frosting for eyes, and arrange Red Hots candy in stripes before the frosting sets. For extra hold, chill the cake for 1 hour before serving. Store decorated cakes in the fridge to prevent melting.