
Desserts
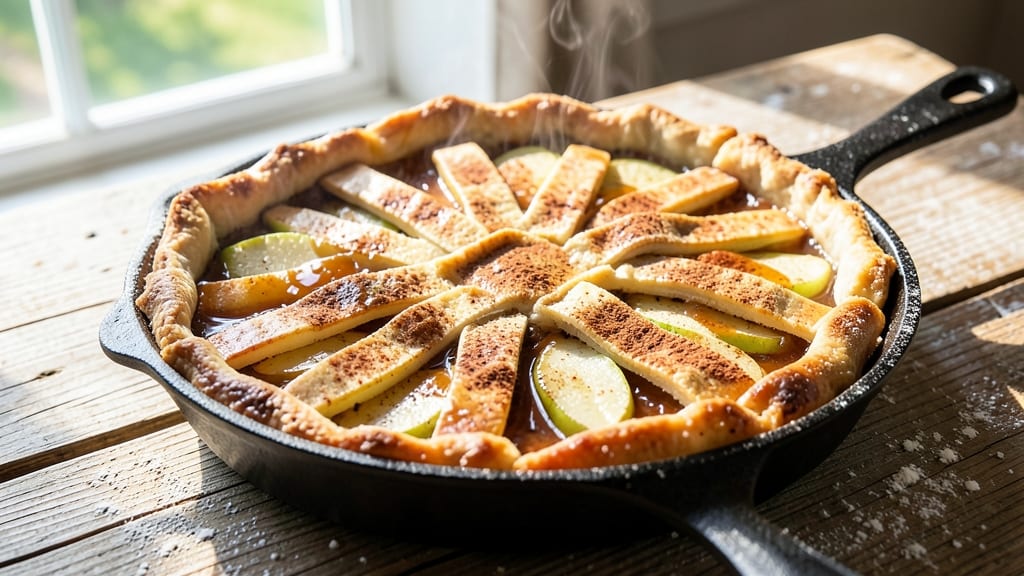
This Grandma's apple pie filling recipe delivers the perfect balance of spiced cinnamon-sugar warmth and vanilla depth that makes every slice taste like childhood nostalgia.
The secret lies in a precise mix of tart apples, brown sugar, and warm spices that caramelize beautifully during baking, creating that signature burst of flavor in every bite.
I’ve perfected this filling over years of baking pies, ensuring it’s foolproof whether you’re using a store-bought crust or rolling out your own.
The filling comes together in just 15 minutes with simple ingredients you likely already have on hand—apples, sugar, cinnamon, and a touch of vanilla extract.
The key is tossing the apples with the spice mixture before baking, which allows the flavors to meld and the edges to caramelize while keeping the center tender.
This isn’t just filling; it’s the heart of a classic apple pie, where the spices and sugar create a symphony of sweet, warm, and slightly tart notes.
What makes this filling truly special is how it transforms into a golden, bubbling center once baked—crisp at the edges, soft in the middle, and infused with that unmistakable cinnamon-sugar aroma.
The vanilla adds a subtle depth that rounds out the flavors, making it richer than store-bought fillings. Once you try this, you’ll never settle for anything less in your apple pie.
Pair it with a buttery pie crust and bake until the edges are golden and the filling is just set—this filling is designed to shine as the star of your dessert. Ready to bake? Let’s get started with the full recipe.
Ingredients for grandma's apple pie filling
Eight ingredients, one nostalgic flavor—this filling brings back memories with every bite.
| Ingredient | Amount | Notes |
|---|---|---|
| Granny Smith Apples 🍎 | 4 medium | Peeled, cored, sliced thin |
| Light Brown Sugar 🍚 | 1 ½ cups | Packed firmly for accuracy |
| Ground Cinnamon 🌿 | 3 tbsp | Freshly ground preferred |
| Pure Vanilla Extract 🍯 | 1 tbsp | High-quality, no imitation |
| Lemon Juice 🍋 | 1 tbsp | Freshly squeezed |
| All-Purpose Flour 🌾 | ½ cup | For thickening consistency |
| Granulated Sugar 🍚 | ¼ cup | For balancing sweetness |
| Ground Nutmeg 🌿 | ½ tsp | Freshly grated nutmeg better |
| Salt 🧂 | ½ tsp | Kosher or sea salt |
| Unsalted Butter 🧈 | ¼ cup | Cold, cubed for baking |
| Ground Allspice 🌶️ | ¼ tsp | Optional for deeper warmth |
The apples are everything here. Granny Smiths give that perfect tartness, but Honeycrisp or Braeburn work too—just make sure they're firm and fresh. I always buy mine from local orchards in season, but the grocery store's pre-washed apples are fine in a pinch. The key is slicing them evenly thin—about 1/4-inch thick. If you're short on time, pre-cut apples from the produce section save you 10 minutes of chopping, though they're pricier. Look for apples that are bright green and crisp to the touch; any soft spots mean they'll turn mushy in the pie.
No Granny Smiths? Mix Honeycrisp and Fuji for a sweeter-tart combo. The brown sugar is non-negotiable—it caramelizes beautifully, but if you're out, light muscovado sugar works in a bind. Fresh vanilla extract is worth the splurge—Nielsen-Massey or McCormick are solid choices. The flour might seem odd, but it helps thicken the filling just enough to keep it from being too runny. Nutmeg can be tricky to find; substitute a pinch of cinnamon if needed. For the butter, European-style is better—it's higher in fat and gives a richer flavor, but regular unsalted works fine too.
This filling keeps beautifully. Store it in an airtight container in the fridge for up to 5 days, though it's best used within 2 days. For longer storage, freeze it in a single layer on a tray, then transfer to a bag—it'll keep for up to 6 months. I like to make a double batch and freeze half; nothing beats pulling out a frozen pie filling on a chilly afternoon. When reheating, microwave it in 30-second bursts until warmed through. The best part? It reheats better than most store-bought fillings—almost like it's fresh from the oven.
Why You'll Love This Recipe
- No Peel Required: I swear by Granny Smiths here—they’re tart enough to stay firm when sliced, so you skip the peeling mess. Toss them straight into the pot with the brown sugar and cinnamon, and let the stove do the work while you sip coffee.
- Taste Like Childhood: That first bite of warm apples with the vanilla cutting through the sugar? It’s the kind of flavor that makes you pause mid-sip. Honestly, the lemon juice brightens it just enough to feel fresh, not cloying—like Grandma’s secret.
- Double Duty Filling: Use it in pies, of course, but I also stir it into oatmeal or spoon it over vanilla ice cream. (Yes, even on a Tuesday night.) The cinnamon’s warmth lingers, so it works anywhere warm apples belong—no guilt, no waste.
- Budget-Friendly Staples: Brown sugar and cinnamon last forever, and Granny Smiths are often cheaper than other apples. Make a big batch—it keeps well in the fridge for days, so you’re always covered without breaking the bank. My wallet and my freezer thank me.
Step-by-step instructions for Grandma's apple pie filling
Here's how to create that perfect balance of spiced sweetness and tender apple texture.
Prepare the Apples for Maximum Flavor
Start by peeling, coring, and slicing the 4 medium Granny Smith Apples into thin, even pieces—about ⅛-inch thick. Granny Smiths stay firm when cooked, so they hold their shape beautifully in the filling. I like to toss the sliced apples with the 1 tablespoon lemon juice immediately after cutting. This prevents browning and brightens their natural tartness, which balances the sweetness later.
Transfer the apples to a large mixing bowl. Here's the thing—if your apples are particularly juicy, you might want to sprinkle them with the 0.5 teaspoon salt now. This helps draw out excess moisture, which prevents a watery filling. Let them sit for 10 minutes while you prepare the other ingredients. This resting time lets the apples soften slightly and release their natural juices.
Create the Spiced Sugar Base
In the same bowl with the apples, add the 1.5 cups light brown sugar, 3 tablespoons ground cinnamon, 0.5 teaspoon ground nutmeg, and 0.25 teaspoon ground allspice. Stir everything together gently but thoroughly. You'll notice the spices cling to the apples and create a beautiful marbled effect. This isn't just for looks—the spices will infuse into the apples as they cook, creating that warm, comforting aroma we all love.
Here's where it gets fun—add the 1 tablespoon pure vanilla extract and mix again. The vanilla might seem like too much, but trust me, it deepens the flavor profile without overpowering. If you're using freshly grated nutmeg, you'll smell that earthy, slightly peppery note that makes this filling truly special. Give everything one final stir so the spices are evenly distributed throughout the apples.
Thicken the Filling for Perfect Texture
In a separate small bowl, whisk together the 0.5 cup all-purpose flour and 0.25 cup granulated sugar. This combination creates the perfect thickening agent while adding just enough sweetness to complement the brown sugar. The flour will help create that lovely, slightly thickened consistency we want in pie filling—thick enough to hold its shape but still juicy and tender.
Add this flour-sugar mixture to the apple-spice mixture and stir gently. You're looking to coat each apple slice lightly with the flour. Here's the moment that matters: fold in the 0.25 cup cold, cubed unsalted butter. The cold butter will create little pockets of richness that melt during baking, creating that perfect balance of tender apples and buttery goodness. Use your hands to work the butter into the mixture until it's evenly distributed.
Cook Until Bubbly and Thickened
Transfer the apple mixture to a large, heavy-bottomed saucepan. Place it over medium heat and bring to a gentle simmer. Here's the key—don't rush this. You want the filling to cook slowly so the apples soften properly without breaking down into mush. Stir occasionally, especially during the first 5 minutes, to prevent sticking and help distribute the juices.
Simmer for 15-20 minutes until the filling thickens noticeably and bubbles steadily. The apples should be tender when pierced with a fork but still hold their shape. You'll see the filling pull away slightly from the sides of the pan when you tilt it—this is your signal that it's ready. If it thickens too quickly, add 1-2 tablespoons of water to loosen it. The filling should coat the back of a spoon but still be spoonable.
Pro Tips For Making Grandma'S Apple Pie Filling
- PEEL THE APPLES: Granny Smiths are tough—skip peeling if you’re in a hurry, but if you’re going for that classic look, use a paring knife instead of a peeler. The peeler tends to shred the skin, and you’ll spend twice as long picking it out of the filling. (I’ve done it both ways—your future pie crust will thank you.)
- COOK THE FILLING LOW AND SLOW: After mixing the apples, sugar, and spices, bring it to a simmer, then drop the heat to a gentle bubble. I learned this the hard way—rushing it makes the filling turn mushy and release too much liquid, which means a soggy pie. Let it cook for 15-20 minutes until the apples break down but still hold their shape.
- MEASURE THE CINNAMON BY WEIGHT: Ground cinnamon varies wildly in density—what looks like 1 teaspoon in one bag might be ¾ teaspoon in another. Use a kitchen scale for 3 grams instead. My grandmother’s recipe called for “a dash,” but I’ve ruined pies by eyeballing it. Precision here keeps the flavor balanced without overpowering the tartness of the Granny Smiths.
- ADD THE VANILLA AND LEMON LAST: Stir in the vanilla extract and lemon juice right before pouring the filling into the crust. Heat destroys some of the vanilla’s delicate flavor, and the lemon’s brightness fades if it sits too long. (Yes, even if you’re impatient like me—wait those 30 seconds.)
Storing and reheating this dish
Fridge Storage
Store your freshly made apple pie filling in an airtight container with a lid, pressing plastic wrap directly on the surface to minimize air exposure. Keep it refrigerated at 40°F or below for up to 5 days, though I recommend using it within 2 days for peak freshness.
The spices will continue to mingle, deepening the flavor, but the texture stays best when used sooner rather than later. 🥧
Freezer Prep
For longer storage, freeze the filling in a single layer on a parchment-lined tray for 1 hour before transferring to a freezer bag or airtight container. This prevents clumping and makes it easier to thaw portions.
Label with the date—it keeps for up to 6 months without losing its signature cinnamon-vanilla warmth. I like to freeze it in 1-cup portions for easy use in mini pies or tarts. ❄️
Thawing Methods
Thaw overnight in the fridge for even results, or use the microwave defrost setting for 2-3 minutes if you're in a hurry. Stir halfway through to distribute heat evenly.
Avoid room-temperature thawing, as it can encourage bacterial growth. Once thawed, the filling is ready to use straight from the freezer—no need to reheat before baking. 💡
Reheating for Serving
If you want to serve the filling warm (like in a hot apple pie à la mode), reheat in a saucepan over medium-low heat for 5-7 minutes, stirring occasionally. For microwave reheating, use 30-second intervals until warmed through, stirring between each.
The filling thickens slightly when cold, so add 1-2 tablespoons of water if it seems too stiff after reheating. 🔥
Baking with Frozen Filling
No need to thaw before baking! Simply spoon the frozen filling directly into your pie crust and bake as usual. The cold filling will help keep the crust crisp, and the apples will soften perfectly during the 45-55 minutes baking time.
If your crust browns too quickly, tent it with foil after 20 minutes to prevent over-browning while the filling finishes cooking. 🍏
Make-Ahead Pie Assembly
Assemble your pie with the filling and crust up to 24 hours ahead, then refrigerate uncovered. This lets the flavors meld and the crust firm up slightly. When ready to bake, add 10-15 extra minutes to the baking time since the filling and crust will be colder.
I often do this when hosting—it’s a game-changer for stress-free baking! 📅
Nutrition facts
Frequently asked questions
Can I use any type of apples for this filling?
Granny Smiths are ideal for their tartness, but Honeycrisp or Braeburn work beautifully too. Avoid overly soft apples like Red Delicious—they'll turn mushy. For a sweeter-tart balance, mix 2 Honeycrisp with 2 Granny Smith. The key is firm, fresh apples that hold their shape during baking.
Why does the recipe call for both brown and granulated sugar?
The brown sugar caramelizes beautifully, creating that classic pie crust edge flavor, while the granulated sugar balances sweetness and helps thicken the filling. Together, they create a perfect harmony of rich caramel notes and smooth texture. Think of it as the "sweet-spice marriage" that makes this filling special.
How do I prevent a watery filling?
Start by sprinkling the sliced apples with 0.5 teaspoon salt and letting them sit for 10 minutes before cooking—this draws out excess moisture. Also, don't overcook the filling; it should thicken naturally during the 15-20 minute simmer. If it gets too thin, stir in 1 tablespoon cornstarch mixed with cold water.
Can I make this filling ahead of time?
Store it in an airtight container in the fridge for up to 5 days or freeze it for 6 months. For best results, use it within 2 days for peak texture. The flavors actually deepen when refrigerated, making it perfect for make-ahead pies.
What's the secret to that perfect pie crust edge?
While this recipe focuses on the filling, the crust edge magic comes from the brown sugar in the filling caramelizing against the crust. For extra crisp edges, sprinkle 1 tablespoon sugar on the crust before baking. Also, brush the crust with egg wash and bake on a preheated 425°F oven for the first 15 minutes to set it before lowering the heat.