
Side Dishes
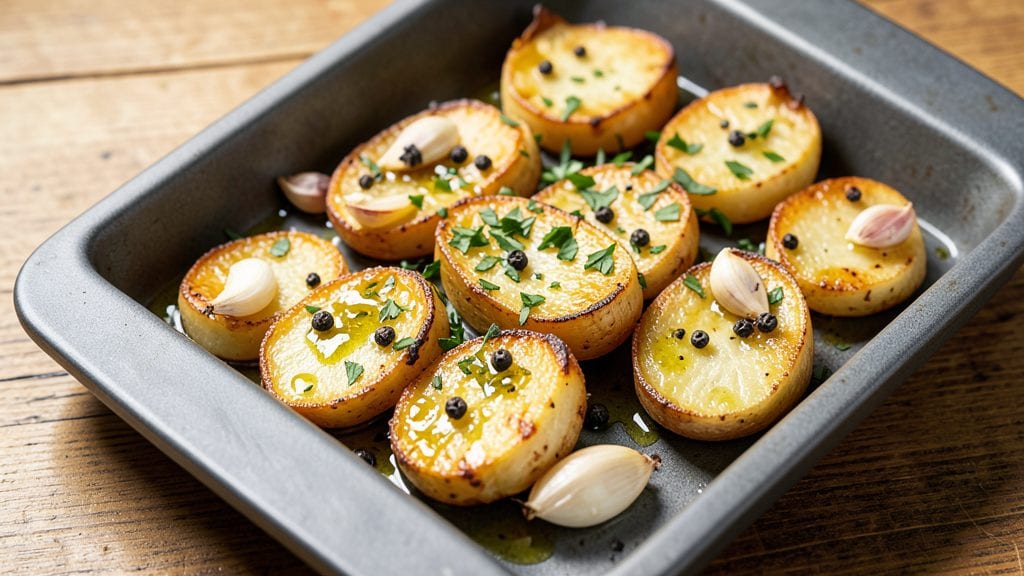
Transforming humble potatoes into crispy garlic potato pops is one of those kitchen revelations that turns simple ingredients into an irresistible snack. The secret lies in thinly sliced potatoes that roast until golden and tender, infused with bold garlic flavor that lingers with every bite.
I first discovered this technique while searching for a healthier alternative to fries—something that delivers the same satisfying crunch without the guilt.
What makes these potato pops special is their foolproof texture: perfectly crispy on the outside while staying tender inside, all achieved in just 20 minutes with minimal effort. The garlic-infused oil not only adds incredible flavor but also helps create that coveted crispiness.
Unlike traditional fries, these bite-sized pieces cook quickly and evenly, making them ideal for game day, movie nights, or a simple snack when hunger strikes.
By the time you pull these from the oven, your kitchen will smell like a garlic festival, and the aroma alone will have everyone gathering around the table.
The result is a dish that’s equally at home as a side for burgers or steak, a standalone snack with your favorite dip, or even a creative addition to salads for extra texture.
This recipe proves that simple ingredients, when prepared with care, can deliver restaurant-quality results right in your own kitchen.
Whether you're cooking for a crowd or treating yourself to a satisfying bite, these garlic potato pops are a game-changer. Let’s get started—your taste buds will thank you.
Ingredients for garlic potato pops
Eight simple ingredients turn ordinary potatoes into irresistible, crispy garlic bites everyone will crave.
| Ingredient | Amount | Notes |
|---|---|---|
| Russet Potatoes 🥔 | 2 lb | Thinly sliced, uniform thickness |
| Extra-Virgin Olive Oil 🫒 | ½ cup | High-quality for crispiness |
| Garlic Cloves 🧄 | 6 cloves | Fresh, minced or finely chopped |
| Salt 🧂 | 1 ½ tsp | Kosher or sea salt preferred |
| Black Pepper 🌶️ | ½ tsp | Freshly ground for best flavor |
| Dried Parsley 🌿 | 1 tbsp | Optional, for garnish |
| Paprika 🌶️ | ½ tsp | Smoked for extra flavor |
| Baking Sheet 🍳 | 1 whole | With parchment paper |
The potatoes are the star here—russets are perfect because they’re low-moisture and slice thinly for even crispiness. Trader Joe’s or Whole Foods usually carry them pre-washed, which saves time. If you’re buying whole, look for ones that feel firm and heavy for their size. The key is slicing them uniformly—about 1/8-inch thick—so they cook at the same rate. I like to use a mandoline for consistency, but a sharp knife works too if you’re careful. Pro tip: Soak the slices in cold water for 10 minutes before draining to remove excess starch, which helps them crisp up better.
No extra-virgin olive oil? Avocado oil or light olive oil work just as well—they both have high smoke points for crisping. The garlic is non-negotiable for that bold flavor, but if you’re sensitive to raw garlic’s punch, roast it first or use garlic powder (though fresh is always better). Want extra crunch? Toss the slices with 1 tsp cornstarch before baking. The paprika adds a subtle smokiness that pairs perfectly with the garlic, and if you’re feeling fancy, swap it for smoked paprika. For a vegan option, skip the parmesan garnish or use nutritional yeast.
These stay crispy for about 20 minutes at room temperature, so serve them fresh out of the oven. For leftovers, store in an airtight container and reheat in the oven at 400°F for 5-7 minutes to restore crispiness. They freeze beautifully too—just spread them on a tray to freeze first, then transfer to a bag. One month in the freezer, and they’ll taste like they just came out of the oven. Double the batch and keep them on hand for quick snacks or game day—trust me, they disappear fast.
Why You'll Love This Recipe
- 20-Minute Magic: I swear, these come together faster than takeout. Cut the potatoes, toss in oil and garlic, and let the oven do the work—no peeling, no fuss, just golden perfection.
- Crispy-Creamy Obsession: That first bite? Crunchy outside, pillowy inside, with garlic so infused it’s like every pop is a little flavor bomb. (Yes, I’ve eaten them straight from the pan.)
- Snack to Side Star: Cold in a lunchbox, warm at a picnic, or straight from the oven with dinner—they adapt to anything. My kids grab them for school; my husband sneaks them at midnight.
- Budget Win: Russets and garlic are cheap, and one bag lasts forever. Make a double batch, reheat leftovers, and still save money compared to store-bought fries or chips.
Step-by-step instructions for garlic potato pops
Here's how to make perfectly crispy, garlicky bites that'll disappear from your plate.
Prep and Season the Potatoes
Start by cutting the 2 lb russet potatoes into even, thin slices about ⅛-inch thick. I use a sharp mandoline for this—it gives you perfect uniformity that cooks evenly. As you slice, arrange the potato pieces in a single layer on the prepared baking sheet lined with parchment paper.
In a small bowl, whisk together the 0.5 cup extra-virgin olive oil, 6 minced garlic cloves, 1.5 tsp salt, 0.5 tsp black pepper, and 0.5 tsp paprika. The oil should look like a pale golden emulsion with tiny garlic flecks suspended throughout. Pour this mixture evenly over the potato slices, making sure each piece gets coated. Let them sit for 5 minutes while you preheat the oven to 425°F.
Arrange for Maximum Crispiness
After the potatoes have absorbed some of the seasoning oil, spread them out in a single layer again on the baking sheet. I like to give them a little space between each piece—about ½ inch apart. This ensures they crisp up properly rather than steaming together. If any slices overlap, gently separate them with a spatula.
Here's the thing—don't skip the spacing. When the potatoes puff up during baking, you want that hot air circulating around each piece to create that perfect golden crust. If they're crowded, you'll end up with soft, greasy potatoes instead of crispy bites.
Bake Until Golden and Crisp
Place the baking sheet on the middle rack of your oven and bake for 15 minutes at 425°F. After 15 minutes, give the potatoes a gentle flip using a metal spatula—this ensures even browning on both sides. Return them to the oven for another 10-12 minutes until they're deep golden brown and crispy.
You'll know they're done when the edges are crisp and the centers still have a slight give when pressed gently with tongs. The potatoes should sound hollow when tapped together. If they're browning too quickly, reduce the oven temperature to 400°F for the final 5 minutes to prevent burning.
Finish with Fresh Flavor
Remove the potatoes from the oven and immediately sprinkle with the 1 tbsp dried parsley. The parsley adds a fresh, bright finish that cuts through the richness of the garlic and olive oil. Let them cool for 2-3 minutes before serving—this gives the flavors time to meld and prevents any potential burns.
Serve these garlic potato pops warm while they're still crispy. They're perfect as an appetizer, side dish, or even straight from the pan as a snack. The contrast of crispy exterior with tender, garlicky interior makes every bite irresistible.
Pro Tips For Making Garlic Potato Pops
- CUT POTATOES SMALLER THAN YOU THINK: I learned this the hard way—oversized chunks mean uneven cooking and sad, undercooked centers. Aim for 1-inch cubes or smaller; they’ll crisp faster and absorb flavor better. (Yes, even if it means extra chopping—your future self will thank you.)
- USE FRESH GARLIC, MINCED COARSELY: Store-bought minced garlic loses punch fast, and pre-sliced cloves turn to mush. Smash whole cloves with the flat side of your knife, then chop roughly—this releases more flavor without burning. (Pro move: Toss the garlic in a little olive oil first to prevent sticking.)
- DON’T SKIP THE DRYING STEP: Wet potatoes steam instead of crisp. After boiling, spread them on a towel and let them air-dry for 10 minutes. This guarantees a crispy exterior every time—no soggy bites. (I know, I know, but trust the process.)
- ROAST AT 425°F FOR CRISPINESS: Too low, and you’ll end up with soft potatoes. Too high, and they’ll burn before the edges crisp. Stick to 425°F and flip halfway through—this is the sweet spot for golden, caramelized edges. (Start hot, finish low if needed, but don’t rush it.)
Creative variations of this dish
Italian-Inspired Twist
Channel my Nonna’s Sicilian roots by adding 1 tbsp dried oregano and ½ tsp crushed red pepper flakes to the garlic oil mixture. The oregano brings earthy depth, while the red pepper adds a subtle kick that reminds me of the markets in Palermo.
For extra authenticity, finish with a sprinkle of grated Pecorino Romano instead of parsley—its sharp, salty notes cut through the richness beautifully. 🌿
Spicy Parmesan Crunch
Take these potato pops to the next level by mixing ½ cup grated Parmesan cheese with 1 tsp garlic powder and ½ tsp cayenne pepper.
Toss the baked potatoes in this mixture while still warm, then return them to the oven for 2-3 minutes at 400°F to melt the cheese into a crispy crust. This adds a cheesy, spicy crunch that’s impossible to resist.
I first tried this variation at a little trattoria in Brooklyn, and it became an instant favorite.
Herb-Infused Olive Oil
Swap the plain olive oil for a homemade herb-infused oil by blending ½ cup olive oil with 2 tbsp fresh rosemary, 2 tbsp fresh thyme, and 4 garlic cloves. Let it infuse for 30 minutes before using.
The herbs add a fragrant, aromatic quality that elevates the flavor profile. This works especially well if you’re serving the potato pops as part of an antipasto platter. 🌿
Sweet and Savory Glaze
For a sweet-savory twist, toss the baked potatoes with a glaze made from 2 tbsp honey, 1 tbsp balsamic vinegar, and 1 tsp Dijon mustard. Warm the mixture in a small saucepan until it thickens slightly, then drizzle it over the hot potatoes.
The caramelized honey and tangy balsamic create a perfect balance with the garlicky flavor. This variation is perfect for serving with a side of goat cheese or as a topping for grilled chicken.
Air Fryer Version
If you’re short on time or prefer a healthier option, use an air fryer instead of the oven. Toss the potato slices with the garlic oil mixture, then cook them at 380°F for 12-15 minutes, shaking the basket every 5 minutes for even crispiness.
The air fryer cuts cooking time in half and requires less oil, making these potato pops even lighter. I love using my Ninja Foodi air fryer for this—it’s a game-changer for quick snacks. ⚡
Loaded Game Day Style
Turn these into a hearty game-day snack by topping them with ¼ cup shredded cheddar cheese, 2 tbsp chopped green onions, and 2 tbsp sour cream mixed with a pinch of smoked paprika.
Broil the potatoes for 2-3 minutes at the end to melt the cheese, then drizzle with the spiced sour cream. This loaded version is perfect for tailgating or movie nights—it’s like a crispy, cheesy potato skin in bite-sized form. 🏈
Nutrition facts
Frequently asked questions
Can I use sweet potatoes instead of russets?
Sweet potatoes work beautifully and add a natural sweetness that pairs well with the garlic. For best results, slice them slightly thinner (1/16-inch) since they contain more moisture. You may need to bake them 2-3 minutes longer to achieve the same crispiness, but the flavor profile becomes even more complex.
Why do my garlic potato pops turn out soggy?
Soggy potato pops usually happen when slices are too thick or crowded on the baking sheet. Start with 1/8-inch slices and space them 1/2 inch apart. Also, pat them dry before seasoning and use an oven rack in the middle position for even air circulation. If using an air fryer, check the temperature—380°F is ideal for crispiness.
How can I make these gluten-free?
This recipe is naturally gluten-free! Just ensure your paprika and seasonings are certified gluten-free. For extra crunch, you can toss the potatoes in 1 tsp cornstarch before baking. The original recipe already avoids all gluten-containing ingredients, making it perfect for gluten-sensitive diets.
Can I prep these ahead of time for meal prep?
Yes, but with a twist! Par-cook the potato slices for 10 minutes at 425°F, then store them in an airtight container. When ready to serve, finish baking at 450°F for 5-7 minutes to restore crispiness. For freezing, bake completely first, then store in a single layer before transferring to a bag—this prevents sticking.
What's the best way to reheat leftovers?
Reheat in a 400°F oven for 5-7 minutes on a parchment-lined tray to maintain crispiness. Avoid microwaving as it makes them rubbery. For a quick fix, place them in an air fryer at 375°F for 3-4 minutes—this works wonders for restoring that perfect crunch.