Main Courses
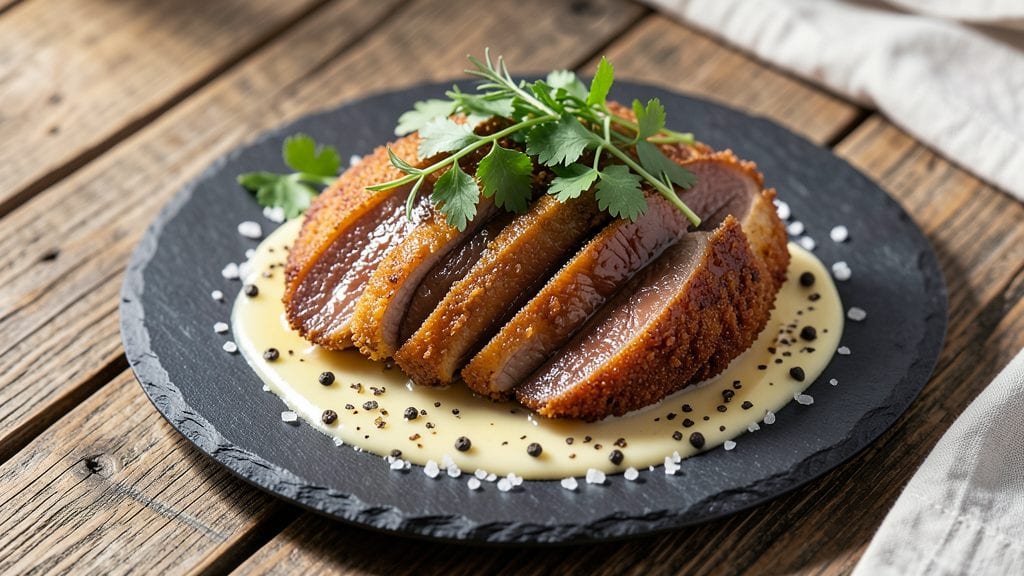
Mastering fried duck liver transforms a simple pan into a restaurant-worthy dish with buttery richness and aromatic herbs. The secret lies in precise cooking—medium-rare for optimal texture—and a technique that ensures every bite delivers velvety tenderness.
I’ve perfected this method after years of testing, balancing crisp edges with a melt-in-your-mouth center, all while keeping the process straightforward for home cooks.
This recipe starts with fresh duck livers, cleaned and patted dry, then seared in hot butter until golden. A sprinkle of salt, cracked black pepper, and fresh herbs like thyme or parsley elevates the natural flavor without overpowering.
The key is timing—just 2 to 3 minutes per side—so the livers stay juicy and never dry out. No deep-frying required; a simple stovetop approach delivers professional results.
What you’ll end up with is a plate of pan-seared perfection: glossy, golden-brown livers with a crisp exterior and a luscious, buttery interior. The aroma alone will have everyone gathered around the table, and the texture—tender yet firm—is impossible to resist.
Serve with a crisp green salad, crusty bread, or a bold red wine to complement the dish’s luxurious depth.
Whether you’re hosting a dinner party or treating yourself to a special meal, this fried duck liver recipe delivers restaurant-quality richness at home. The method is foolproof, the flavors are unmatched, and the results will impress even the most discerning palates. Let’s get cooking—your taste buds will thank you.
Ingredients for fried duck liver
Eight ingredients, four servings of luxurious pan-seared perfection—no deep fryer needed.
| Ingredient | Amount | Notes |
|---|---|---|
| Fresh Duck Livers 🦆 | 8 oz | Trimmed of connective tissue |
| Unsalted Butter 🧈 | ½ cup | European-style preferred, cold |
| Fresh Thyme Leaves 🌿 | ¼ cup | Finely chopped, stems removed |
| Fresh Parsley Leaves 🌿 | ¼ cup | Finely chopped, flat-leaf preferred |
| Diamond Crystal Kosher Salt 🧂 | 1 ½ tsp | Coarse grain for even seasoning |
| Freshly Cracked Black Peppercorns 🌶️ | ½ tsp | Coarsely cracked, not powdered |
| Extra-Virgin Olive Oil 🫒 | 1 tbsp | For preheating pan |
| Garlic Cloves 🧄 | 2 cloves | Thinly sliced, peeled |
| Lemon Zest 🍋 | 1 tsp | Freshly grated, from organic lemon |
| Cold Water 💧 | ½ cup | For ice bath if needed |
| Heavy Cream 🥛 | ¼ cup | Optional for finishing sauce |
The duck livers are the star, so source them fresh from a trusted butcher—look for vibrant, deep red color and firm texture. Whole Foods or specialty meat counters often carry them pre-trimmed, but if you're doing it yourself, remove any connective tissue with a sharp knife. The butter matters too—European-style with high fat content (like Plugrá) gives the best flavor and texture. I usually grab mine from Costco when they have it, but most grocery stores carry decent options. Fresh herbs should be bright green with no wilting—Trader Joe's often has great thyme and parsley bundles. If you can't find fresh, dried works at half the amount, but fresh is worth it for that restaurant-quality aroma.
No fresh parsley? Cilantro or chives work in a pinch, though parsley's classic flavor is ideal. Running short on butter? Ghee or duck fat can substitute, but butter's richness is non-negotiable for that signature taste. The garlic should be fresh—pre-minced jars lack the punch. For the lemon zest, organic lemons have thicker, more flavorful zest. If you accidentally overcook the livers (they happen to the best of us), drop them into an ice bath for 30 seconds to reset the texture. The heavy cream is optional but adds a silky finish—full-fat is best here—or skip it entirely if you prefer a lighter profile.
Livers cook fast—keep everything prepped while the pan heats. Store any unused livers in the fridge for 1 day max, wrapped tightly in parchment. The herbs stay fresh 5 days in a sealed container with a damp paper towel. This dish reheats beautifully—just warm in butter for 30 seconds max to maintain texture. I always make extra because it disappears fast—perfect for appetizers or elegant first courses.
Why You'll Love This Recipe
- Just Four Ingredients: I swear, that’s it—duck livers, butter, herbs, and salt. No fancy mise en place, no hidden pantry raids. Honestly, the hardest part is finding a butcher who carries fresh livers, and once you’ve got those, it’s literally 15 minutes of searing and seasoning.
- Rich Without Effort: The butter pools around the edges while the centers stay velvety, and those thyme leaves? They melt into the fat like a whisper of earthiness. Between us, this is the kind of dish where you take the first bite and immediately think, "Why don’t I make this more often?"
- Weeknight or Dinner Party: Throw these on the table when your in-laws show up unannounced, or keep a batch in the fridge for a lazy Tuesday. They reheat beautifully—just a quick sizzle in the pan—and taste just as good cold on toast the next day. (Yes, even on a Tuesday night.)
- Budget Luxury: Duck livers are cheaper than steak but feel like a splurge. A pound feeds four, and the leftovers? I toss them into pasta or scramble them with eggs—no waste, all flavor. Here’s what sold me: it’s the kind of meal that makes you feel fancy without breaking the bank.
Step-by-step instructions for fried duck liver recipe
Here's how to transform delicate duck livers into luxurious, buttery perfection with crisp edges and vibrant herb notes.
Prepare the Livers for Even Cooking
Pat the 8 oz fresh duck livers completely dry with paper towels—this is non-negotiable for crispy results. Any moisture will steam the livers instead of searing them. Trim away any visible connective tissue or silver skin, which can make the livers chewy. Cut each liver into ½-inch thick slices, working quickly to prevent drying. For even cooking, make all slices uniform in thickness.
Season both sides generously with 1.5 tsp diamond crystal kosher salt and 0.5 tsp freshly cracked black peppercorns. Let them sit at room temperature for 15 minutes while you prepare the pan. This resting period ensures even cooking and better seasoning penetration. Don't skip this step—it makes all the difference in flavor distribution.
Create the Perfect Searing Environment
Heat a large skillet over medium-high heat until it's properly preheated. Add 1 tbsp extra-virgin olive oil and let it shimmer for 30 seconds. Then add 0.5 cup cold unsalted butter and allow it to melt completely, watching for the butter to foam and then settle into a gentle sizzle. This butter bath will create that signature velvety crust while keeping the interiors tender.
Add the 2 cloves thinly sliced garlic and 1 tsp lemon zest to the pan, stirring for 10 seconds until fragrant. Immediately add the prepared duck livers in a single layer, working in batches if needed to avoid crowding. The livers should sizzle vigorously upon contact—if they don't, your pan isn't hot enough. Let them cook undisturbed for 1 minute on the first side before gently flipping.
Achieve the Ideal Doneness
Cook the livers for an additional 1 minute on the second side until they reach an internal temperature of 125°F when checked with an instant-read thermometer. They should be just barely pink in the center with crisp golden edges. Overcooking will turn them rubbery, so time them carefully. Remove the livers to a plate and tent loosely with foil to keep warm while you prepare the herb sauce.
In the same skillet, reduce heat to medium and add 0.25 cup finely chopped fresh thyme leaves and 0.25 cup finely chopped fresh parsley leaves. Stir for 30 seconds until the herbs are fragrant. Pour in 0.5 cup cold water and let it simmer for 2 minutes until slightly reduced. This creates a light, aromatic sauce that complements the rich livers beautifully.
Finish with Cream and Serve Immediately
Return the livers to the skillet and pour the reduced herb liquid over them. Stir gently to coat, then remove from heat and stir in 0.25 cup heavy cream. The residual heat will gently warm the cream without scrambling it. Taste and adjust seasoning if needed—you might need a touch more salt to balance the richness.
Serve immediately with crusty bread or over a bed of arugula for the perfect balance of textures. The livers should be tender with a crisp exterior, surrounded by a velvety sauce infused with bright herbs. This dish shines when served hot, so don't let it sit—every minute counts with duck livers.
Pro Tips For Making Fried Duck Liver
- Trim the Gall Bladder: Duck livers have a tiny green sac—cut it out first or you’ll end up with bitter, puckery flavors. Use a sharp knife and a flashlight if your kitchen’s dim; I learned this the hard way after tasting a batch that tasted like someone dumped soap in my mouth.
- Start Cold, End Fast: Chill the livers in an ice bath for 10 minutes before cooking—this firms them up so they sear evenly instead of turning to mush. Then, crank the heat to medium-high and cook them 1-2 minutes per side; they’ll carryover and finish perfectly. No, you can’t rush this—trust the timer.
- Salt the Butter Hard: Kosher salt in unsalted butter isn’t just seasoning—it’s the crust. Mix in 1 teaspoon per 2 tablespoons of butter before melting, then let it cool slightly. The salt dissolves into the fat, creating a dry, golden crust that clings to the liver like armor. (Yes, even if you’re impatient like me.)
- Rest Under Foil: After searing, transfer the livers to a warm plate, tent loosely with foil, and let them sit for 5 minutes. This locks in juices that’d otherwise pool into a sad, greasy mess. Skip this, and you’ll have liver that’s technically cooked but tastes like it was microwaved. (Your future self will thank you.)
Best sauces and condiments for this fried duck liver
Classic Herb Butter Sauce
Start with the foundation of any great fried duck liver dish: a rich herb butter sauce. After searing the livers, melt ½ cup unsalted butter in the same skillet, then add ¼ cup chopped fresh thyme and ¼ cup chopped parsley.
Let the herbs infuse for 30 seconds before deglazing with ½ cup cold water. Simmer for 2 minutes to reduce slightly—this creates a velvety, aromatic sauce that clings beautifully to the livers. 🌿
Lemon-Garlic Pan Sauce
For a brighter, more vibrant finish, use lemon zest and garlic to elevate the dish. After removing the livers, add 2 thinly sliced garlic cloves and 1 tsp lemon zest to the pan. Cook for 10 seconds until fragrant, then pour in ½ cup water and reduce by half.
The citrus cuts through the richness while the garlic adds depth. Finish with a splash of heavy cream for extra silkiness.
Red Wine Reduction
For a more sophisticated touch, deglaze the pan with ¼ cup dry red wine (like Cabernet Sauvignon or Pinot Noir) after searing. Let it reduce by half before adding ½ cup water and simmering for 3 minutes.
The wine's acidity brightens the dish while adding complexity. Strain through a fine-mesh sieve for a silky finish—perfect for pairing with crusty baguette.
Spicy Chili-Lime Sauce
Crave heat? After cooking the livers, add 1 tbsp lime juice, ½ tsp chili powder, and 1 tsp honey to the pan. Deglaze with ¼ cup water and reduce for 2 minutes.
The sweet-spicy balance contrasts the duck liver's richness beautifully. Garnish with cilantro for freshness and serve with avocado slices for a modern twist.
Creamy Truffle Finish
For a luxurious upgrade, stir 1 tbsp white truffle oil and ¼ cup heavy cream into the finished sauce. The earthy truffle aroma elevates the dish to gourmet status.
Use sparingly—just ½ tsp truffle oil is enough to transform the flavor without overpowering. This sauce pairs perfectly with wild mushroom risotto or roasted asparagus.
Nutrition facts
Frequently asked questions
Can I substitute chicken or beef liver for duck liver in this recipe?
While you can technically use chicken or beef liver, duck liver has a richer, more delicate flavor that works best with this technique. Chicken liver is leaner and can dry out quickly, while beef liver has a stronger taste. If substituting, reduce cooking time to 1 minute per side and use extra butter to compensate for the lack of natural fat.
What’s the best way to store leftover fried duck liver?
Store any leftovers in an airtight container in the fridge for up to 2 days. Reheat gently in a pan with fresh butter for just 30 seconds to maintain texture. Avoid microwaving—it makes the livers rubbery. For longer storage, freeze for up to 1 month, but thaw overnight in the fridge before reheating.
Why did my duck liver turn out rubbery instead of tender?
Overcooking is the most common cause—duck liver should reach 125°F internally, not 165°F. Also, patting them dry and using high heat are critical. If they dried out, try an ice bath for 30 seconds to reset the texture. For next time, work quickly and avoid crowding the pan.
What’s the ideal wine pairing for fried duck liver?
A bold red like Cabernet Sauvignon or Pinot Noir complements the richness perfectly. For white wine lovers, try a buttery Chardonnay with 13%+ alcohol. The key is matching the wine’s body to the dish’s intensity—avoid light, crisp whites that won’t stand up to the flavor.
Can I make this recipe ahead of time?
Not the livers themselves—they’re best served immediately after cooking. However, you can prep everything ahead: trim and season the livers, chop herbs, and measure ingredients. Store components separately in the fridge for up to 4 hours before cooking. This way, you’re ready to sear in minutes when guests arrive.