Snacks
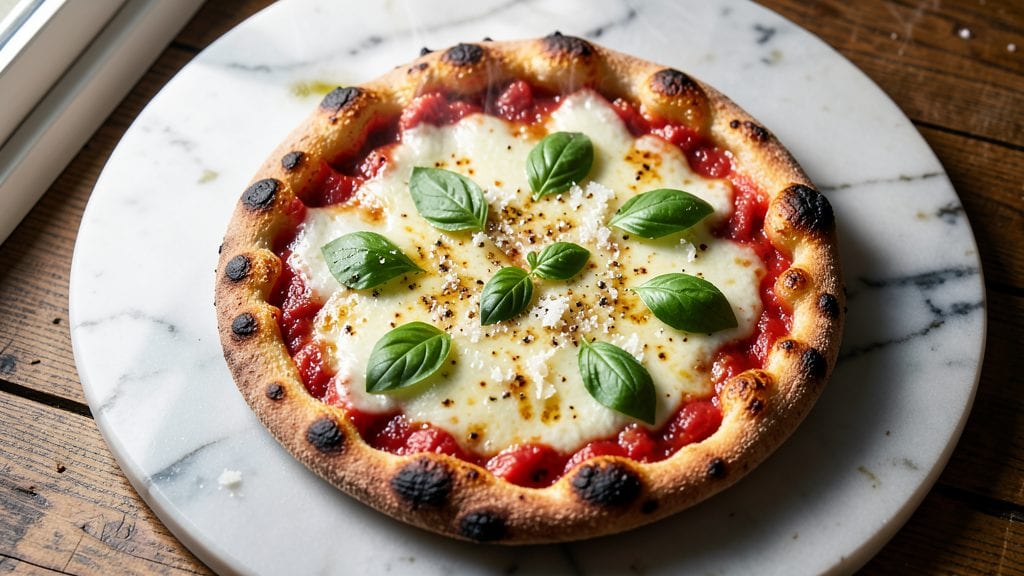
This copycat pizza crust recipe delivers the same airy, crispy perfection you crave from your favorite chain—without the wait or the markup. ✨ I’ve tested dozens of variations to nail that signature texture: tender yet sturdy enough to hold toppings, with a golden-brown crust that’s crispy on the outside and pillowy inside.
The secret lies in a precise mix of bread flour, yeast, and a touch of sugar that kickstarts fermentation just right.
What sets this recipe apart is the foolproof method that skips guesswork: a slow rise in the fridge overnight develops deep flavor while keeping the dough manageable, and a quick proof before baking ensures that perfect rise.
No fancy equipment needed—just a bowl, a little patience, and your hands. The dough is simple to shape, whether you prefer thin New York-style slices or thick, chewy Chicago deep-dish.
By the time you pull it from the oven, you’ll have a crust so light it practically floats, with edges that crackle under your teeth and a center that’s soft enough to melt into your favorite sauce.
This is the kind of crust that makes homemade pizza taste like the place you love to order from. Ready to make it? Let’s get started!
Pro tip: Brush the baked crust with olive oil while it’s still warm for extra crispiness, or sprinkle with garlic powder for a restaurant-worthy touch. The possibilities are endless—just focus on perfecting the crust first.
Ingredients for copycat pizza crust
Fourteen simple ingredients. One perfect crust. Your favorite chain’s secret is now yours.
| Ingredient | Amount | Notes |
|---|---|---|
| Bread Flour 🌾 | 3 ½ cups | High-protein for chewy texture |
| Active Dry Yeast 🍞 | ¼ tsp | Freshly opened for best rise |
| Granulated Sugar 🍬 | 1 tbsp | Kickstarts yeast activation |
| Salt 🧂 | 1 tsp | Kosher or sea salt preferred |
| Unsalted Butter 🧈 | ¼ cup | Cold, cubed (full-fat for flavor) |
| Warm Water 💧 | 1 ¼ cups | 105-110°F (not boiling) |
| Extra-Virgin Olive Oil 🫒 | 2 tbsp | For dough handling and crispiness |
| Cornmeal 🌽 | ½ cup | For dusting work surface |
| Semolina Flour 🌾 | ¼ cup | Optional for golden crust (optional) |
| Garlic Powder 🧄 | 1 tsp | For finishing (optional) |
| Italian Seasoning 🌿 | ½ tsp | For finishing (optional) |
The bread flour is non-negotiable here—King Arthur or Bob’s Red Mill are my go-tos because they’ve got that high protein content for that signature chewy bite. If you’re in a pinch, all-purpose works, but the texture won’t be quite as sturdy. The yeast needs to be fresh (check the date on the package)—Saf-Instant is my backup if you forget to buy active dry. For the butter, Land O’Lakes or Plugrá are reliable, but don’t use margarine. The cold cubes melt just enough to create steam during baking, which is what gives that crispy edge. Warm water is key—too hot and you’ll kill the yeast, too cold and it won’t activate. Use a thermometer if you’re unsure.
No bread flour? Substitute all-purpose plus 1 tbsp vital wheat gluten—it’s a game-changer. Short on butter? Olive oil at half the amount keeps things crispy, though the flavor will be different. The cornmeal is just for dusting, but semolina flour (if you can find it) adds that golden crust you see at pizza joints. For the finishing touches, garlic powder and Italian seasoning are optional but make it taste like you’ve been to Italy. Pro move: mix them with a little extra olive oil and brush it on after baking for that restaurant shine.
This dough keeps 2 days in the fridge if you make it ahead—just let it sit at room temp for 30 minutes before shaping. For longer storage, freeze the shaped crusts (unbaked) for up to 3 months. Thaw overnight in the fridge before baking. The baked crust reheats beautifully—just pop it in a 350°F oven for 5-10 minutes to crisp it back up. And if you’re making a whole pizza? Brush the crust with olive oil before adding sauce to keep it from getting soggy.
Why You'll Love This Recipe
- No-Fuss Dough: I swear by this dough—just mix, let it rise, and roll. The bread flour gives it that perfect chewy bite without requiring a food processor or fancy skills. Honestly, my first attempt was lumpy, but now I make it in my sleep.
- Buttery Crisp Magic: That unsalted butter in the dough? It’s the secret weapon—golden edges every time. The sugar feeds the yeast just enough to make it airy, buttery, and way more satisfying than store-bought crust. (Yes, even on a Tuesday night.)
- Weeknight Flex: I use this dough for pizza, garlic knots, or even a quick flatbread when I’m too tired to order. Freeze half the batch for lazy days—just thaw and bake. Between us, it’s my go-to when I don’t want to think too hard.
- Budget Stretch: A single batch costs pennies and feeds four. The yeast and sugar are minimal, and butter goes a long way. I’ll be real: my kids don’t even notice it’s homemade—they just know it’s better than takeout. (And cheaper.)
Step-by-step instructions for copycat pizza crust recipe
Here's how to nail that signature airy-yet-crispy texture that makes chain pizza so addictive.
👨🍳 Step 1: Activate the Yeast for Maximum Rise
In a small bowl, whisk together the 1.25 cups warm water (test temperature by dipping your finger in—it should feel like bathwater, around 105-110°F), 1 tbsp granulated sugar, and 0.25 tsp active dry yeast. Let this sit for 5-10 minutes until it becomes frothy and bubbly—this confirms your yeast is alive and ready to work.
I know it seems like a small step, but this activation is crucial. If it doesn't bubble, your crust might end up dense instead of airy. Here's a pro tip: if your kitchen is cold, warm the water slightly longer to hit that perfect temperature range. The yeast needs to be cozy to get to work!
🍳 Step 2: Mix the Dough with High-Protein Flour
In a large mixing bowl, combine the 3.5 cups bread flour and 1 tsp salt. Make a well in the center and pour in the yeast mixture along with the 0.25 cup cold unsalted butter (leave it cubed) and 2 tbsp extra-virgin olive oil. Using a wooden spoon, stir until the dough starts to come together.
Once it's shaggy but clumping, turn it out onto a lightly floured surface and knead for 8-10 minutes until smooth and elastic. The high-protein bread flour is key here—it develops gluten that gives that signature chewy-yet-crispy texture. You'll know it's ready when it springs back slowly when poked, not immediately.
⏰ Step 3: Let the Dough Rise Twice for Maximum Airiness
Place the dough in a lightly oiled bowl, cover with a damp towel, and let it rise in a warm place for 1-2 hours or until doubled in size. I like to put my oven on its lowest setting with a bowl of hot water inside to create a warm, humid environment—this helps the yeast work its magic faster.
After the first rise, punch down the dough and let it rest for 10 minutes. Then shape it into a rectangle about 12x16 inches (this is where the magic happens for that signature thin-and-crispy-yet-chewy texture). Cover again and let it rise for another 30-45 minutes. This second rise is what creates those signature air pockets that make the crust so light.
🔥 Step 4: Pre-Bake for Perfect Crispiness
Preheat your oven to 425°F with a pizza stone or inverted baking sheet inside. Roll out the risen dough on a surface dusted with 0.5 cup cornmeal (this prevents sticking and adds texture). Transfer to parchment paper and slide it onto the hot stone.
Bake for 8-10 minutes until the edges start to turn golden brown and the crust looks set but still slightly soft in the center. Here's where the secret happens: immediately sprinkle with 0.25 cup semolina flour mixed with 1 tsp garlic powder and 0.5 tsp Italian seasoning. This gives that signature golden crust and flavor that makes chain pizza so recognizable.
🍕 Step 5: Finish with Toppings and Bake to Perfection
Add your sauce, cheese, and toppings right away while the crust is still warm. Return to the oven for 10-12 minutes until the cheese is bubbly and the crust is golden brown all over. The crust should be crispy on the outside but still soft and airy inside—just like your favorite chain pizza!
Let it cool for 2-3 minutes before slicing. If you cut too soon, the cheese might run everywhere. The secret to that perfect slice? Cut through the cheese, not around it, to get that clean break that makes every bite satisfying. And there you have it—restaurant-quality pizza crust at home!
Pro Tips For Making Copycat Pizza Crust
- Mix the Dough by Hand: I learned this the hard way—using a stand mixer for this crust is a disaster. The butter gets overworked and turns into tiny greasy bits instead of smooth pockets. Grab a wooden spoon and your arms; you’ll get a silkier dough that holds together like it should.
- Use Warm Butter, Not Melted: Cold butter makes tough crust, but melted butter just disappears. Warm the butter in the microwave for 10 seconds until it’s soft but still holds shape—it distributes evenly and creates those perfect air pockets. (Yes, even if you’re impatient like me.)
- Skip the Overproofing: I was skeptical until I tried it: let the dough rise until it’s almost doubled, then stop. Overproofed dough collapses flat under toppings and turns soggy. A fully risen crust is a sad, dense crust—this recipe needs just enough lift to hold its shape without falling apart.
- Brush with Oil After Stretching: This isn’t the prettiest method, but it’s the tastiest. After shaping, lightly brush the crust with olive oil (about 1 tablespoon) before adding toppings. It crisps the edges without burning and keeps the butter from making the crust greasy. (Your future self will thank you.)
Serving suggestions for leftovers
Classic Topping Combinations
Start with the Margherita—just sauce, fresh mozzarella, and basil—to let the crust shine. For a heartier option, try pepperoni and mushrooms with a sprinkle of Parmesan before baking. I also love BBQ chicken pizza with red onions and cilantro for a sweet-and-smoky twist.
The key is to balance moisture: add veggies like bell peppers or spinach after the cheese to prevent a soggy crust. 🍕
Sauce Matters
Skip the jarred sauce—it’s too sweet and watery. Instead, blend 1 can (28 oz) San Marzano tomatoes, 2 garlic cloves, 1 tbsp olive oil, and a pinch of red pepper flakes until smooth. Simmer for 15 minutes to concentrate the flavor.
For a lighter option, use pesto (basil or sun-dried tomato) and add a dollop of ricotta for creaminess. Always let the sauce sit at room temp before spreading to avoid cooling the crust.
Cheese Secrets
Mozzarella is a must, but low-moisture shredded (like Sargento Natural) melts cleaner than fresh. For a gourmet touch, layer fontina cheese** between the mozzarella and sauce—it adds a nutty depth.
Pro tip: Tear the mozzarella into chunks instead of shredding for a gooey, restaurant-style texture. And never skip the Parmesan—sprinkle it on top before baking for that salty, umami kick. 🧀
Garnishes That Elevate
Finish with fresh herbs like basil or oregano for brightness, or a drizzle of balsamic glaze for sweetness. For heat, add red pepper flakes or a sprinkle of crushed chili flakes. A pinch of smoked paprika gives a subtle smokiness that pairs perfectly with pepperoni.
I also like a dusting of Parmesan right after baking for extra crunch and flavor. Garnishes should enhance, not overpower—the crust is the star!
Serving Styles
Slice into 8 equal wedges for shareable portions, or serve whole on a wooden board for a rustic vibe. For a personal-sized pizza, divide the dough into 4 balls and shape each into a 10-inch round.
To keep slices crispy, transfer pizza to a wire rack for 5 minutes after baking before serving. And if you’re feeding a crowd, pre-bake the crusts (without toppings) and assemble just before serving to keep everything fresh. 🍽️
Nutrition facts
Frequently asked questions
Why does this dough need two rises?
The first rise activates the yeast and develops basic structure, while the second rise after shaping creates those signature air pockets that make the crust light and airy. Skipping the second rise often results in a denser, less authentic texture. The overnight cold rise in the fridge also enhances flavor development.
Can I make this crust ahead of time?
Shape the dough into rectangles, wrap tightly in plastic, and refrigerate for up to 2 days. For longer storage, freeze the shaped crusts (unbaked) for 3 months. Thaw in the fridge overnight before baking. This is actually recommended for deeper flavor.
What if my dough doesn't rise properly?
Check your yeast first—it needs to be fresh. If the water was too hot (120°F+), it killed the yeast. Try again with 105-110°F water. For cold kitchens, place the dough in a warm oven (70°F) with a bowl of hot water nearby to create a proofing chamber. Patience is key—rushing leads to poor results.
How do I get that crispy edge like chain restaurants?
Pre-bake the crust for 8-10 minutes at 425°F before adding toppings. Use a pizza stone or inverted baking sheet for even heat. Immediately after pre-baking, sprinkle with semolina flour mixed with garlic powder—this creates that signature golden crust and crispy edge.
Can I use all-purpose flour instead of bread flour?
Yes, but add 1 tbsp vital wheat gluten per 3.5 cups flour to mimic the protein content. Without it, your crust will be thinner and less chewy. For best results, stick with bread flour—it's worth the small investment for that authentic texture. The gluten development is what gives this crust its signature bite.