
Appetizers
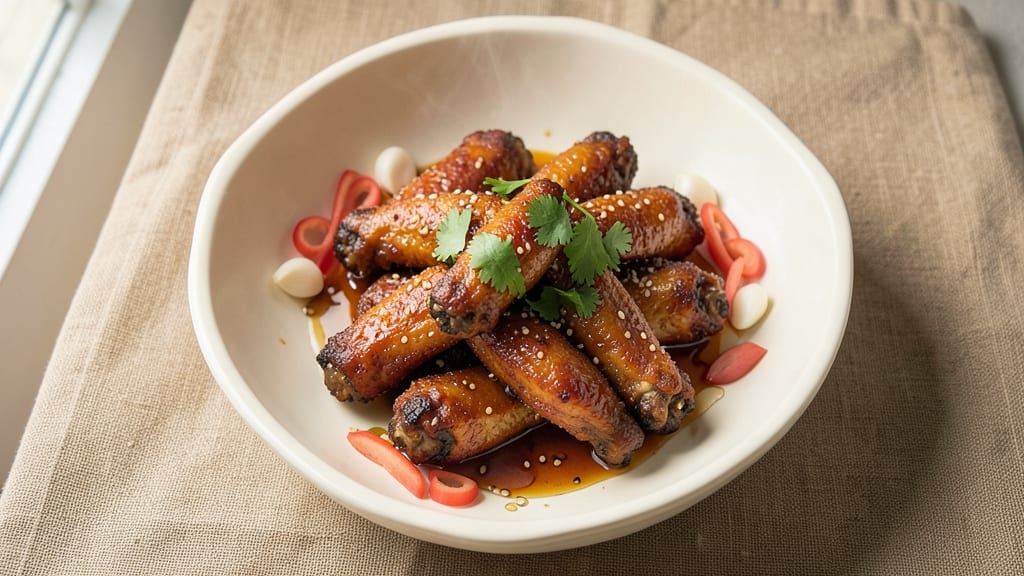
Recreating Chinese takeout chicken wings at home means mastering that signature sesame-ginger glaze that clings to crispy wings like it was made in a wok over high heat. The secret lies in the balance of sweet, spicy, and umami flavors that transform ordinary wings into something addictive.
I developed this recipe after years of studying authentic takeout versions, and it delivers the same sticky, flavorful glaze without the grease.
What sets these wings apart is the two-step process: first, frying or baking until golden and crispy, then tossing in a glaze that's thick enough to coat every surface.
The marinade infuses the wings with ginger and garlic while the sauce—made with soy sauce, honey, and sesame oil—adds that signature sweet-spicy kick. It's a foolproof method that works whether you fry or bake, ensuring wings that are crispy outside and tender inside.
The result is wings that taste just like your favorite takeout spot: sticky, aromatic, and impossible to resist. The glaze caramelizes slightly as it cools, creating pockets of flavor in every bite.
Serve with extra sauce on the side and watch them disappear faster than you can say "sesame." Ready to make wings that impress? Let's get started.
This recipe scales perfectly for parties or meal prep, and the glaze keeps well in the fridge for up to a week. Whether you're feeding a crowd or craving takeout at home, these wings deliver restaurant-quality results with minimal effort.
The key is patience—let the glaze set for at least 10 minutes before serving, and you'll have wings that taste like they came straight from a Chinese restaurant.
Ingredients for chinese takeout chicken wings
Six ingredients for the glaze, six for the wings—everything you need for takeout-style flavor.
| Ingredient | Amount | Notes |
|---|---|---|
| Chicken Wings 🍗 | 3 lb | Split into drumettes and flats |
| Fresh Ginger 🌿 | 2 tbsp | Finely grated, aromatic |
| Garlic Cloves 🧄 | 4 cloves | Minced, fresh preferred |
| Soy Sauce 🍶 | ½ cup | Low-sodium preferred |
| Honey 🍯 | ¼ cup | Pure, not agave |
| Sesame Oil 🫒 | 1 tbsp | Toasted, for aroma |
| Rice Vinegar 🍶 | 1 tbsp | White or seasoned |
| Sesame Seeds 🌾 | 2 tbsp | Toasted, for garnish |
| Sriracha 🌶️ | 1 tbsp | Adjust for heat preference |
| Vegetable Oil 🫒 | 2 cups | For frying, high smoke point |
| Salt 🧂 | 1 tsp | Kosher or sea salt |
| Black Pepper 🌶️ | ½ tsp | Freshly ground |
| Cornstarch 🌾 | 1 tbsp | For crispy coating |
| Green Onions 🧅 | 3 whole | Sliced, for garnish |
The wings are the foundation, so grab drumettes and flats—they're more flavorful than wing tips. Trader Joe's or Costco usually have them pre-split, but if you're buying whole wings, separate them yourself. Fresh ginger and garlic are non-negotiable here—they make the marinade sing. I always grab ginger from the Asian market (it's fresher and less woody), but the grocery store stuff works too. For the soy sauce, Kikkoman or Lee Kum Kee are my go-tos—they've got that authentic umami punch. If you're baking instead of frying, skip the oil and use an oven-safe rack for crispiness.
No sesame oil? Toasted peanut oil at half the amount works in a pinch, though it won't have the same nutty aroma. Sriracha too spicy? Substitute a pinch of cayenne or skip it entirely. The glaze needs to be thick enough to stick, so if it's too runny, simmer it longer (it'll thicken as it cools). For extra crispiness, toss the wings in cornstarch before frying—it's like a secret weapon. The green onions? Only use the white and light green parts—they're milder and sweeter. And if you're making a big batch, double the glaze ingredients—it keeps for up to a week in the fridge.
Fry the wings until they're golden and crispy—350°F oil is perfect. Drain them on a wire rack (not paper towels) so they stay crisp. The glaze is best when it's had time to set, so let it sit for 10 minutes before serving. Store leftovers in the fridge for 3-4 days, but reheat them in the oven (not microwave) to keep that crispy texture. Freeze extra wings without the glaze—the sauce can be reheated separately and tossed on later. Pro tip: Keep a small jar of the glaze in your fridge for quick takeout-style flavor boosts on anything from noodles to rice.
Why You'll Love This Recipe
- One-Pan Magic: I swear by this recipe because it’s that simple—just wings, a few pantry staples, and a sheet pan. No fancy gadgets, no last-minute grocery runs. The ginger and garlic get minced in two minutes while the oven preheats, and boom, you’re done.
- Sweet-Savory Crunch: That honey-soy glaze? It’s the star. The wings walk out of the oven sticky, crispy, and packed with that perfect balance of salty, sweet, and a little kick from the ginger. Honestly, it’s the closest I’ve gotten to my favorite takeout spot without the $15 delivery fee.
- Game for Any Night: Between us, this is my go-to for game days, lazy Sundays, or when I’m too tired to plan. The leftovers? Even better the next day—crispier, if you can believe it. And because it’s wings, it’s always a crowd-pleaser, whether it’s just me or a house full of people.
- Budget-Friendly Crisp: I buy wings in bulk when they’re on sale, and this recipe stretches them far. A single batch feeds four, and the flavor only gets deeper as it sits. Plus, using fresh ginger and garlic (even if it’s just a little) makes it taste like a restaurant, not a sad imitation. My wallet and taste buds win.
Step-by-step instructions for Chinese takeout chicken wings
Here's how to make wings with that signature sticky glaze you crave from your favorite takeout spot.
Prep the Wings for Maximum Crispiness
Pat the 3 lb chicken wings completely dry with paper towels—this is non-negotiable for crispy skin. Split each wing into drumettes and flats at the joints using kitchen shears or a sharp knife. In a large bowl, toss the wings with the 1 tbsp cornstarch, 1 tsp salt, and 0.5 tsp black pepper until they're evenly coated. Let them sit for 10 minutes while you get your frying setup ready.
The cornstarch creates that perfect crunchy exterior that Chinese takeout wings are famous for. Don't skip this step—wet wings will steam instead of fry crispy. I like to work in batches so I don't overcrowd the pan later, which would lower the oil temperature and make them greasy.
Fry to Golden Perfection
Fill a deep skillet or Dutch oven halfway with the 2 cups vegetable oil and heat it to 350°F. Use a deep-fry thermometer to monitor the temperature—this is critical. Once hot, carefully add the wings in a single layer (don't overcrowd) and fry for 8-10 minutes until they reach 165°F internally and turn golden brown. Transfer them to a paper towel-lined plate to drain excess oil.
Here's the thing—your oil temperature will drop when you add the wings, so keep an eye on it. If it falls below 325°F, your wings will absorb too much oil and become greasy. Fry in batches if needed, but don't let the oil cool completely between batches. The wings should float when they're ready to flip, and you'll see little bubbles forming around them.
Make the Signature Glaze
While the wings fry, combine the 0.5 cup soy sauce, 0.25 cup honey, 2 tbsp fresh ginger, 4 cloves minced garlic, 1 tbsp sesame oil, 1 tbsp rice vinegar, and 1 tbsp sriracha in a saucepan. Bring to a simmer over medium heat and cook for 5-7 minutes until slightly thickened. The glaze should coat the back of a spoon but still be pourable.
This is where the magic happens—the ginger and garlic infuse their flavors into the sauce while the honey and soy sauce create that perfect balance of sweet and salty. Taste as you go and adjust the sriracha if you want more heat. The glaze should be glossy and sticky when done, just like takeout wings. Keep it warm while you finish the wings.
Toss and Glaze the Wings
Return the fried wings to the skillet (no need to add more oil) and pour the glaze over them. Toss gently to coat every wing evenly. Cook for an additional 2-3 minutes until the glaze has caramelized slightly and sticks to the wings. The wings should be sizzling gently and the glaze should bubble around them.
This is the moment that matters: the glaze needs to cling to the wings, not pool at the bottom. If it's too thick, add 1-2 teaspoons of hot water to loosen it. The wings should be sticky but not dripping. Work quickly—once you start serving, the glaze will thicken as it cools. Sprinkle with the 2 tbsp sesame seeds while they're still hot for that authentic takeout look.
Garnish and Serve Immediately
Transfer the wings to a serving platter and garnish with the sliced 3 whole green onions. Serve immediately with extra glaze on the side for dipping. The wings should be crispy outside, juicy inside, and coated in that perfect sticky glaze that you'll want to lick off your fingers.
Real talk: these wings are best served fresh out of the fryer. The glaze will start to set as they cool, so don't make them too far ahead of serving. Pair with extra hot sauce if you're feeling spicy, or serve with cucumber slices and hoisin sauce for a complete takeout experience. Your taste buds will thank you!
Pro Tips For Making Chinese Takeout Chicken Wings
- Blister Wings First: Hit the oven at 425°F (220°C) until the wings are deeply browned and crispy—about 20 minutes. I used to skip this step and ended up with soggy wings that tasted more like a sad dumpling than takeout gold.
- Mince Ginger Fine: Use a microplane or the finest grater for the ginger—no chunks, no skipping. The texture should be almost paste-like, or the flavor will sit in clumps like a lazy sauce. (Yes, even if you’re impatient like me.)
- Salt Wings Early: Toss the raw wings with 1 teaspoon of salt and let them sit uncovered in the fridge for at least 30 minutes. This guarantees crispiness and cuts down on grease splatter later—my grandmother swore by this, and she was right.
- Balance Soy and Honey: Start with a 3:1 ratio of soy sauce to honey (about 3 tablespoons soy to 1 tablespoon honey), then taste. Too sweet? Add a splash of rice vinegar. Too salty? A pinch of sugar fixes it. No guesswork—just adjust as you go.
Best sauces and condiments for chinese takeout chicken wings
Sweet-Spicy Glaze
The signature sauce here is a perfect balance of sweet honey, salty soy sauce, and spicy sriracha—just like your favorite takeout spot. I use Kikkoman soy sauce for that authentic umami depth, but Lee Kum Kee works too if you prefer a slightly sweeter profile.
The honey adds caramelization when simmered, while the rice vinegar brightens everything up. For extra authenticity, add 1 tsp of white pepper to the glaze—it’s a common takeout trick for that subtle kick. 🌶️
If you’re feeling adventurous, swap the sriracha for 1 tbsp of chili crisp (like La Choy) for a smoky, spicy depth. Or, for a sweeter glaze, reduce the sriracha to ½ tbsp and add 1 tsp of grated orange zest—it’s a game-changer.
The key is to simmer the glaze until it’s thick enough to coat the back of a spoon but still pourable. If it’s too thin, let it reduce longer or add ½ tsp of cornstarch mixed with water to thicken it up.
Extra Sauce Options
Don’t stop at the glaze—serve these wings with a side of hoisin sauce for dipping. I like to mix 2 tbsp hoisin with 1 tsp sesame oil and a pinch of red pepper flakes for a quick dipping sauce.
For a tangy twist, offer plum sauce (like Mae Ploy) on the side—it cuts through the richness beautifully. If you’re serving a crowd, set out small bowls of each sauce so everyone can customize their wings. 🍶
For a spicy kick, keep a bowl of sriracha or chili oil nearby. I swear by Lee Kum Kee chili oil—it’s got that perfect balance of heat and garlicky depth.
If you’re not a fan of spice, a honey mustard dip (mix 2 tbsp Dijon mustard with 3 tbsp honey and 1 tbsp apple cider vinegar) is a crowd-pleaser. The acidity in the vinegar balances the sweetness of the wings, and the mustard adds a tangy contrast.
Garnish Like a Pro
Topping your wings with toasted sesame seeds and sliced green onions isn’t just for looks—it adds texture and freshness. Toast the sesame seeds in a dry skillet over medium heat for 1-2 minutes until fragrant, then sprinkle them over the wings while they’re still hot.
The green onions should be sliced on the bias (thin, diagonal cuts) so they’re easier to pick up and add a pop of color. For an extra touch, add a few crushed peanuts—they bring a nice crunch and nutty flavor. 🌾
If you’re feeling fancy, drizzle the wings with a little extra sesame oil right before serving. It adds a fragrant aroma and ties all the flavors together. I also like to add a few crushed red pepper flakes on top for a subtle heat.
And here’s a pro tip: Keep a small bowl of extra glaze on the table so guests can dip their wings—it’s always a hit, especially with kids.
Make-Ahead Sauce
Save time by making the glaze a day ahead—it actually tastes better after the flavors meld. Store it in an airtight container in the fridge for up to 5 days.
When ready to use, reheat it in a saucepan over medium-low heat, stirring occasionally, until it’s warmed through and slightly thickened. If it’s too thick, add 1-2 teaspoons of water to loosen it up.
The glaze keeps well, so you can always have it ready for a quick weeknight dinner. ✨
For the wings themselves, fry them fresh and store them in the fridge for 3-4 days (without the glaze). Reheat them in the oven at 375°F for 8-10 minutes to keep them crispy, then toss them in the glaze just before serving.
If you’re prepping for a party, fry the wings ahead, let them cool completely, and store them in the freezer for up to 2 months. When ready to serve, reheat them in the oven or air fryer, then glaze them fresh.
Nutrition facts
Frequently asked questions
Can I bake these wings instead of frying?
For baked wings, preheat your oven to 425°F and arrange wings on a wire rack over a baking sheet (no oil needed). Bake for 35-40 minutes, flipping halfway, until crispy and reaching 165°F internally. Brush with the glaze after baking for that sticky texture. Use a spray bottle with water to help crisp the skin during baking.
How do I keep the wings crispy when reheating?
Reheat wings in a 400°F oven for 8-10 minutes on a wire rack (not paper towels) to maintain crispiness. For air fryer reheating, use 375°F for 5-6 minutes. Never microwave—they'll turn soggy. Always glaze fresh after reheating to restore that sticky texture.
What if my glaze isn't thick enough?
Simmer the glaze longer (up to 10 minutes) to reduce it. For instant thickening, mix ½ teaspoon cornstarch with 1 teaspoon water, stir into the glaze, and cook for 1 more minute until thickened. The glaze should coat the back of a spoon but remain pourable.
Can I make this recipe gluten-free?
Yes! Use tamari instead of soy sauce and ensure your cornstarch is certified gluten-free. Check that sriracha and sesame oil are also gluten-free. The recipe remains delicious with these substitutions—just verify all ingredients for cross-contamination risks.
How do I adjust the spice level?
Reduce sriracha to ½ tablespoon for mild heat or omit entirely. For extra spice, add ½ teaspoon red pepper flakes to the glaze or serve with chili oil on the side. Always taste the glaze before tossing the wings to adjust to your preference.