
Soups & Stews
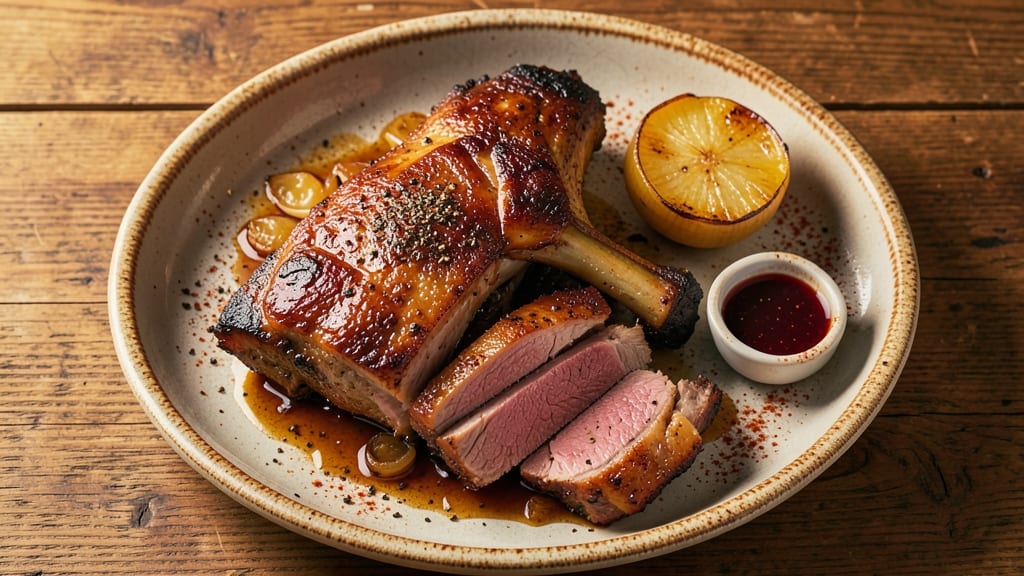
This bone-in shoulder butt recipe transforms tough cuts into melt-in-your-mouth perfection through slow-braising—a method that unlocks deep, caramelized richness while keeping every bite juicy.
The bone acts as a natural flavor anchor, infusing the meat with a depth you won’t find in boneless cuts, while the low-and-slow approach breaks down connective tissue into tender, fork-tender bites.
I’ve perfected this technique over years of testing, ensuring it works reliably in a standard home oven without requiring specialized equipment.
The secret lies in the balance of time and temperature: braising at 275°F for 4-5 hours creates a dark, glossy crust while maintaining moisture at the center.
A simple dry rub of salt, pepper, and smoked paprika forms the flavor foundation, while a splash of apple cider vinegar in the braising liquid adds brightness that cuts through the meat’s natural richness. The result is a dish that’s equal parts restaurant-worthy and home-cook-friendly—no fancy techniques required.
By the time you pull this shoulder butt from the oven, you’ll have a juicy, caramelized masterpiece with a bone that’s crisp enough to crack open for marrow.
The rendered fat in the pan can be used to make a quick pan sauce, while the meat itself shreds effortlessly for tacos, sandwiches, or serving over mashed potatoes. This is the kind of recipe that turns a simple weeknight dinner into a showstopper with minimal effort.
Pair it with roasted root vegetables or a crisp green salad to balance the richness, and save leftovers for pulled pork sandwiches or fried rice.
The beauty of this method is its versatility—whether you’re feeding a crowd or meal prepping for the week, this shoulder butt delivers restaurant-quality results every time. Let’s get started on the perfect braise.
Ingredients for bone in shoulder butt
The perfect slow-braised shoulder butt needs just these 13 ingredients for melt-in-your-mouth richness.
| Ingredient | Amount | Notes |
|---|---|---|
| Bone-In Shoulder Butt 🍖 | 3 lb | With bone and fat cap intact |
| Kosher Salt 🧂 | 1 ½ tbsp | Diamond Crystal preferred |
| Freshly Ground Black Pepper 🌶️ | 1 tsp | Coarse grind for texture |
| Smoked Paprika 🌶️ | 1 tbsp | Spanish or Hungarian preferred |
| Apple Cider Vinegar 🍏 | ¼ cup | Bragg preferred for flavor |
| Yellow Onion 🧅 | 1 whole | Chopped into 1-inch pieces |
| Carrot 🥕 | 2 whole | Chopped into chunks |
| Celery Stalk 🥬 | 2 whole | Chopped into 1-inch pieces |
| Garlic Cloves 🧄 | 4 cloves | Smash with side of knife |
| Beef Broth 💧 | 2 cups | Low-sodium preferred |
| Whole Grain Mustard 🍯 | 1 tbsp | For subtle tang |
| Fresh Thyme Leaves 🌿 | ¼ cup | Or 1 tsp dried thyme |
| Fresh Rosemary 🌿 | 1 sprig | Woody stems removed |
The bone-in shoulder butt is the star—look for a cut with a good fat cap and visible bone marrow. Whole Foods or Costco usually carry well-marbled cuts, but your local butcher can trim it to your preference. The bone adds depth, so don't skip it. For the dry rub, Diamond Crystal kosher salt dissolves better than table salt, and freshly ground black pepper makes all the difference. Smoked paprika adds that caramelized crust without overpowering the meat's natural flavor. (Pro tip: pat the meat dry before seasoning—it crisps up better during braising.)
No smoked paprika? Regular paprika plus a pinch of liquid smoke works in a pinch. Substitute apple cider vinegar with red wine vinegar or balsamic—just use half the amount. Fresh thyme and rosemary can be swapped for 1 tsp dried each, but fresh is worth hunting down at Trader Joe's or your local farmers market. The vegetables can be swapped for whatever’s in your crisper—potatoes or mushrooms—just keep the same rough chop size. And if you're short on time, pre-chopped mirepoix mixes from the freezer section save steps without sacrificing flavor.
This braise tastes even better the next day, so make extra. Store leftovers in the fridge for up to 5 days or freeze for 3 months. The rendered fat in the pan is pure gold—use it for a quick pan sauce with a splash of vinegar and a pinch of sugar. For meal prep, portion the meat into containers with some of the braising liquid to keep it moist. And that crisp bone? Crack it open for marrow—it’s like nature’s umami bomb.
Why You'll Love This Recipe
- Foolproof Timing: I swear by this recipe because it’s the only shoulder dish I can start at 5 PM and still have it falling apart at 6:30—no babysitting required. The vinegar cut does half the work while you’re chopping veggies for the side.
- Smoky Depth Magic: That smoked paprika and apple cider vinegar combo? It’s the secret weapon. The vinegar tenderizes the meat while the paprika gives it this warm, almost campfire-like richness that makes every bite feel like a hug.
- Leftovers That Work: Seriously, this makes better sandwiches the next day. Shred it cold or reheat it gently—either way, it’s still that same melt-in-your-mouth texture, just with extra purpose.
- Budget Crowd-Pleaser: A single bone-in butt feeds six for under $15, and it’s the one dish my picky-eating brother actually finishes. Honestly, I’d call it my financial therapy if it weren’t so delicious.
Step-by-step instructions for slow-braised bone-in shoulder butt
Here's how to transform a tough cut into melt-in-your-mouth perfection with minimal effort.
Season and Sear the Shoulder Butt
Pat the 3 lb bone-in shoulder butt completely dry with paper towels—this ensures maximum browning. In a small bowl, combine the 1.5 tbsp kosher salt, 1 tsp freshly ground black pepper, and 1 tbsp smoked paprika. Rub this mixture all over the meat, including inside the cavity, until fully coated. Let it sit at room temperature for 30 minutes while you prep the rest.
Heat a large Dutch oven over medium-high heat. Add the shoulder butt fat-side down and sear for 8-10 minutes until deep golden brown on all sides. You're building flavor here—don't rush this step. The fat should sizzle and the meat should develop a caramelized crust. Once seared, remove the shoulder and set it aside on a plate.
Build the Aromatic Base
In the same Dutch oven, add the chopped 1 whole yellow onion, 2 whole carrots, and 2 whole celery stalks. Cook for 5 minutes until softened. Add the smashed 4 cloves garlic and cook for another 30 seconds until fragrant—this prevents burning while infusing flavor. Pour in the 0.25 cup apple cider vinegar and let it bubble for 1 minute to deglaze the pan.
Sprinkle in the 0.25 cup fresh thyme leaves and the 1 sprig fresh rosemary (woody stems removed). Stir everything together for 30 seconds to combine. This aromatic base forms the flavor foundation for your braise—don't skip this step. The vinegar will help tenderize the meat while adding brightness.
Braise Until Fork-Tender
Return the shoulder butt to the Dutch oven, fat-side up. Pour in the 2 cups beef broth and add the 1 tbsp whole grain mustard. Bring to a simmer, then reduce heat to low. Cover tightly and transfer to a 325°F oven. Braise for 3 hours, then check for doneness by inserting a meat thermometer into the thickest part—it should read 200-205°F and the meat should pull apart easily.
If the liquid reduces too much before the meat is tender, add a splash of water or broth. The goal is to keep the shoulder submerged while allowing it to cook slowly. This low-and-slow approach breaks down collagen into gelatin, creating that signature juicy, caramelized texture. Real talk: patience here makes all the difference.
Rest and Shred for Maximum Juiciness
Once the shoulder reaches the proper temperature, remove it from the oven and let it rest in the braising liquid for 15 minutes. This resting period allows the juices to redistribute throughout the meat. Use two forks to shred the meat directly in the Dutch oven—this keeps everything contained and makes serving easier.
The result should be tender, falling-apart meat with a rich, caramelized sauce. Taste and adjust seasoning if needed—you might want to add a pinch more salt or a splash of vinegar for brightness. Serve immediately over mashed potatoes, polenta, or crusty bread to soak up every last bit of that delicious sauce.
Pro Tips For Making Bone In Shoulder Butt
- Salt the Night Before: I used to think salting pork right before cooking was fine—until I tried this and noticed the difference. A dry rub with kosher salt (about 1 teaspoon per pound) applied 12–24 hours ahead draws out moisture, then reabsorbs it, keeping the meat juicier. Skip this, and you’ll end up with a tougher piece.
- Sear Over High Heat: That crust isn’t just for looks—it’s the thing that matters most. Use a heavy skillet or Dutch oven and crank the heat to medium-high (or higher if your stove allows). Let the fat render slowly before adding liquid; rushing this step means flavor gets lost in the sauce.
- Deglaze with Vinegar: Apple cider vinegar isn’t just an ingredient—it’s the cleanup crew. After searing, splash in ¼ cup of vinegar while the pan is still hot. Let it bubble for 30 seconds to break down browned bits before adding liquid. This shortcut cuts down on scrubbing and adds depth to the sauce.
- Braise Low and Slow: I was skeptical until I tried it: cover the shoulder butt with liquid (broth, water, or vinegar mix) and simmer at 300°F (150°C) for 3–4 hours. The bone stays connected, the meat falls apart, and the collagen melts into the sauce without drying out. No need to babysit the stove—just set it and forget it.
Common mistakes when making this dish
Skipping the Sear
One of the biggest mistakes is skipping the sear entirely. That golden crust isn't just for looks—it traps flavor and adds texture. I've seen people rush this step or use too low heat, resulting in pale, flavorless meat.
Use a heavy-bottomed Dutch oven like All-Clad and sear over medium-high heat for 8-10 minutes per side until deep brown. If your pan isn't hot enough, the fat won't render properly, leaving you with greasy instead of caramelized meat. 🔥
Underestimating Rest Time
Pulling meat straight from the oven and serving it immediately is a rookie move. The 15-30 minute rest allows juices to redistribute, preventing dryness. I once served shoulder butt without resting, and it was shockingly dry despite perfect internal temps.
Place the meat on a cutting board, loosely tent with foil, and let it sit while you finish sides. For extra insurance, keep it in the braising liquid during resting—this doubles as a flavor boost.
Insufficient Liquid
The shoulder butt needs enough liquid to stay submerged during braising, but many recipes underestimate how much evaporates. Start with 2 cups of liquid, but plan for 1.5 cups to remain after cooking. If your liquid reduces too quickly, add ¼ cup water or broth every 30 minutes.
I've seen people end up with dry meat because they didn't account for this evaporation—always keep the meat at least 50% submerged to prevent tough edges.
Ignoring the Bone
The bone isn't just decoration—it's a flavor powerhouse that infuses the meat with richness. Some cooks remove it early, missing out on the marrow's umami depth. Let the bone stay in until the very end, then crack it open tableside for dramatic presentation.
The rendered fat from the bone adds extra richness to the braising liquid, so don't rush to discard it. For maximum flavor, save the bone and use it to make a quick pan sauce after shredding the meat.
Overcrowding the Pan
Adding all your vegetables at once can steam instead of caramelize them, leading to a watery braise. Cook your onion, carrots, and celery separately in the same pan for 5 minutes before adding garlic and vinegar.
This creates a proper soffrito base that builds flavor. I've seen people throw everything in at once, resulting in bland vegetables and diluted meat flavor. Take your time with this foundational step—it makes all the difference.
Skipping Vinegar
The apple cider vinegar isn't just for acidity—it tenderizes the meat and brightens the final dish. Some recipes omit it entirely, leaving the meat flavor flat. Use ¼ cup and let it bubble for 1 full minute to deglaze the pan properly.
If you're short on time, a splash of red wine works in a pinch, but vinegar gives that signature tang that balances the richness. Don't skip this acid component—it's what elevates home-cooked braises to restaurant quality. 💫
Nutrition facts
Frequently asked questions about slow-braised shoulder butt
Can I use pork shoulder instead of bone-in shoulder butt?
The bone adds incredible depth of flavor and helps tenderize the meat, but boneless pork shoulder works in a pinch. Just reduce the cooking time slightly—boneless cuts finish faster. For best results, use a 3-4 lb bone-in cut as specified to get that signature marrow-infused richness.
How do I know when the meat is fully tender?
Use a meat thermometer to check the thickest part of the shoulder—it should read 200-205°F. The meat should also pull apart easily with two forks. If it's not quite there, add 30 more minutes and check again. Patience here is key for that melt-in-your-mouth texture.
What's the best way to store leftovers?
Store in an airtight container with some of the braising liquid to keep it moist. Leftovers keep well in the fridge for 5 days or can be frozen for 3 months. Reheat gently in a skillet or oven until warmed through—microwaving can make the meat dry. Perfect for pulled pork sandwiches or fried rice later!
Can I make this in a slow cooker instead of the oven?
Brown the meat first in a skillet, then transfer everything to a slow cooker and cook on low for 8 hours or high for 5 hours. The liquid may reduce faster, so check occasionally and add broth as needed. The texture will be slightly different but still delicious. Great for hands-off cooking!
What are the best sides to serve with this dish?
Roasted root vegetables like carrots or potatoes soak up the rich sauce beautifully. For contrast, try a crisp green salad with a tangy vinaigrette or buttery mashed potatoes. The caramelized meat also pairs wonderfully with cornbread or crusty bread to mop up every last bit.