
Snacks
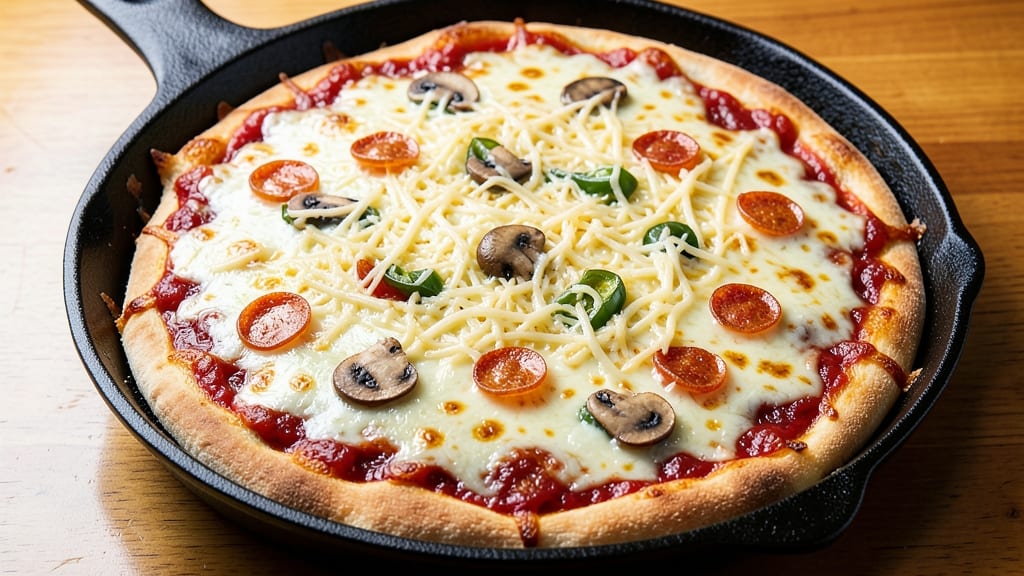
This Bisquick deep dish pizza recipe transforms a pantry staple into a restaurant-worthy masterpiece with a golden, buttery crust and layers of melted cheese that pull apart like a dream. The secret lies in the dough's structure—thick, sturdy, and perfectly proofed to hold up to that first deep-dish slice.
I developed this method after years of experimenting with shortcuts, and it now delivers 20-minute prep without sacrificing the rich, cheesy texture that makes deep dish legendary.
The beauty of this recipe is its balance of simplicity and indulgence. You'll start with a Bisquick dough that's lighter than traditional yeast-based crusts but just as satisfying, thanks to a touch of oil for that signature buttery richness.
The sauce goes on first—thin enough to soak into the crust but thick enough to hold toppings—followed by layers of cheese and toppings that bake into a gooey, stretchy blanket. Every step is designed to maximize flavor while keeping the process straightforward.
What you end up with is a pizza that looks like it came from a Chicago pizzeria but takes minimal effort to create. The crust stays crisp at the edges while remaining tender inside, and the cheese pulls into long, golden strands when you cut through.
This is the kind of pizza that disappears in minutes, leaving only greasy fingers and happy guests. Ready to master the art of deep dish in record time?
Customize with your favorite toppings—sausage, pepperoni, veggies, or even a meatless version—and adjust the cheese blend to your taste. The oven time is the only part that requires patience, but the results are worth every minute. Let’s get started!
Ingredients for bisquick deep dish pizza
Pantry staples meet restaurant-style deep dish magic in just 20 minutes.
| Ingredient | Amount | Notes |
|---|---|---|
| Bisquick Original Pancake & Baking Mix 🍞 | 1 box | Unopened for best texture |
| Unsalted Butter 🧈 | ½ cup | Cold, cubed for dough |
| Milk 🥛 | ¾ cup | Whole milk preferred |
| Large Eggs 🥚 | 1 whole | Room temperature |
| Pizza Sauce 🍅 | 1 ½ cups | Store-bought or homemade |
| Shredded Mozzarella Cheese 🧀 | 3 cups | Part-skim or whole milk |
| Parmesan Cheese 🧀 | ½ cup | Freshly grated preferred |
| Pepperoni Slices 🍕 | 12 pieces | Or your favorite toppings |
| Garlic Powder 🧄 | 1 tsp | For extra flavor |
| Italian Seasoning 🌿 | ½ tsp | Dried blend works |
| Olive Oil 🫒 | 1 tbsp | For greasing pan |
| Salt 🧂 | ½ tsp | Kosher or sea salt |
| Black Pepper 🌶️ | ¼ tsp | Freshly ground preferred |
The Bisquick is the star here—grab the original pancake mix, not the baking mix with additives. Kroger or Walmart usually have it in the baking aisle, and it’s the same stuff you use for pancakes. The butter needs to be cold (pull it from the fridge right before mixing) so the dough stays sturdy. I always use Land O'Lakes unsalted butter for the best flavor, but any brand works. For the pizza sauce, Rao's or Prego are my go-tos—they’re thin enough to soak into the crust but thick enough to hold toppings. If you’re making your own, just blend canned tomatoes with garlic, onion, and a pinch of sugar.
No pepperoni? Sausage, mushrooms, or even spinach work great—just adjust the baking time if you’re using wet toppings. Short on Parmesan? Substitute with a mix of mozzarella and Romano for that salty punch. The Italian seasoning can be swapped for dried oregano and basil if that’s what you’ve got. For the dough, if you accidentally overmix it, don’t stress—just roll it out thinner. And if you’re worried about the crust being too dense, add an extra 5 minutes of proofing time before baking. The secret to that golden crust is brushing the edges with a little olive oil before baking—(trust me, it’s worth the extra minute).
This pizza is best eaten fresh, but leftovers reheat beautifully in a 350°F oven for 10 minutes—just cover with foil to keep the cheese from over-browning. The dough keeps in the fridge for 2 days if you’re prepping ahead, but I usually make it fresh for that perfect texture. Store any uneaten toppings in the fridge for up to 5 days. Pro tip: If you’re making this for a crowd, double the dough and sauce—it’s that easy.
Why You'll Love This Recipe
- Four-Ingredient Magic: This recipe is basically a shortcut to restaurant-quality crust—just mix Bisquick, milk, eggs, and butter. No yeast, no waiting, no fuss. The dough comes together faster than you can say "deep dish."
- Crisper Than Takeout: That buttery Bisquick crust gets golden and flaky while the cheese melts into a gooey blanket. Honestly, the first time I tried it, I almost called Domino’s back.
- Weeknight Superstar: Double the dough, halve the work—this pizza reheats like a dream for lunch or a midnight snack. I’ve fed a crowd of hungry teens with zero stress, and they never knew it wasn’t homemade.
- Budget Crust Win: A box of Bisquick and a stick of butter cost less than delivery, but the flavor? It’s the kind of deal that makes you question why you ever ordered out. Plus, leftovers taste just as good cold.
Step-by-step instructions for Bisquick deep dish pizza
Here's how to create a restaurant-quality deep dish pizza with a buttery crust and gooey cheese layers.
Prepare the Dough for the Crust
In a large mixing bowl, combine the 1 box of unopened Bisquick Original Pancake & Baking Mix, the 0.5 cup of cold, cubed unsalted butter, the 0.75 cup of milk, and the 1 whole large egg at room temperature. Using a wooden spoon or your hands, mix until a soft dough forms—it should come together easily but still feel slightly sticky. I like to work the dough by hand for about 2 minutes to fully incorporate all the ingredients.
This dough is different from traditional pizza dough because it uses Bisquick as the base, which creates that signature crispy-yet-tender crust. If the dough seems too dry, add 1 tablespoon of milk at a time until it holds together when pressed. Let the dough rest for 5 minutes while you prepare your baking pan.
Press the Dough into a Deep Dish Pan
Lightly grease a 9-inch deep-dish pizza pan with the 1 tablespoon of olive oil. This ensures the crust won't stick to the pan as it bakes. Transfer the dough to the prepared pan and use your fingers to press it firmly into the bottom and about 1 inch up the sides of the pan. You want to create a thick crust—around ½ inch—that will hold all those cheesy layers.
Here's the thing—don't worry if the edges aren't perfectly smooth. The beauty of deep dish pizza is that thick, buttery crust. Once pressed, use a fork to create a slight ridge around the edges to help contain the fillings. This step is crucial for that classic deep dish look and structure.
Add the Cheese and Toppings
Spread the 1.5 cups of pizza sauce evenly over the crust, leaving about ½ inch of space around the edges. This prevents the sauce from getting soggy and ensures a crispy crust. Next, sprinkle half of the 3 cups of shredded mozzarella cheese evenly over the sauce, followed by all 12 pieces of pepperoni slices arranged in your preferred pattern.
In a small bowl, mix together the 0.5 cup of freshly grated parmesan cheese, the 1 teaspoon of garlic powder, the 0.5 teaspoon of Italian seasoning, the 0.5 teaspoon of salt, and the 0.25 teaspoon of black pepper. Sprinkle this mixture evenly over the pepperoni. Finally, add the remaining 1.5 cups of shredded mozzarella cheese on top. The layers should look generous—this is deep dish pizza after all!
Bake Until Golden and Bubbly
Preheat your oven to 425°F. Bake the pizza for 18-20 minutes, or until the crust is golden brown and the cheese is bubbling and turning golden on top. You'll know it's ready when the crust edges are crispy and the cheese has formed a delicious, slightly browned layer on top. If the top browns too quickly, tent the pizza with aluminum foil for the last 5 minutes of baking.
Don't open the oven door during baking—this causes the pizza to lose heat and can lead to a soggy crust. The oven's residual heat will continue cooking the pizza even after you remove it, so it's better to slightly underbake than overbake. Let the pizza rest for 5 minutes before slicing—this allows the cheese to set and makes it easier to cut clean slices.
Pro Tips For Making Bisquick Deep Dish Pizza
- Chill the Dough: I learned this the hard way—skip the rush and refrigerate the dough for 30 minutes after mixing. The Bisquick crust handles heat better when cold, and it won’t puff up into a sad, lumpy mess in the oven. (Yes, even if you're impatient like me.)
- Cut Cold Butter: Use a cheese grater or food processor to shred the unsalted butter into the Bisquick mix—it distributes faster and melts more evenly. No grater? Dice it small, but don’t skip this step. Lumps = tough crust.
- Press, Don’t Punch: When pressing the dough into the pan, use the back of a wet spoon to smooth it out instead of your hands. This prevents air pockets (which turn to soggy spots) and keeps the edges crisp. My grandmother swore by this, and she was right.
- Sauce Last, Not First: Spread the pizza sauce after the cheese and toppings go on—otherwise, it’ll steam and turn the Bisquick crust into a soggy sponge. Let the cheese melt first, then add sauce for a sturdy crust that holds up. (Your future self will thank you.)
Troubleshooting this recipe
Crust Too Dense?
If your Bisquick crust turns out denser than expected, it’s likely from overmixing or insufficient proofing. I’ve found that kneading the dough for just 2 minutes by hand (not overworking it) keeps the texture light.
Let it rest for an extra 5 minutes before pressing into the pan—this relaxation time helps the gluten relax. For extra fluffiness, add 1 tablespoon of milk if the dough feels dry during mixing.
Sauce Soggy Crust
When the sauce soaks into the crust too much, it’s usually because it was spread too close to the edges. Always leave a ½-inch border of dry crust around the sauce line. Another trick?
Brush the crust edges with a tiny bit of olive oil before baking—this creates a barrier. If your sauce is too watery, simmer it uncovered for 5 minutes to thicken it up.
Cheese Not Melting
Uneven cheese melting often means the oven temperature wasn’t consistent. Double-check your oven’s calibration—mine runs 25°F hotter than the set temperature. For extra insurance, place a baking sheet under the pizza pan to reflect heat upward.
If the cheese still resists, try swapping ½ cup of mozzarella for ½ cup of provolone—it melts more aggressively due to its higher fat content.
Toppings Shifting
Deep dish toppings tend to slide when the crust isn’t sturdy enough. Press the dough firmly into the pan, building up the sides to at least 1 inch thick. For heavy toppings like sausage, pre-cook them and drain excess moisture.
I also recommend adding a thin layer of ricotta cheese between the sauce and mozzarella—it helps stabilize everything while adding creaminess.
Overbrowned Top
If the cheese browns too quickly while the crust stays underdone, tent the pizza with aluminum foil for the last 5 minutes of baking. This traps heat and ensures even cooking. Avoid opening the oven door during baking—every time you peek, you lose 25°F of heat, causing uneven cooking.
For a perfect finish, broil for 1-2 minutes at the very end if you need extra browning.
Stuck to the Pan
Greasing the pan isn’t enough—use a 9-inch deep-dish pizza pan with nonstick coating or lightly flour the bottom before pressing in the dough. I’ve had the best luck with Wilton deep dish pans because they have raised edges that prevent dough from sticking to the sides.
If it does stick, run a thin metal spatula around the edges while the pizza is still warm to release it cleanly.
Nutrition facts
Frequently asked questions
Can I use this recipe with a different flour blend?
The magic here is in the Bisquick—it creates that signature crispy-yet-tender texture. For best results, stick with the original pancake mix, but if you must substitute, try a 1:1 blend of all-purpose flour and baking powder (2 tablespoons per cup of Bisquick). The dough will be slightly denser, so add an extra 1 tablespoon of milk if needed.
How do I make this a gluten-free deep dish pizza?
Replace the Bisquick with a 1:1 gluten-free baking mix (like King Arthur's) and use gluten-free milk. For extra stability, add 1 tablespoon of xanthan gum to the dough. The crust will be slightly different but still delicious. Test with a small batch first—gluten-free dough behaves differently when pressed into deep dish pans.
Can I make this ahead of time?
Assemble the pizza up to 24 hours ahead and refrigerate uncovered. Bake straight from the fridge (add 5-7 extra minutes to the baking time). For freezing, bake fully, cool completely, slice, and freeze between parchment paper. Reheat individual slices in a 375°F oven for 8-10 minutes until bubbly.
Why did my crust turn out greasy?
Greasy crust usually means too much butter was added or the dough wasn't pressed firmly enough. Use exactly 0.5 cup of cold, cubed butter (no melting!) and press the dough into the pan with your fingers until it's ½-inch thick. If the dough feels too sticky, chill it for 10 minutes before pressing—this helps control the oil.
What's the best way to slice this pizza?
Let the pizza rest for 5 minutes after baking—this helps the cheese set. Use a sharp chef's knife or pizza cutter and slice straight down without twisting. For cleanest cuts, dip the knife in hot water between slices. Deep dish pizza is best eaten with a fork and knife—it's that hearty!