
Main Courses
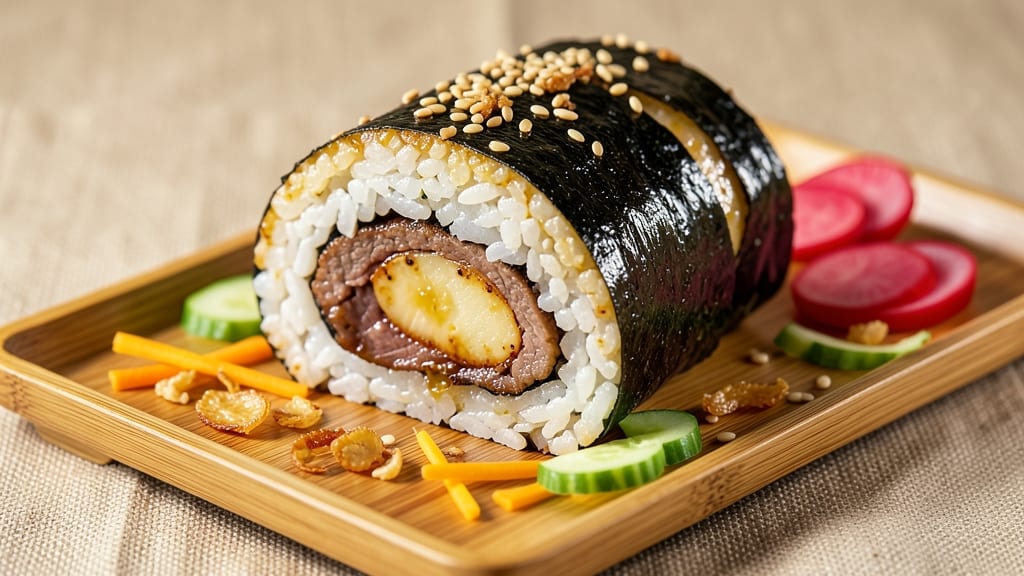
This beef kimbap recipe transforms simple rice and beef into restaurant-quality rolls with a secret umami boost that elevates every bite. The key lies in perfectly seasoned rice that stays cohesive while rolling, paired with tender beef and crisp vegetables that hold their texture.
I developed this method after years of experimenting with traditional techniques and modern shortcuts—like using pre-cooked beef—to create a version that’s both authentic and practical for home cooks.
The foundation of great kimbap starts with short-grain rice cooked just right—neither mushy nor dry—and seasoned with a blend of rice vinegar, sugar, and salt for that signature tangy-sweet balance.
Thinly sliced beef (or pre-cooked bulgogi) adds richness, while julienned carrots, spinach, and a soft-boiled egg provide color, crunch, and protein. The rolling technique is where precision matters most: tight, even layers ensure clean slices and a satisfying bite every time.
What you’ll end up with are flavor-packed rolls that are cohesive, visually stunning, and packed with layers of texture—crisp vegetables, tender beef, and creamy egg—all wrapped in that perfect sticky rice.
The umami-rich seasoning blend (soy sauce, sesame oil, and a touch of msg) ensures every slice delivers depth without overpowering. These rolls are hearty enough to stand alone but pair beautifully with a side of kimchi or a simple cucumber salad.
Whether you’re making kimbap for a Korean feast or a quick lunch, this recipe delivers restaurant-quality results with minimal fuss. The step-by-step instructions cover everything from rice preparation to rolling and slicing, so even beginners can achieve professional-looking rolls. Let’s get started—your first bite will be worth the effort.
Ingredients for beef kimbap
Short-grain rice, tender beef, and crisp vegetables transform into restaurant-quality kimbap with this umami-boosted recipe.
| Ingredient | Amount | Notes |
|---|---|---|
| Short-Grain White Rice 🍚 | 1 ½ cups | Uncooked, Japanese or sushi rice preferred |
| Water 💧 | 2 ¼ cups | For rice cooking ratio |
| Rice Vinegar 🍶 | 2 tbsp | Seasoned or unseasoned, mild acidity |
| Granulated Sugar 🍚 | 1 ½ tbsp | Adjust to taste for sweetness |
| Diamond Crystal Kosher Salt 🧂 | ½ tsp | Fine grain preferred for even seasoning |
| Thinly Sliced Beef 🥩 | 1 lb | Pre-cooked bulgogi or sirloin preferred |
| Orange Carrots 🥕 | 1 whole | Julienned into thin matchsticks |
| Baby Spinach Leaves 🌿 | 2 cups | Fresh, loosely packed |
| Large Eggs 🥚 | 4 whole | Soft-boiled, peeled, halved lengthwise |
| Sesame Oil 🫒 | 1 tbsp | Toasted sesame oil for aroma |
| Soy Sauce 🍶 | 2 tbsp | Light or regular, not reduced |
| Monosodium Glutamate (MSG) 🧂 | ¼ tsp | Optional umami enhancer |
| Nori Sheets 🌿 | 8 whole | High-quality, 7-inch sheets |
| Vegetable Oil 🫒 | 1 tbsp | For rice cooking pan |
| Toasted Sesame Seeds 🌾 | 1 tbsp | For garnish, optional |
The rice is the foundation—Japanese short-grain rice like Koshihikari or sushi rice delivers that signature stickiness. Look for brands like Calrose or Nishiki at specialty Asian markets; they’re worth the investment for authentic texture. If using regular white rice, expect slightly less cohesion when rolling. For the beef, pre-cooked bulgogi from the refrigerated section at H Mart or Korean grocery stores saves time, but thinly sliced sirloin works beautifully if you marinate it overnight in soy sauce, sesame oil, and a touch of sugar. The carrots should be bright orange and firm—avoid anything with a woody core. Baby spinach is ideal, but regular spinach works if you chop the stems finely.
No sesame oil? Toasted peanut oil at half the amount mimics the nutty aroma, though the flavor profile shifts slightly. Substituting soy sauce with coconut aminos reduces sodium but dulls the umami depth—use only if necessary. For the MSG, a pinch of fish sauce or mushroom powder provides similar umami punch, though not identical. The nori sheets must be fresh and pliable—avoid brittle or yellowed sheets, which indicate old stock. If you can’t find 7-inch sheets, 6-inch sheets with extra overlap work for smaller rolls. For the eggs, soft-boiled at 6 minutes yields the perfect creamy-yolk center that stays intact when sliced.
Store unassembled ingredients separately in airtight containers: rice in the fridge for up to 3 days, beef and vegetables for 2 days, and soft-boiled eggs for 1 day. Assembled kimbap keeps for 2 days refrigerated when tightly wrapped in plastic, though texture softens over time. For longer storage, freeze individual rolls in a single layer before transferring to a bag—up to 1 month. Reheat gently in a steamer or microwave with a damp paper towel to restore moisture without making the rice mushy. The umami seasoning blend (soy sauce, sesame oil, and MSG) can be pre-mixed and stored for 1 week in the fridge.
Why You'll Love This Recipe
- No Rice Burner Needed: I swear by this trick—just a pot, water, and 15 minutes of simmering for that perfect sticky rice. No fancy rice cooker, no guesswork. The vinegar-sugar mix? That’s the secret to keeping it fluffy instead of gummy.
- Sweet-Savory Magic: That little splash of rice vinegar and sugar in the rice isn’t just seasoning—it’s a bright, tangy contrast to the beef. Honestly, the first time I tasted it, I thought, “Why haven’t I been doing this all along?” The salt cuts through the richness, and suddenly, simple rice feels like a revelation.
- Lunchbox Legend: Between us, this is my go-to for school lunches or office snacks. Wrap a slice, toss it in a container, and it stays fresh for days—no soggy rice here. My kid’s favorite? The crispy edges from the sizzling beef. (Yes, even on a Tuesday night.)
- Budget Meal, Big Payoff: Short-grain rice and a few pantry staples? That’s it. I make a big batch on Sundays, and it stretches across lunches, picnics, and even a quick dinner. No wasted ingredients, no last-minute grocery runs—just pure, reliable flavor that won’t break the bank.
Step-by-step instructions for flavor-packed rice rolls
Mastering these rice rolls requires precision and layering techniques to balance textures and flavors.
Prepare the Seasoned Rice Foundation
Rinse the 1.5 cups short-grain white rice thoroughly under cold water until the water runs clear. This removes excess starch that would make the rice gummy. Transfer the drained rice to a pot with the 2.25 cups water, 2 tbsp rice vinegar, 1.5 tbsp granulated sugar, and 0.5 tsp diamond crystal kosher salt. Bring to a boil over high heat, then reduce to a simmer, cover, and cook for 15 minutes.
After 15 minutes, turn off the heat and let the rice steam undisturbed for 10 minutes. This resting period ensures even moisture distribution. Fluff the rice gently with a rice paddle or fork—it should be tender but slightly sticky, with grains clinging together just enough to hold the rolls. If the rice feels dry, lightly spray with water and redistribute before proceeding.
Assemble the Umami-Packed Filling Components
In a mixing bowl, combine the 1 lb thinly sliced beef with 2 tbsp soy sauce, 1 tbsp sesame oil, and 0.25 tsp monosodium glutamate (MSG). Toss gently to coat evenly, ensuring the beef absorbs all the flavors. Let it marinate for 5 minutes while you prepare the remaining fillings. The beef should glisten slightly from the sauce, indicating proper absorption.
Julienne the 1 whole orange carrots into thin matchsticks using a sharp knife or mandoline. Blanch the 2 cups baby spinach leaves in boiling water for 30 seconds, then plunge into ice water to stop cooking. Drain well and squeeze out excess moisture. Halve the 4 whole large eggs lengthwise and soft-boil them for 6 minutes in simmering water, then cool in ice water before peeling. The spinach should wilt completely, and the egg whites should remain set with runny yolks.
Layer and Roll with Precision
Place a nori sheet shiny-side down on a bamboo sushi mat. Spread 1 cup seasoned rice evenly over the nori, leaving a 1-inch border at the top. Press down gently but firmly—this ensures the rice adheres without tearing the nori. The rice should form a rectangular base with crisp edges.
Arrange the fillings in this order: 1/4 of the beef mixture, 1/4 of the julienned carrots, 1/2 cup spinach, and 1 halved egg. Distribute evenly along the bottom edge of the rice, within 1 inch of the border. Fold the bottom edge of the nori over the fillings, then tightly roll the mat toward you, applying even pressure. The roll should be snug but not compressed—this prevents cracking during slicing.
Slice and Garnish for Presentation
Use a sharp, wet knife to cut each roll into 6 equal pieces. Dip the knife in water between cuts to prevent sticking. Arrange the slices on a platter and drizzle lightly with remaining sesame oil. Sprinkle evenly with 1 tbsp toasted sesame seeds for texture and aroma. The rolls should hold their shape with clean cuts, revealing the layered fillings at each slice.
Serve immediately while the rice is warm and the flavors are most vibrant. Each bite should deliver a harmonious blend of tender beef, sweet carrots, creamy egg, and umami-rich spinach, all encased in perfectly seasoned rice. For best results, prepare the rolls just before serving to maintain texture contrast.
Pro Tips For Making Beef Kimbap
- Rinse Rice Twice: I learned this the hard way—skipping the second rinse leaves your rice gummy and sticky. After the first rinse, swirl the water out, then repeat with fresh water until it runs almost clear (not perfectly—some starch is good). This keeps the rice separate when filling the kimbap so it doesn’t turn into a gluey mess.
- Salt the Vinegar Mix: That rice vinegar-sugar mix? Add a pinch of kosher salt—just ¼ teaspoon. It balances the sweetness and cuts through the beef’s richness later. I used to skip it, and the flavor always felt flat, like something was missing.
- Spread Rice Thin: A ¼-inch layer of rice is your goal—any thicker and the kimbap gets dense and chewy. Use the back of a spoon to press it down evenly, then wet your fingers to smooth the edges. Trust me, no one wants to chomp through rice like a brick.
- Chill Before Rolling: Let the rice cool to room temp before assembling—about 10 minutes. Cold rice sticks together better and doesn’t rip when you wrap it. I used to rush this, and half my kimbap would unravel by the first bite. Patience here saves cleanup.
Best sauces and condiments for beef kimbap
Classic Gochujang Sauce
This spicy-sweet fermented chili paste sauce is a must for beef kimbap lovers. Mix 2 tbsp gochujang (Korean red chili paste), 1 tbsp soy sauce, 1 tbsp rice vinegar, and 1 tsp honey for a perfect balance of heat and umami.
Serve warm or at room temperature—it pairs beautifully with the creamy egg and tender beef in each bite. 🌶️
Sesame Soy Drizzle
For a lighter, nutty contrast, blend 2 tbsp soy sauce, 1 tbsp toasted sesame oil, and 1 tsp sesame seeds into a smooth drizzle. Warm it gently in a small saucepan over low heat for 2 minutes—just enough to release the sesame aroma without overpowering.
Drizzle over sliced kimbap right before serving to keep the rice from becoming soggy.
Spicy Mayo Dip
Combine ¼ cup mayonnaise, 1 tsp sriracha (or ½ tsp gochugaru for authentic heat), and ½ tsp toasted sesame oil for a creamy, spicy dip. This dip cuts through the richness of the beef and adds a tangy kick.
Store in an airtight container in the fridge for up to 5 days—perfect for meal prep. 💛
Kimchi Slaw Topping
Shred 1 cup kimchi (drained of excess liquid) and toss with 1 tbsp rice vinegar and ½ tsp sesame seeds. The tangy, fermented flavors complement the sweetness of the carrots and the umami of the beef. Sprinkle this fresh topping over sliced kimbap just before serving to maintain crispness.
Sweet Soy Glaze
Simmer 2 tbsp soy sauce, 1 tbsp mirin, and 1 tsp brown sugar in a small saucepan over medium heat for 3 minutes until slightly thickened. Brush lightly over the beef before assembling the rolls for an extra layer of sweetness.
This glaze also works as a dipping sauce when thinned with 1 tsp water.
Nutrition facts
Frequently asked questions
Why does my kimbap rice keep falling apart when I roll it?
The rice needs to be sticky but not mushy. If it crumbles, it's either undercooked or over-rinsed. Use Japanese short-grain rice and cook it with 2 tbsp rice vinegar—this adds just enough acidity to help the grains cling together. Also, spread the rice evenly and press it firmly but gently before adding fillings.
Can I make beef kimbap ahead of time?
Yes, but with a few key adjustments. Assemble the rolls and refrigerate them for up to 2 days in an airtight container. To prevent sogginess, slice them just before serving. For longer storage, freeze individual rolls for up to 1 month. Thaw overnight in the fridge and reheat gently in a steamer to restore texture.
What’s the best way to cook the beef for kimbap?
For maximum tenderness, marinate 1 lb thinly sliced beef in 2 tbsp soy sauce, 1 tbsp sesame oil, and 0.25 tsp MSG for 30 minutes before cooking. Sear quickly in a hot pan for 1-2 minutes per side until just done—overcooking makes it tough. Pre-cooked bulgogi from Korean markets is a great shortcut!
Do I need a bamboo sushi mat to roll kimbap?
Not strictly! If you don’t have one, use a clean kitchen towel or plastic wrap. Roll tightly to mimic the mat’s pressure, but avoid over-compressing the rice. A sharp knife dipped in water will still help slice cleanly. For extra grip, lightly wet your hands before handling the nori.
What’s the secret to crispy carrots in kimbap?
Julienne the carrots into thin matchsticks (about 1/8-inch thick) and blanch them for 1 minute in boiling water, then shock in ice water. This preserves their crunch. Avoid overcooking—they should stay bright orange and firm. Layer them near the edge of the roll where they’ll get the least pressure during slicing.