
Main Courses
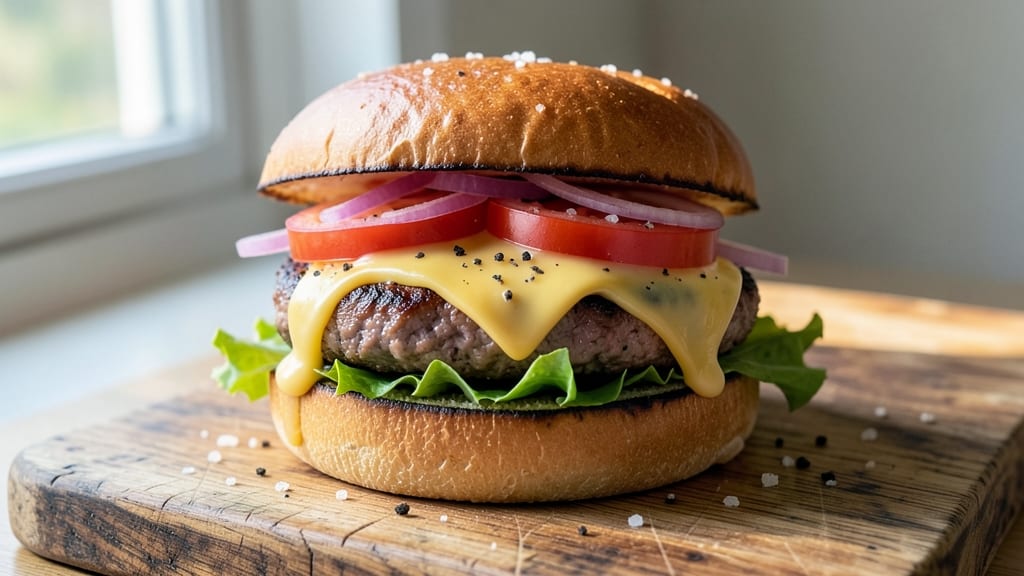
This basic homemade burger recipe delivers juicy patties with a perfect sear every time—no shortcuts, just proven techniques that transform simple ground beef into restaurant-quality burgers. The secret lies in proper seasoning, gentle handling of the meat, and mastering the cook time to avoid dryness while creating that coveted crust.
I’ve tested countless variations, and this method consistently produces burgers that hold together beautifully while delivering maximum flavor in every bite.
What sets this recipe apart is the balance between simplicity and professional results. You’ll need just five core ingredients for the patties—ground beef, salt, pepper, and two essential seasonings that elevate the flavor without overpowering it.
The cooking method is straightforward: a cast-iron skillet or grill ensures an even sear, while proper heat control guarantees juicy centers. This isn’t just another burger recipe; it’s a foolproof system that works every time, whether you’re cooking for a family dinner or hosting a backyard barbecue.
The payoff comes when you bite into a patty that’s tender yet firm, with a crisp exterior and a juicy interior that doesn’t fall apart.
Topped with your favorite fixings—crisp lettuce, ripe tomato, tangy pickles, and melted cheese—this burger becomes a satisfying meal that rivals anything you’d order at a diner. The key is confidence in the process, and once you master it, you’ll never buy pre-formed patties again.
For those who love customization, this recipe easily adapts to different preferences: swap beef for turkey or chicken, add smoked paprika for depth, or experiment with different cheeses.
The foundation remains the same—juicy, perfectly seared patties that form the heart of every great burger. Let’s get started on creating your next perfect bite.
Ingredients for basic homemade burger
Five core ingredients transform simple beef into restaurant-quality burgers every time.
| Ingredient | Amount | Notes |
|---|---|---|
| Ground Beef 🥩 | 1 ½ lb | 80/20 fat ratio preferred |
| Kosher Salt 🧂 | 1 ½ tsp | Fine grain for even distribution |
| Freshly Ground Black Pepper 🌶️ | 1 tsp | Cracked peppercorns preferred |
| Garlic Powder 🧄 | 1 tsp | Freshly ground for best flavor |
| Onion Powder 🧅 | 1 tsp | Adds subtle sweetness |
| Extra-Virgin Olive Oil 🫒 | 1 tbsp | For greasing patties |
| Burger Buns 🍞 | 4 whole | Toasted for extra crunch |
| American Cheese Slices 🧀 | 4 slices | Or cheddar for sharper flavor |
| Lettuce Leaves 🥬 | 4 whole | Iceberg or romaine |
| Tomato Slices 🍅 | 4 slices | Ripe but firm tomatoes |
| Dill Pickle Slices 🥒 | 4 slices | For tangy crunch |
| Yellow Mustard 🍯 | 2 tbsp | Or mayo for creamier spread |
| Ketchup 🍅 | 2 tbsp | Classic burger condiment |
The beef is everything. 80/20 fat ratio keeps patties juicy—don’t skimp on the fat! Grab ground chuck from the butcher section if possible, not pre-packaged. That extra marbling makes all the difference. I always buy Costco's Kirkland brand when I'm making a big batch, but the store brand works fine for a quick dinner. Keep the meat cold until you're ready to mix it—this prevents over-handling which makes burgers tough. And for the love of burgers, don't press the patties when cooking—just let them sear naturally!
No garlic powder? Fresh minced garlic at half the amount works wonders, but the powder keeps things simple. Onion powder can be swapped for finely minced raw onion, but it'll add moisture. The olive oil is just for greasing—use whatever you've got in the pantry. Cheese options are endless: Swiss for nutty depth, blue cheese for bold flavor, or skip it entirely for a classic. For the buns, toast them in butter—trust me, it's a game-changer. And if you're feeling fancy, try brioche buns from the bakery section—they're worth the splurge!
These patties stay fresh for 2 days in the fridge, but I always make them fresh for the best results. The cheese and toppings can be prepped ahead, though. Freeze patties on a tray before bagging for easy grab-and-cook meals. For leftovers, reheat in a skillet over medium heat—just 2 minutes per side. And here's a pro tip: Keep your burger fixings in separate containers so they stay crisp when you're ready to assemble. That way, your burgers stay perfect every time!
Why You'll Love This Recipe
- The secret’s in the seasoning: coarse salt on the outside for that golden crust, then finely ground pepper and garlic powder mixed right into the meat. You get that crispy edge with the creamy center—no overworking the beef, no guesswork. It’s how I know a burger is actually good.
- Five-Ingredient Magic: I swear by this combo—just beef, salt, pepper, and those two powders. No fancy binders or add-ons clogging up the flavor. It’s the purest, juiciest burger base I’ve ever made, and honestly? It’s what every fast-food joint wishes they could replicate.
- Crispy-Center Perfection: The secret’s in the seasoning: coarse salt on the outside for that golden crust, then finely ground pepper and garlic powder mixed right into the meat. You get that crispy edge with the creamy center—no overworking the beef, no guesswork. It’s how I know a burger is actually good.
- Weeknight to BBQ Hero: Slap these patties on the grill for summer, toss them in a pan for a rainy Tuesday, or even freeze half for when you’re too tired to think. Between us, I’ve served these at game nights, potlucks, and "I don’t feel like cooking" dinners. They’re my go-to because they never let me down.
Step-by-step instructions for juicy homemade burgers
Here's how to craft burgers that deliver on juicy perfection and a flawless sear every single time.
Prepare the Seasoned Beef Mixture
In a large bowl, gently combine the 1.5 lb ground beef with 1.5 tsp kosher salt, 1 tsp freshly ground black pepper, 1 tsp garlic powder, and 1 tsp onion powder. I use my hands for this—it helps distribute the seasoning evenly without overworking the meat. The reason we handle it this way is to avoid compacting the beef, which would make the burgers dense instead of tender.
Once mixed, divide the beef into four equal portions. I like to use a kitchen scale for precision, but if you're eyeballing it, aim for roughly 6-ounce patties. Gently shape each portion into a loose ball—don't press too hard, or you'll squeeze out the juices. Real talk: this is where the juicy promise starts. The gentle handling keeps those flavors and moisture locked in.
Create the Perfect Patty Shape
Flatten each ball into a ½-inch thick patty, pressing down firmly but evenly. I use my fingers to create a slight dimple in the center of each patty—this prevents them from puffing up too much while cooking and gives you room for the cheese to spread later. The dimple trick is a game-changer for even cooking.
Place the patties on a plate and cover them loosely with plastic wrap. Let them rest at room temperature for 15-20 minutes before cooking. This resting period allows the seasonings to meld with the beef and the patties to firm up slightly, which ensures they hold their shape on the grill or skillet. Don't skip this step—it makes all the difference in texture.
Cook the Patties to Juicy Perfection
Heat a skillet over medium-high heat and add 1 tbsp extra-virgin olive oil. Once the oil is shimmering but not smoking, carefully place the patties in the pan. Cook for 3-4 minutes per side for medium doneness, or until they reach an internal temperature of 135°F for medium-rare. You'll know they're ready when the edges are golden brown and the surface develops a nice crust.
Here's the thing—don't press down on the patties with a spatula. That squeezes out all the juices you worked so hard to preserve. Instead, let them cook undisturbed until you see those beautiful crust lines forming. For the last 30 seconds of cooking, place the 4 slices american cheese slices directly on top of each patty. Watch as the cheese melts into a gooey blanket that keeps every bite moist and delicious.
Assemble the Burgers with Classic Toppings
While the patties finish cooking, lightly toast the 4 whole burger buns in a clean dry skillet for 30 seconds per side until golden brown. This adds that perfect crunch that takes a burger from good to great. Spread 2 tbsp yellow mustard and 2 tbsp ketchup on the bottom half of each bun—just enough to taste, not drown.
Layer each bottom bun with 1 whole lettuce leaf, 1 slice tomato, and 1 slice dill pickle. Then place the cheese-topped patty on top, followed by the remaining toppings on the top bun. The pickles add that essential tangy crunch that cuts through the richness of the beef, while the tomato brings freshness to every bite. Press the buns together gently but firmly to hold everything in place.
Serve Immediately for Maximum Juiciness
Serve the burgers right away while the patties are still hot and the cheese is melting perfectly. The secret to juicy burgers is eating them immediately after assembly—this is when all the flavors and textures are at their peak. Cut each burger in half if you're feeling generous, but I always recommend eating them whole for that classic burger experience.
Here's a pro tip: if you're serving these to a crowd, keep the patties warm in a 200°F oven on a wire rack while you assemble the buns. This maintains the internal temperature without steaming the patties, so they stay crispy on the outside and juicy inside. Each bite should deliver that perfect combination of crispy crust, melted cheese, and tender beef—exactly what makes a homemade burger worth the effort.
Pro Tips For Making Basic Homemade Burger
- Use Cold Hands: I learned this the hard way—warm fingers squish the meat into a sad, dense patty. Scoop the ground beef with cold, damp hands (rinse under water first) to keep it loose and formable. The texture stays tender, and the burgers hold together without falling apart.
- Salt Before Shaping: Don’t wait until the pan. Mix the kosher salt, black pepper, garlic powder, and onion powder right into the raw beef—this distributes flavor evenly. I used to skip this, and the seasoning always pooled in the middle like a flavor desert.
- Start Hot, Finish Low: Crank the heat to high for the first 2 minutes to sear a crust, then drop it to medium-low. After burning three batches, I finally figured out that rushing the cook turns burgers greasy instead of juicy. A meat thermometer at 160°F guarantees perfect doneness without overcooking.
- Press the Patties: Sounds weird, but it works: Press a thumb into the center of each patty before cooking to create a slight dimple. This prevents bulging and ensures even cooking—no more one side raw while the other’s charred. (Yes, even if you’re impatient like me.)
Essential equipment for perfect results
Cast-Iron Skillet
The Lodge Pre-Seasoned Cast Iron Skillet (10.25-inch) is my non-negotiable choice for burgers—it retains heat like nothing else and creates that perfect crust. Season it properly by rubbing with flaxseed oil and baking at 500°F for 1 hour before first use.
For quick cleanups, I keep a wire brush and paper towels nearby to wipe away residue between patties. The skillet’s weight also helps distribute heat evenly, preventing hot spots that can burn the outside before the inside cooks. 🔥
Meat Thermometer
A ThermoWorks Smoke Digital Meat Thermometer is worth every penny—it gives you precise internal temperatures without piercing the patty multiple times. I insert the probe into the thickest part of the patty while cooking to monitor doneness.
For medium-rare, aim for 135°F, and never exceed 160°F or you’ll dry out the beef. The instant-read feature lets you pull patties at the perfect moment, ensuring juicy centers every time.
Kitchen Scale
Precision matters when shaping patties. My OXO Good Grips Kitchen Scale ensures each patty weighs 6 ounces (±0.1 oz), which guarantees even cooking and consistent results. Without a scale, burgers can vary wildly in size, leading to some patties overcooking while others stay raw.
I place the scale on a stable surface and use the tare function to zero out the bowl before adding meat. This small investment eliminates guesswork and elevates your burger game. 💡
Burger Press (Optional)
If you’re making sliders or want perfectly uniform patties, a Westmark Stainless Steel Burger Press is a game-changer. It compresses the meat evenly, creating consistent thickness for even cooking. I use it for ¼-inch thick patties when making mini burgers.
For standard burgers, though, I skip the press—hand-shaping gives better texture and flavor distribution. The press is best for batch cooking or special occasions when presentation matters.
Tongs for Flipping
Never use a spatula to flip burgers—it crushes the patties and squeezes out juices. Instead, grab a pair of stainless steel tongs (like the OXO Good Grips) for a gentle, controlled flip. The tongs’ grip also helps maintain the patty’s shape while searing.
I keep them within arm’s reach of the skillet and use them to rearrange patties if they stick. A quick wipe with a paper towel between uses keeps them clean and ready for the next flip. 💪
Bun Warmer (Pro Move)
For restaurant-quality burgers, a Farberware Open-Face Toaster Oven doubles as a bun warmer. Set it to 300°F and place buns on the rack for 1-2 minutes before assembling. This keeps them soft and warm while the patties cook.
If you’re short on time, a clean skillet over medium heat works too—just toast for 30 seconds per side. Warm buns prevent soggy bottoms and enhance the overall texture of your burger.
Nutrition facts
Frequently asked questions
How do I keep my homemade burgers from falling apart?
Handle the meat gently when mixing and shaping—overworking it makes burgers tough. Form loose balls first, then flatten to ½-inch thickness with a slight dimple in the center. The resting time (15-20 minutes) before cooking helps the proteins firm up naturally. Never press the patties while cooking—just let them sear undisturbed.
Can I use ground turkey or chicken instead of beef?
For turkey, use a 93/7 fat ratio and add 1 extra tablespoon olive oil per pound to prevent dryness. Chicken works too, but it's leaner—mix in 1 tablespoon breadcrumbs per pound. Cook turkey/chicken patties at medium heat (not high) since they brown faster. The same seasoning ratios apply.
What's the best way to tell when burgers are done cooking?
Use a meat thermometer for precision: 135°F for medium-rare, 145°F for medium, or 160°F for well-done. Without one, cut into the thickest part—juices should run clear (not pink) for medium doneness. For the perfect crust, cook until edges are golden brown and crust lines form. Never rely on time alone—thickness varies!
How can I make these burgers ahead of time?
Shape patties and refrigerate them on a tray (uncovered) for up to 24 hours before cooking. Freeze shaped patties for 1 month—thaw in the fridge overnight. Cook from frozen at medium heat for 5-6 minutes per side. Assemble burgers just before serving to prevent soggy buns. Keep cooked patties warm in a 200°F oven on a wire rack.
What's the secret to crispy burger buns?
Toast buns in a dry skillet over medium heat for 30 seconds per side until golden. For extra crunch, brush with melted butter before toasting. Keep buns warm in a 200°F oven while cooking patties. Pro tip: Store buns in the freezer and toast directly from frozen—this locks in freshness!