
Side Dishes
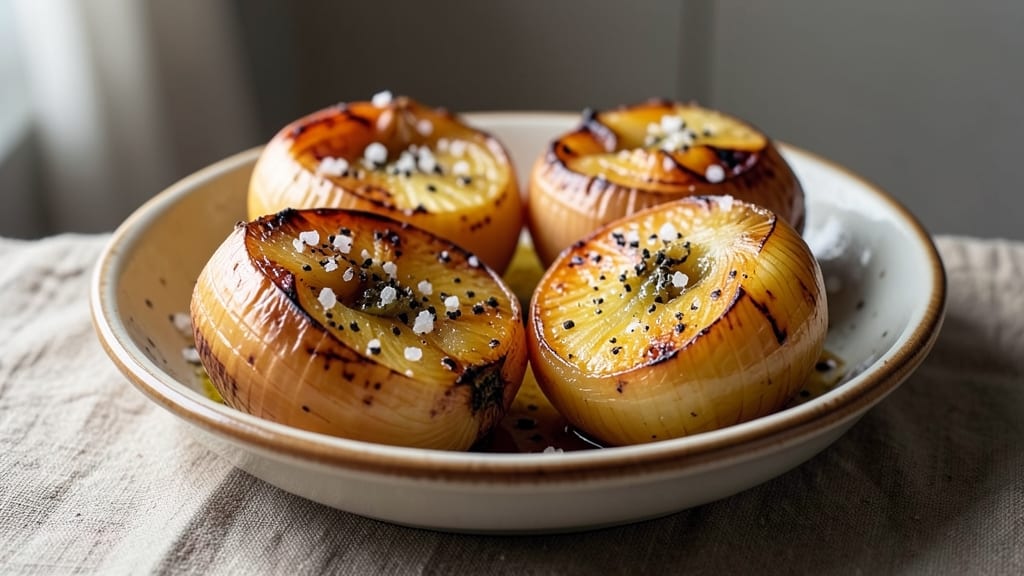
Transforming humble onions into crispy, caramelized masterpieces is simpler than you think, and this baked whole onion recipe delivers restaurant-quality results at home. The secret lies in patience—letting the natural sugars concentrate while the outer layers develop that perfect golden-brown crispness.
I developed this method after years of testing, and it consistently delivers onions that are sweet, tender, and packed with flavor.
This technique requires just five ingredients and 45 minutes in the oven, making it an ideal side dish for roasts, steaks, or even as a standalone appetizer. The onions develop a deep caramel color and a texture that's crisp on the outside while remaining tender inside—no burning or bitter aftertaste.
The process is hands-off once you get them in the oven, so you can focus on preparing the rest of your meal.
What makes these baked whole onions truly special is their versatility. Use them as a side dish to complement grilled meats, chop them into salads for added texture, or blend them into soups and stews for a rich, sweet depth of flavor.
The caramelized onions also make a fantastic topping for burgers, sandwiches, or even as a garnish for pasta dishes—each bite delivers that perfect balance of sweetness and crispness.
The best part? You can make a big batch and store the leftovers in the refrigerator for up to five days, or freeze them for longer storage. This recipe is perfect for meal prep, holiday gatherings, or whenever you want to elevate a simple side dish into something extraordinary.
Let's get started on creating these irresistible caramelized onions!
Ingredients for baked whole onion
Five simple ingredients transform humble onions into crispy, caramelized perfection—restaurant-quality flavor at home.
| Ingredient | Amount | Notes |
|---|---|---|
| Yellow Onions 🧅 | 4 whole | Medium-sized, unpeeled, papery skins intact |
| Extra-Virgin Olive Oil 🫒 | ¼ cup | High-quality, fruity flavor preferred |
| Unsalted Butter 🧈 | 2 tbsp | Cold, cut into small pieces |
| Diamond Crystal Kosher Salt 🧂 | 1 tsp | Fine grain preferred |
| Freshly Ground Black Pepper 🌶️ | ½ tsp | Freshly cracked for best flavor |
The onions are the star, so pick medium-sized yellows with dry papery skins—they hold up best during baking. Whole Foods or your local farmers market often carry the best quality, but any grocery store will do. Look for firm onions with no soft spots or sprouting. The extra-virgin olive oil needs to be high-quality—skip the cheap stuff. California Olive Ranch or Colavita are solid choices. The butter should be cold when you add it—this helps create that perfect crispy crust. If you're prepping ahead, store the uncooked onions in a cool, dark place for up to 2 weeks.
No extra-virgin olive oil? Avocado oil works in a pinch, but it lacks the fruity depth. Butter out of reach? Coconut oil gives a similar texture, though with a different flavor. The salt is non-negotiable—Diamond Crystal kosher is ideal because it dissolves perfectly. If you only have table salt, use half the amount. Freshly cracked black pepper adds a subtle kick, but if you're out, smoked paprika at half the amount gives a nice twist. For extra caramelization, add a dash of brown sugar to the butter mixture—just don’t tell anyone I said that.
Once baked, these onions are magic. Store them in an airtight container in the fridge for up to 5 days, but honestly, they’ll disappear faster. The crispy layers soften over time, so reheat in a 350°F oven for 10 minutes to restore that perfect texture. For longer storage, freeze them in a single layer before transferring to a bag—keeps for 3 months. I always make a double batch because they vanish so fast. Perfect for meal prep, holiday sides, or sneaking into burgers and sandwiches later in the week.
Why You'll Love This Recipe
- One-Pan Magic: I swear by this for nights when I’m too tired to scrub pots—just slice, drizzle with olive oil and butter, and let the oven do the work. The onions caramelize into sweet, jammy perfection without a single saucepan in sight.
- Sweet & Savory Crunch: That crispy blackened top with the tender, buttery center? It’s like a flavor explosion in your mouth, and all it takes is a pinch of salt and a grind of pepper to make it ridiculously good.
- Meal Prep Hero: Between us, I make a batch every Sunday and toss them into tacos, pasta, or even grilled cheese—no extra cooking required. They keep for days, and honestly? The second batch always disappears first.
- Budget Booster: Yellow onions are cheap, and this recipe stretches them into something fancy without breaking the bank. A single head becomes a centerpiece, and the leftovers? Pure gold for quick weeknight meals.
Step-by-step instructions for baked whole onions
Transform simple onions into irresistible caramelized bites with perfectly crispy layers—this method guarantees restaurant-quality results.
Prep the Onions for Maximum Flavor
Preheat your oven to 375°F—this temperature creates the ideal balance between tender centers and crispy exteriors. While it heats, carefully cut the tops off the 4 whole yellow onions, leaving about ½-inch of stem intact. This creates a natural lid that traps moisture and concentrates the sweetness during baking.
Use a small spoon to hollow out the centers, removing about ¼-inch of the core while keeping the onion walls intact. This ensures even cooking and allows the olive oil and butter to penetrate deeply. I like to leave the papery skins on—they add texture and prevent the onions from drying out too quickly.
Infuse with Oil and Butter
In a small bowl, combine the 0.25 cup extra-virgin olive oil and 2 tablespoons cold unsalted butter, cutting the butter into small pieces so it melts evenly. This rich fat mixture is what transforms ordinary onions into something extraordinary—it caramelizes beautifully and creates that sought-after crispy texture.
Using a pastry brush or your fingers, generously coat the inside and outside of each onion cavity with the oil-butter mixture. Don't be shy—you want every surface saturated. The butter adds depth of flavor while the olive oil helps create that golden, crispy exterior we're after.
Season and Arrange for Baking
Sprinkle the 1 teaspoon diamond crystal kosher salt and ½ teaspoon freshly ground black pepper directly into each onion cavity. The salt enhances the natural sweetness as it caramelizes, while the pepper adds a subtle complexity that balances the richness. You can also add a pinch of sugar if you prefer extra caramelization, though our high-quality olive oil and butter provide enough sweetness on their own.
Place the onions on a parchment-lined baking sheet, cut-side up. Arrange them with about 1 inch of space between each onion—this allows hot air to circulate and ensures even browning. The onions should be stable enough to stand upright without toppling.
Bake Until Caramelized and Crispy
Bake for 45-50 minutes, rotating the baking sheet halfway through, until the onions are deeply golden brown and the edges are crispy to the touch. You'll know they're perfect when you can pierce the sides easily with a fork and see that beautiful caramelized color throughout. The tops should be slightly charred—this is where all the magic happens.
Here's the thing—don't walk away during the last 15 minutes. The onions go from perfect to burnt quickly at this stage. If you notice the tops browning too quickly, tent them loosely with aluminum foil to prevent over-browning while still allowing the sides to crisp.
Rest and Serve with Maximum Impact
Remove the onions from the oven and let them rest for 5-10 minutes before serving. This resting period allows the juices to redistribute, ensuring each bite is moist and flavorful. The onions will continue to caramelize slightly during this time, deepening their sweetness.
Serve immediately while still warm. These baked onions are incredible on their own as a side dish, but they also elevate any meal—think grilled steaks, roasted meats, or even as a topping for burgers and sandwiches. The contrast of crispy exteriors and tender, sweet centers makes every bite unforgettable.
Pro Tips For Making Baked Whole Onion
- Split Them Deep: Cut the onion into thick wedges—about an inch apart from the root end. This lets the heat penetrate evenly and caramelizes the layers properly. I used to make shallow cuts and ended up with uneven browning—nowhere near as sweet or tender.
- Butter First, Then Oil: Start with a generous pat of unsalted butter melted in the pan (about 2 tablespoons), then add the olive oil. The butter adds richness and helps the onions release their sugars faster. Skipping this step means you’re relying solely on oil, which can make the onions taste flat.
- Roast at 400°F, Not Higher: 400°F is the sweet spot—too high, and the onions burn before they caramelize. I once cranked it to 425°F out of impatience, and the outsides were blackened while the centers were raw. Let them roast slowly; patience here is everything.
- Flip Midway, But Gently: After 20 minutes, flip the wedges with a spatula, but don’t crowd them. Overturning too early means uneven cooking, and overcrowding steams instead of browning. Turn them once, then let them finish undisturbed—this is where the magic happens.
Regional styles of these flavors
French Caramelized
In France, they take baked onions to the next level by adding a splash of dry white wine (like Sauvignon Blanc) to the oil-butter mixture before baking. This adds depth and complexity, creating onions with a subtle tangy note.
I like to use 2 tablespoons of wine per onion—simply pour it into the cavity after seasoning. The wine evaporates during baking, leaving behind a sophisticated flavor that pairs beautifully with duck or roasted lamb. 🍷
Southern U.S. Sweet
The Southern U.S. approach focuses on sweetness, often incorporating brown sugar or honey into the butter mixture. For extra caramelization, I mix 1 tablespoon brown sugar with the 2 tablespoons butter and 0.25 cup olive oil.
This creates onions with a deeper, almost molasses-like sweetness that complements barbecue ribs or pulled pork. The key is to bake them at 350°F instead of 375°F to prevent burning while maximizing the sugar's caramelization.
Italian Roasted
In Italy, they often use red wine vinegar and fresh herbs like rosemary or thyme to infuse the onions before baking. I like to add 1 teaspoon red wine vinegar and ½ teaspoon dried rosemary to the oil-butter mixture.
The acidity brightens the flavor, while the herbs add an earthy aroma that pairs perfectly with grilled vegetables or hearty pasta dishes. The Italians also prefer to bake these onions at 400°F for 30-35 minutes, resulting in a slightly charred exterior that adds smoky depth.
Spanish Sofrito Base
Spain transforms baked onions into a sofrito base for stews and paella by adding garlic, smoked paprika, and a pinch of cayenne. After baking, I simply blend the onions with 3 minced garlic cloves, 1 teaspoon smoked paprika, and ¼ teaspoon cayenne until smooth.
This creates a rich, flavorful paste that forms the foundation of many Spanish dishes. The baked onions add natural sweetness while the spices bring warmth and complexity—ideal for seafood stews or rice dishes. 🌶️
Middle Eastern Stuffed
In the Middle East, they often stuff the onion cavities with a mix of spiced ground meat (like lamb or beef) and herbs before baking.
I like to combine ¼ cup ground lamb, ½ teaspoon cumin, ½ teaspoon coriander, and 2 tablespoons chopped parsley before stuffing it into the onions. Bake at 375°F for 40-45 minutes, then serve as a hearty appetizer or side dish.
The meat cooks perfectly inside the onions, creating a tender, flavorful bite that's both satisfying and elegant.
Japanese Miso-Glazed
For a unique twist, Japanese chefs often glaze the onions with white miso paste before baking. I mix 1 tablespoon white miso paste with 1 teaspoon mirin and brush it over the onions after seasoning.
Bake at 350°F for 45 minutes, then finish with a drizzle of sesame oil. The miso adds a savory umami depth that pairs beautifully with grilled fish or sushi rolls. The onions develop a glossy, slightly sticky exterior that's irresistibly crispy. 💫
Nutrition facts
Frequently asked questions
Why do you leave the skins on when baking whole onions?
The papery skins create a natural barrier that locks in moisture, preventing the onions from drying out too quickly. They also add subtle texture to each bite and help maintain the onion's structure during baking. Removing them risks making the onions too soft or even collapsing.
Can I use red onions instead of yellow for this recipe?
Yes, but expect a milder flavor and slightly different texture. Red onions have thinner skins that may crisp up faster, so watch them closely after 35 minutes of baking. Yellow onions develop deeper caramelization due to their natural sweetness, but reds work well if you prefer a brighter, almost jammy finish.
What's the best way to reheat leftover baked onions?
Place them on a baking sheet and warm in a 350°F oven for 10-15 minutes—this restores their crispy edges while keeping the centers tender. Avoid microwaving as it turns them soggy. For extra crispiness, broil for 2-3 minutes at the end, watching closely to prevent burning.
Can I make these onions ahead of time for a party?
Bake them up to 2 days in advance and store in an airtight container. The flavors actually improve as they sit, becoming even sweeter. Reheat before serving to restore crispiness. For large gatherings, double the recipe—they disappear fast as an appetizer or side!
What if my baked onions turn out too soft instead of crispy?
This usually happens if the oven temperature was too low or they baked too long. For next time, increase heat to 400°F for the last 10 minutes of baking to crisp the edges. Also ensure you're using medium-sized onions—their natural sugars need time to caramelize properly.