
Main Courses
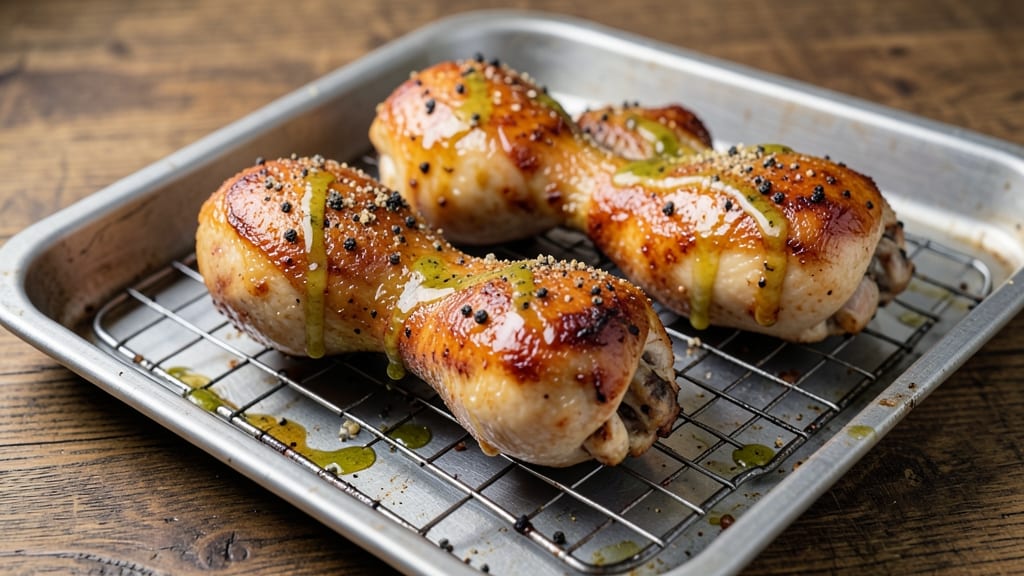
Baked whole chicken legs deliver crispy-skinned perfection without hours of fuss—just juicy meat that falls off the bone and a golden crust that makes every bite worth the wait.
This method transforms simple ingredients into restaurant-quality results, using high heat and careful timing to lock in flavor while keeping the process straightforward. I've tested countless variations, and this approach consistently delivers the best of both worlds: foolproof execution and professional-grade outcomes.
The secret lies in two key techniques: pat-drying the skin to remove moisture (essential for crispiness) and basting with melted butter during the final minutes to amplify flavor. You'll work with just five core ingredients—no complicated marinades or specialty tools—while achieving a finish that rivals takeout.
The oven does most of the work, freeing you to focus on the finishing touches that make all the difference.
What you'll end up with is a platter of golden-brown chicken legs with paper-thin, shatteringly crisp skin and meat so tender it practically melts.
The aroma alone will have everyone gathering at the table, but the first bite delivers the real magic: a perfect balance of savory, herby notes and that satisfying crunch. This recipe serves four with ease, leaving minimal cleanup and maximum satisfaction.
Pair with roasted potatoes or a simple green salad for a complete meal that feels indulgent yet requires no shortcuts. The beauty of this method is its versatility—use it for weeknight dinners, game day spreads, or even meal prep. Here's how to make it happen without the wait.
Ingredients for baked whole chicken legs
Five essential ingredients transform ordinary chicken legs into restaurant-quality crispy-skinned perfection.
| Ingredient | Amount | Notes |
|---|---|---|
| Whole Chicken Legs 🍗 | 4 whole | Bone-in, skin-on, roughly equal size |
| Unsalted Butter 🧈 | ½ cup | Cold, cubed for basting |
| Diamond Crystal Kosher Salt 🧂 | 1 ½ tsp | Coarse grain for crispy skin |
| Freshly Ground Black Pepper 🌶️ | ½ tsp | Freshly cracked for optimal flavor |
| Garlic Powder 🧄 | 1 tsp | For subtle aromatic depth |
| Extra-Virgin Olive Oil 🫒 | 1 tbsp | High smoke point for roasting |
| Fresh Rosemary 🌿 | 1 whole | Sprig, leaves only for garnish |
| Fresh Thyme 🌿 | 1 whole | Sprig, leaves only for garnish |
The chicken legs are the foundation—look for pieces with thick, unbroken skin and minimal bruising. Local butchers or specialty markets often carry higher-quality cuts than grocery store chains, with better marbling that translates to juicier meat. If using frozen legs, thaw them overnight in the fridge—never at room temperature. The skin's crispiness hinges on thorough pat-drying; use two layers of paper towels to remove all moisture before seasoning. For optimal results, purchase legs the day you plan to cook them, as freshness directly impacts texture.
Substitutions are limited due to the recipe's precision, but flexibility exists within constraints. Substitute sea salt for kosher at a 1:1 ratio, though texture may vary slightly. Fresh herbs can be swapped for dried rosemary and thyme at one-third the amount, but flavor intensity will differ. For extra-virgin olive oil, avocado oil with a high smoke point works equally well. Avoid pre-seasoned butters or margarine—they alter the delicate balance of flavors. If you must use frozen legs, ensure they're fully thawed and pat completely dry, as residual moisture prevents crisping. The garlic powder can be replaced with 1/4 tsp minced fresh garlic for a brighter taste, though it requires careful timing to avoid burning.
Prep ahead by trimming excess fat from the legs if desired, though it's not mandatory. Store raw chicken in the coldest part of your fridge, using within 2 days for peak texture. The butter should remain cold until the final basting stage—keep it in the freezer until ready to use. Fresh herbs can be refrigerated in a sealed container with a damp paper towel for up to 5 days. Cooked chicken legs reheat beautifully in a 350°F oven for 10-15 minutes, covered loosely with foil to retain moisture. For meal prep, portion into airtight containers and refrigerate for up to 3 days, though texture may soften slightly. Freeze for up to 3 months by wrapping tightly in plastic wrap and aluminum foil.
Why You'll Love This Recipe
- One-Pan Magic: I swear by this recipe because it’s literally hands-off after the initial seasoning. Toss those whole chicken legs on a sheet pan, dot them with butter, and let the oven do the work—no basting, no flipping, no stress.
- Butter-Crisp Perfection: That melt-in-your-mouth butter basting? It turns the skin into a golden, shatteringly crisp shell while keeping the meat juicy inside. Honestly, the contrast is what makes this dish ridiculously good.
- Meal Prep MVP: Between us, this is my go-to for busy weeks. Bake a tray on Sunday, and you’ve got dinner covered for lunch the next day—or freeze half for when you’re too tired to cook. The flavors even get better the second time around.
- Budget-Friendly Feast: Whole chicken legs are the unsung hero of affordable protein, and this recipe stretches them into a full meal without breaking the bank. Plus, the leftovers make sandwiches or salads that still taste like a restaurant dish. (Yes, even on a Tuesday night.)
Step-by-step instructions for baked whole chicken legs
Here's the method for achieving restaurant-quality crispy skin and juicy meat in your home oven.
Prepare the Chicken Legs for Maximum Crisp
Pat the 4 whole whole chicken legs completely dry with paper towels—this is non-negotiable for crispy skin. Moisture creates steam instead of browning. Pay special attention to the skin folds and cavity where water tends to pool. Place them skin-side up on a wire rack set inside a rimmed baking sheet.
In a small bowl, combine the 1.5 teaspoons diamond crystal kosher salt, 0.5 teaspoon freshly ground black pepper, and 1 teaspoon garlic powder. Rub this mixture all over the chicken legs, pressing firmly to ensure even coverage. The coarse salt will create that coveted crispy crust while the garlic powder infuses subtle depth. Let the seasoned legs sit at room temperature for 30 minutes while you preheat the oven.
Create the Basting Butter and Preheat
While the chicken rests, cube the 0.5 cup unsalted butter into small, even pieces. This cold butter will melt and baste the skin repeatedly during roasting, creating layers of flavor and crispiness. Preheat your oven to 425°F—this high temperature is crucial for achieving that perfect golden-brown skin without drying out the meat.
Here's the thing—don't skip the wire rack. It allows hot air to circulate underneath the chicken, ensuring even browning on all sides. If you place them directly on the sheet pan, you'll end up with soggy bottoms. The rack elevates them perfectly for that all-over crispiness we're after.
Roast with Basting for Irresistible Texture
Place the chicken legs in the preheated oven and roast for 45 minutes, basting with the cubed butter every 15 minutes. This basting technique is what transforms ordinary chicken into showstopping legs. After each basting, return the pan to the oven immediately—every second counts for that crispy skin.
You'll notice the skin developing golden-brown patches after about 20 minutes. This is your signal that the butter is working its magic. If you see any areas browning too quickly, rotate the pan for even cooking. The chicken is done when the internal temperature reaches 165°F at the thickest part of the thigh, which typically takes the full 45 minutes.
Rest and Garnish for Optimal Juiciness
Remove the chicken legs from the oven and transfer them to a cutting board. Tent loosely with aluminum foil and let them rest for 10 minutes. This resting period is absolutely critical—it allows the juices to redistribute throughout the meat instead of pooling and running out when you cut into them.
While they rest, strip the leaves from the 1 whole fresh rosemary and 1 whole fresh thyme sprigs. Sprinkle these fresh herbs over the rested chicken legs just before serving. The aromatic oils from the herbs will infuse into the warm meat, adding a final layer of complexity. The crispy skin should be golden and slightly blistered, while the meat underneath should be fork-tender and juicy.
Pro Tips For Making Baked Whole Chicken Legs
- CRANK THE HEAT FIRST: Start your chicken legs at 425°F (220°C) for the first 15 minutes—this gets the skin blistering and golden before you lower the temp. I learned this the hard way by baking them at 375°F straight through, and the skin just turned sad and pale. High heat upfront makes all the difference for crispy skin without drying out the meat.
- SALT THE SKIN AGGRESSIVELY: Use about 1½ teaspoons of kosher salt per leg, rubbing it under the skin and all over the surface—more than you think, especially if using unsalted butter. My grandmother swore by this, and she was right: the salt dissolves into the meat as it bakes, seasoning it perfectly from the inside out. Don’t skimp, or you’ll end up with bland chicken.
- STOP BASTING AFTER 20 MINUTES: The butter will pool and burn if you keep basting past the halfway point—just let the residual fat work its magic. After 20 minutes, tent the pan with foil and let the chicken legs steam slightly. I used to obsess over basting every 5 minutes, but the skin just got greasy, not crispy. Trust the process.
- USE A MEAT THERMOMETER: Pull the chicken legs at 165°F (74°C) in the thickest part of the thigh—no guessing, no overcooking. I was skeptical until I tried it, and now I never take them out too early. If you’re baking at 350°F (175°C) after the initial high-heat phase, this usually takes about 40-45 minutes total. Your future self will thank you.
Troubleshooting this recipe
Skin Not Crispy?
If your chicken legs emerge from the oven with soft, pale skin instead of golden and shatteringly crisp, you're likely dealing with one of three issues: residual moisture, insufficient heat, or improper basting.
First, double-check that you patted the skin completely dry with two layers of paper towels—even a thin film of moisture prevents browning. I once made this mistake and ended up with skin that was more rubbery than crisp. 🔥
Next, verify your oven temperature using an oven thermometer—many home ovens run 25°F cooler than their displayed temperature. If your oven isn't reaching 425°F, increase the heat to 450°F and try again.
Finally, ensure you're basting with cold butter every 15 minutes—warm butter won't create the same crispy texture. For extra insurance, broil the chicken for 2-3 minutes at the end on high heat.
Meat Too Dry?
Overcooking is the most common cause of dry chicken legs. The key is monitoring the internal temperature—remove them immediately when they hit 165°F at the thickest part of the thigh. I recommend using a meat thermometer like the Thermoworks Smoke for accuracy.
If your chicken is dry, try reducing the cooking time by 5 minutes and checking earlier. Another trick is to add a ½ cup water to the baking sheet to create steam, which helps retain moisture.
For extra juiciness, baste the chicken with melted butter mixed with 1 tablespoon chicken broth during the final 10 minutes of cooking. This adds moisture while keeping the skin crispy.
If you're concerned about timing, consider cooking the legs to 155°F (they'll continue cooking while resting), then finish them under the broiler for 3-5 minutes to crisp the skin without overcooking the meat.
Uneven Cooking?
Uneven browning or cooking often stems from poor air circulation. Always place your chicken legs on a wire rack inside the baking sheet—this allows heat to circulate underneath and prevents soggy bottoms. If you notice one side browning faster than the other, rotate the pan halfway through cooking.
I also recommend using a rimmed baking sheet to prevent juices from dripping onto the oven rack below.
For stubborn uneven spots, try this pro trick: After 30 minutes of cooking, flip the chicken legs skin-side down and continue roasting for another 15 minutes. This ensures even browning on all surfaces.
If your oven has hot spots, consider using the middle rack instead of the top or bottom. For convection ovens, reduce the temperature by 25°F and check for doneness 5-10 minutes earlier.
Butter Not Melting Properly?
If your basting butter remains in clumps or doesn't create that glossy, golden finish, it's likely not cold enough when you start. Always cube the butter and keep it in the freezer until you're ready to baste.
I like to use European-style unsalted butter like Plugrá because it has a higher fat content, which promotes better browning. If the butter burns before melting, reduce the oven temperature to 400°F and baste more frequently with smaller amounts.
For an alternative approach, try basting with olive oil mixed with melted butter (a 1:1 ratio) instead of butter alone. This combination creates a more stable fat that browns beautifully while adding extra flavor.
Another tip: Use a basting brush to spread the melted butter evenly over the skin—this ensures complete coverage and better browning.
Nutrition facts
Frequently asked questions
Can I use bone-in or boneless chicken legs for this recipe?
This recipe is designed specifically for bone-in, skin-on chicken legs—the bone helps retain moisture and the skin creates that irresistible crispy texture. Boneless legs will cook faster and may not develop the same satisfying crunch. If you only have boneless, reduce the cooking time by about 10 minutes and watch closely for doneness.
What's the best way to check if the chicken is fully cooked?
Use a meat thermometer to check the internal temperature at the thickest part of the thigh—it should read 165°F. Never rely on visual cues alone, as the skin can brown before the meat reaches a safe temperature. If you don't have a thermometer, cut into the thickest part and check for clear juices (no pink) and firm, white meat.
Can I make this recipe ahead of time?
Cooked chicken legs reheat beautifully! Store them in an airtight container in the fridge for up to 3 days, or freeze for 3 months. To reheat, bake at 350°F for 10-15 minutes covered loosely with foil. For best texture, avoid microwaving—it makes the skin rubbery. The skin may lose some crispiness when reheated, but the meat stays juicy.
Why do my chicken legs turn out dry?
Overcooking is the #1 cause of dry chicken. Remove them immediately when they hit 165°F—they'll continue cooking while resting. Another trick: Add ½ cup water to the baking sheet to create steam, which helps retain moisture. For extra juiciness, baste with melted butter mixed with 1 tablespoon chicken broth during the final 10 minutes of cooking.
Can I use this method for chicken thighs instead?
Chicken thighs work perfectly with this technique—they're even more forgiving and develop incredible crispy skin. Increase cooking time by 10-15 minutes (about 55-60 minutes total) since thighs have more fat and cook slower. The basting method and high heat will create the same amazing results. For extra flavor, add ½ teaspoon smoked paprika to the seasoning mix.