Side Dishes
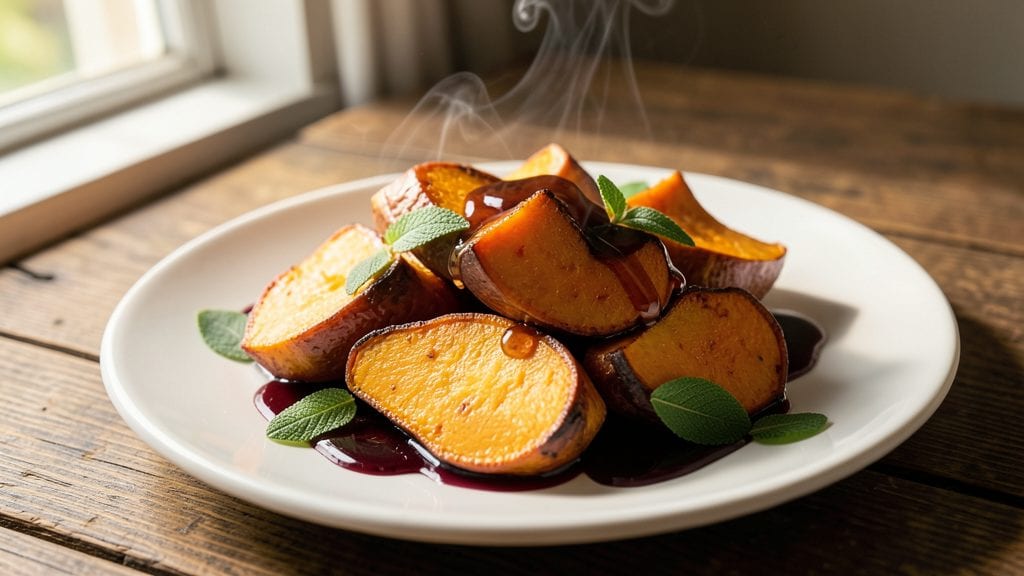
This baked butternut squash recipe transforms humble squash into a caramelized, crispy-edged centerpiece that rivals any restaurant side dish. The secret lies in high-heat roasting that creates a perfect balance between tender flesh and golden-brown edges—no soggy squash here.
I developed this method after years of experimenting with oven techniques, and it consistently delivers that coveted texture professionals pay for.
The process is simpler than it sounds: halved squash roasts on a sheet pan at 425°F for 40 minutes, with a drizzle of olive oil and sprinkle of salt to enhance natural sweetness. No peeling required—just scrub, halve, and roast.
The result? Buttery, melt-in-your-mouth squash with edges that crisp just enough to add satisfying texture. This is the kind of side that makes vegetarians ask for seconds and meat lovers forget it's not the main event.
What makes this recipe stand out is its versatility—serve it as a side with roasted chicken, puree it into soups, or pile it onto grain bowls for a hearty vegetarian meal.
The natural sweetness pairs beautifully with savory elements like sage, pecans, or sharp cheddar. Once you try this method, store-bought squash will never satisfy again. Let's get to the oven.
For extra flavor, try brushing the squash with maple syrup or balsamic glaze before roasting. The caramelized edges become even more complex, and the sweetness balances perfectly with savory dishes. This recipe delivers restaurant-quality results with minimal effort—proof that professional techniques can be simple when you know the right approach.
Ingredients for baked butternut
Eight simple ingredients transform ordinary squash into restaurant-worthy caramelized perfection with crispy edges.
| Ingredient | Amount | Notes |
|---|---|---|
| Butternut Squash 🍠 | 1 ½ lb | Medium-sized, scrubbed clean |
| Extra-Virgin Olive Oil 🫒 | ½ cup | High quality, fruity variety |
| Kosher Salt 🧂 | 1 ½ tsp | Fine grain preferred |
| Fresh Sage Leaves 🌿 | ¼ cup | Chopped, stems removed |
| Pure Maple Syrup 🍯 | 1 tbsp | Grade A or B preferred |
| Balsamic Glaze 🍷 | 1 tbsp | For optional finishing |
| Pecans 🥜 | ¼ cup | Toasted, chopped optional |
| Sharp Cheddar Cheese 🧀 | ¼ cup | Shredded, for serving |
| Ground Black Pepper 🌶️ | ½ tsp | Freshly ground preferred |
The squash is the star—look for medium-sized butternuts weighing 1.5 pounds each, with smooth skin and no soft spots. Local farmers markets often have the freshest selection, but any grocery store squash will work if it's firm and heavy for its size. The extra-virgin olive oil matters here—California avocado or Italian varieties have the best flavor. Fresh sage is ideal, but dried works at one-third the amount if you're in a pinch. For the maple syrup, Grade A has a lighter flavor that won't overpower, while Grade B offers deeper caramel notes perfect for this recipe.
No maple syrup? Honey works equally well, though it has a slightly different flavor profile. Short on pecans? Toasted walnuts or candied pumpkin seeds add a similar crunch. The balsamic glaze is optional but recommended—Trader Joe's has an excellent pre-made version if you don't want to reduce your own. For the cheddar, sharp varieties like Cabot or Tillamook melt beautifully, while mild cheddars can be too bland. The black pepper should be freshly ground—pre-ground loses its punch quickly. If you're making this ahead, skip the pecans and cheese until serving to maintain crispness.
Roasted squash keeps well for 4-5 days in the fridge, though the texture softens slightly over time. For longer storage, portion into airtight containers and freeze for up to 3 months. Reheat gently in the oven or microwave until warmed through. The pecans and cheese should be added fresh to prevent sogginess—store them separately in the fridge if prepping ahead. This dish reheats beautifully, making it perfect for meal prep. For extra restaurant flair, serve with a sprinkle of flaky sea salt right before eating.
Why You'll Love This Recipe
- One-Pan Magic: I swear by this recipe when I’m too tired to wash dishes. Toss the squash cubes in olive oil, salt, and sage, then let the oven do the work—no pots, no pans, just golden perfection waiting for you.
- Sweet-Savory Balance: That maple syrup drizzle isn’t just for show—it caramelizes into a sticky, buttery glaze that cuts through the squash’s natural sweetness. Honestly, the first bite makes me pause mid-chew.
- Meal Prep Hero: Roast a big tray on Sunday, and you’ve got lunch for days. The squash keeps its texture for 4-5 days in the fridge, so it’s my go-to when I’m too busy to cook.
- Budget-Friendly Luxury: Butternut squash is cheaper than takeout, and these ingredients stretch further than you’d think. I’ll be real: it’s the one fancy-feeling dish I make when my wallet’s tight—but no one knows.
Step-by-step instructions for baked butternut squash with crispy edges
Transform simple butternut squash into caramelized sweetness with perfectly crispy edges using this foolproof method.
Prep and Cut the Squash for Even Cooking
Preheat your oven to 425°F for maximum crispiness. Cut the 1.5 lb butternut squash in half lengthwise, then scoop out and discard the seeds. Place each half cut-side down on a cutting board and slice into ½-inch thick half-moons. You should end up with about 12-15 pieces depending on the squash's size.
Arrange the squash pieces on a rimmed baking sheet in a single layer, leaving about ½ inch between each piece. This spacing ensures even browning and prevents steam from making the edges soggy. Real talk: if you crowd the pan, you'll end up with uneven cooking and lost crispiness.
Season and Roast Until Tender
Drizzle the squash pieces evenly with 0.5 cup extra-virgin olive oil, then sprinkle with 1.5 tsp kosher salt and 0.5 tsp ground black pepper. Toss gently to coat all surfaces, making sure the oil penetrates the cut edges. The oil helps create that beautiful caramelization while keeping the flesh moist.
Roast for 25-30 minutes until the edges are deep golden brown and a knife slides in easily with just slight resistance. You'll see the edges start to crisp while the centers remain tender. Here's the thing—don't walk away during this time. Check at the 20-minute mark because oven temperatures vary, and you want that perfect balance of crispy exterior and creamy interior.
Add Aromatics for Depth of Flavor
After the initial roasting, remove the baking sheet from the oven. In a small bowl, combine the 0.25 cup chopped fresh sage leaves with 1 tbsp pure maple syrup. Drizzle this mixture evenly over the squash pieces, then return the sheet to the oven. Bake for another 10-15 minutes until the sage is fragrant and the squash is fully tender.
This step is where the magic happens. The sage adds an earthy aroma that pairs perfectly with the natural sweetness of the squash, while the maple syrup enhances the caramelization. The syrup also helps create a subtle glossy finish on the squash pieces. Don't skip this—it makes all the difference in flavor complexity.
Finish with Crunchy Toppings
While the squash finishes baking, toast the 0.25 cup pecans in a dry skillet over medium heat for 3-4 minutes until fragrant and lightly golden. Watch them carefully—they burn quickly. Remove from heat and set aside.
Once the squash is tender, transfer it to a serving platter. Sprinkle the toasted pecans evenly over the top, then finish with 0.25 cup shredded sharp cheddar cheese and a drizzle of 1 tbsp balsamic glaze. The cheese adds a sharp contrast to the sweet squash, while the balsamic glaze ties everything together with its tangy sweetness. Serve immediately while the squash is still warm and the toppings are crisp.
Pro Tips For Making Baked Butternut
- Cut Evenly, Roast Fast: Slice the squash into ½-inch thick half-moons—thicker pieces stay gummy, thinner ones burn before tenderizing. Use a sharp knife and work in batches if needed; I learned this the hard way when my first batch turned to mush because I rushed the prep.
- Salt the Squash First: Toss the raw butternut with 1 teaspoon kosher salt per pound right after slicing. Let it sit for 10 minutes while you preheat the oven—this draws out moisture, ensuring crisp edges instead of soggy ones. (Yes, even if you’re impatient like me.)
- Don’t Overcrowd the Pan: Spread the squash in a single layer with space between pieces. If your pan is small, roast in batches—overlapping slices steam instead of caramelizing. I skip this rule sometimes, and the result is always dull, uncooked-looking edges.
- Drizzle Maple After Roasting: Add the maple syrup in the last 5 minutes of baking, not at the start. The heat will concentrate its flavor without burning it into bitterness. Fresh sage leaves tossed in at this stage? They’ll crisp up beautifully—no need to pre-cook them.
Serving suggestions for leftovers
Grain Bowl Base
This caramelized squash makes an incredible base for grain bowls—just pile it alongside warm quinoa or farro, then top with grilled chicken, avocado slices, and a drizzle of tahini-lemon dressing. The sweetness balances the earthy grains perfectly, while the crispy edges add satisfying texture.
I often double the recipe for meal prep because it reheats beautifully in the microwave for 2-3 minutes on high. 🥗
Protein Pairings
For a vegetarian main, serve the squash alongside crispy tofu or seared tempeh—the nutty flavors complement the squash's natural sweetness. Meat lovers will adore it with herb-roasted turkey breast or smoked salmon.
I like to add a sprinkle of everything bagel seasoning to the salmon for extra depth. The key is to balance the squash's richness with lean, flavorful protein. 🍽️
Cheesy Casserole Twist
Transform this into a comforting casserole by layering the roasted squash with cream cheese, sharp cheddar, and a sprinkle of breadcrumbs before baking at 375°F for 15 minutes until bubbly.
Top with extra pecans and a drizzle of maple syrup for a sweet-savory finish. This works perfectly as a side for Thanksgiving or holiday meals. 🧀
Soup Upgrade
Save half the roasted squash for soups—simply blend it with vegetable broth, garlic, and a splash of cream for an instant butternut squash soup. The caramelized edges add depth without needing extra sugar.
I like to finish with a swirl of crème fraîche and a crack of black pepper for brightness. This shortcut saves hours of simmering while delivering restaurant-quality flavor. 🥘
Bread Service
Serve the squash warm on toasted sourdough or brioche with a smear of herb butter for an elegant appetizer. The crispy edges cut through the bread's richness, while the sweet squash balances the savory butter.
Garnish with extra pecans and a sprinkle of flaky sea salt for a sophisticated touch that feels like a chef's special. 🍞
Dessert Surprise
Don’t stop at savory—this squash also shines in desserts! Toss the roasted pieces with vanilla ice cream, toasted coconut flakes, and a drizzle of honey***. The warm squash contrasts beautifully with cold ice cream, creating a texture play that’s oddly addictive.
For extra flair, add a pinch of cinnamon and cardamom to the ice cream before serving. 🍦
Nutrition facts
Frequently asked questions
Do I need to peel butternut squash before baking?
No peeling required! The skin stays intact during roasting and adds subtle texture. Simply scrub the squash clean with a vegetable brush to remove dirt, then cut into halves or cubes. The skin becomes tender and slightly caramelized, adding depth to the flavor. Just avoid squash with soft spots or cuts in the skin.
Can I bake butternut squash at a lower temperature?
Yes, but expect longer cooking times. For 400°F, roast for 45-50 minutes instead of 25-30 minutes at 425°F. Lower temps prevent crispy edges, but work well for soups or purees where texture isn't critical. The key is patience—check tenderness with a knife at 40 minutes if using 400°F.
What if my squash turns out mushy instead of crispy?
Overcrowding the pan or covering with foil too early causes soggy squash. Always leave ½-inch space between pieces and remove foil after 20 minutes to allow moisture to escape. For extra crispiness, broil for 2-3 minutes at the end. The secret is high heat and proper airflow.
How do I store leftover roasted squash?
Keep roasted squash in an airtight container for 4-5 days in the fridge. For longer storage, freeze for up to 3 months. Reheat gently in the oven at 350°F for 10 minutes to restore texture. Add toppings fresh to prevent sogginess—store pecans and cheese separately until ready to serve.
Can I substitute maple syrup with something else?
Use honey (equal amount) or brown sugar mixed with water (1:1 ratio). For a savory twist, try balsamic vinegar or soy sauce instead. The key is enhancing caramelization—just adjust sweetness to taste. The maple syrup adds natural depth that complements the squash's sweetness perfectly.