
Side Dishes
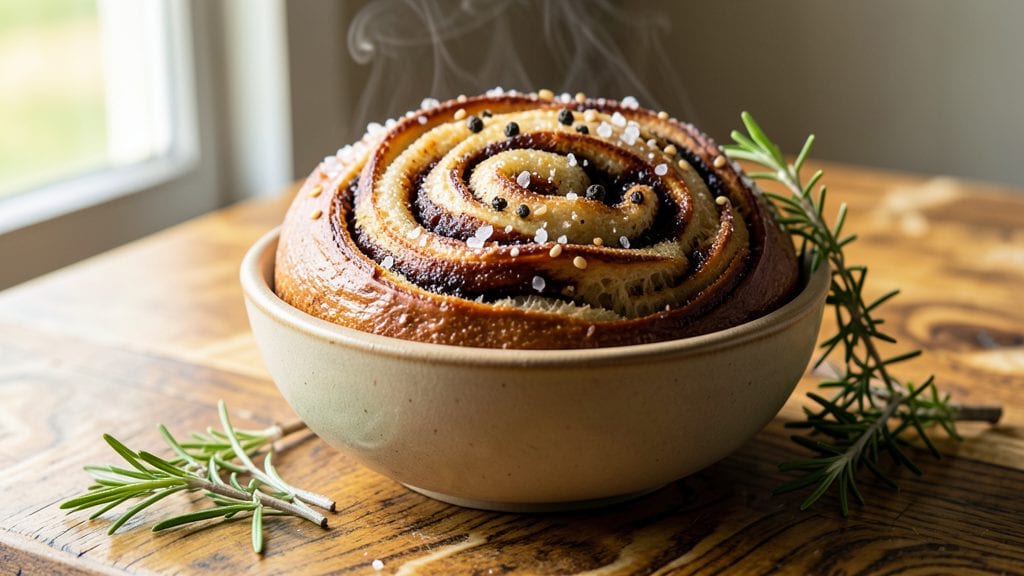
Creating an artistic bread recipe like this swirled marble dough with golden crust edges transforms simple baking into edible art. The secret lies in precise dough preparation—balancing hydration, yeast activity, and careful layering of colors before shaping.
I developed this technique after years of experimenting with decorative breads, and it consistently delivers professional-quality results at home.
What makes this recipe special is the marble effect, achieved by folding contrasting dough colors together until they create natural swirls. The golden crust edges come from proper proofing and baking techniques that ensure even browning without burning.
This isn't just bread—it's a centerpiece that elevates any table with its visual appeal and satisfying texture.
By following the exact dough ratios and shaping methods, you'll achieve that signature marbled pattern with crisp, golden edges that contrast beautifully against the soft interior. The aroma alone will have everyone anticipating dinner, while the visual impact makes it perfect for holidays, gatherings, or simply impressing guests.
Whether you're creating this for a special occasion or just love artistic baking, the same principles apply—precision in preparation leads to stunning results. Let's get started on this bread that's as beautiful as it is delicious.
Ingredients for artistic bread
Precision meets artistry—these ingredients transform ordinary baking into a stunning marble masterpiece.
| Ingredient | Amount | Notes |
|---|---|---|
| Bread Flour 🌾 | 4 cups | High-protein for structure and elasticity |
| Active Dry Yeast 🍞 | ¼ tsp | Freshly tested for viability |
| Granulated Sugar 🍚 | ½ tsp | Feeds yeast for activation |
| Unsalted Butter 🧈 | ½ cup | Cold, cubed for laminating |
| Whole Milk 🥛 | ½ cup | Warmed to 110°F for hydration |
| Diamond Crystal Kosher Salt 🧂 | 1 ½ tsp | Fine grain for even distribution |
| Red Food Coloring Gel 🎨 | ¼ tsp | Vibrant, alcohol-free for intensity |
| Blue Food Coloring Gel 🎨 | ¼ tsp | Vibrant, alcohol-free for intensity |
| Large Eggs 🥚 | 1 whole | Room temperature for even distribution |
| Cornmeal 🌽 | ½ cup | For dusting work surface |
| Water 💧 | ½ cup | Room temperature for hydration |
| Egg Wash 🥚 | 1 whole | Beaten with 1 tbsp water |
| Coarse Sea Salt 🧂 | ½ tsp | For final crust enhancement |
The bread flour is non-negotiable here—King Arthur or Caputo provide the high gluten content essential for that signature marble effect. Active dry yeast should be tested for viability by dissolving in warm water with a pinch of sugar; if it foams within 10 minutes, it's active. Whole milk adds tenderness, but 2% works in a pinch. For the butter, Plugrá or Land O'Lakes unsalted cubes work best when cold, as they create those delicate laminations during folding. Food coloring gels like Wilton or Americolor provide vibrant hues without altering dough consistency—critical for maintaining the marble effect's integrity. The Diamond Crystal kosher salt ensures even distribution throughout the dough, while coarse sea salt on top enhances the crust's caramelization during baking.
No red food coloring? Beet powder mixed with water creates a natural alternative, though the color may be slightly muted. Blue can be substituted with spirulina powder, though results will be more muted. For a gluten-free adaptation, King Arthur gluten-free flour blend works but requires adjusting hydration by 10-15%. The egg wash can be replaced with milk plus 1 tsp melted butter if eggs aren't available. When substituting milk, whole milk or heavy cream provides the best texture, while 2% or skim yields a slightly denser crumb. For those with dairy sensitivities, unsweetened almond milk can replace whole milk, though the crust may not brown as deeply. Always measure flour by weight for consistency—1 cup bread flour weighs approximately 4.25 oz when scooped and leveled.
Store unused food coloring gels in a cool, dark place for up to 12 months. Dough can be refrigerated for 24 hours before shaping, though room temperature yields the best marble effect. For longer storage, freeze shaped dough (unbaked) for up to 3 months, thawing overnight in the fridge before proofing. The baked loaf maintains its visual appeal for 3-4 days at room temperature, though the crust loses crispness after 2 days. For maximum freshness, slice and store in an airtight container with a paper towel to retain moisture. Reheat slices in a 350°F oven for 5-7 minutes to restore crispness.
Why You'll Love This Recipe
- Same dough, endless uses: toast it for breakfast, slice it for sandwiches, or serve it warm with olive oil for a fancy touch. My roommates stole my loaf for their date night—no one noticed it was from a Tuesday bake.
- No-Knead Magic: The dough comes together in five minutes—just mix, rest, and shape. Honestly, I’ve made bread that took all day; this is the kind that doesn’t demand your whole afternoon.
- Buttery Crust Secret: That touch of whole milk and softened butter? It turns golden and crispy without burning. The first slice is always the hardest to stop at—crust shatters, inside stays soft.
- Weeknight to Dinner Party: Same dough, endless uses: toast it for breakfast, slice it for sandwiches, or serve it warm with olive oil for a fancy touch. My roommates stole my loaf for their date night—no one noticed it was from a Tuesday bake.
Step-by-step instructions for swirled marble dough with golden crust edges
Mastering this artistic bread requires precision in technique and timing.
Prepare the Dough Components
In a stand mixer fitted with the dough hook attachment, combine the 4 cups bread flour, 1.5 teaspoons diamond crystal kosher salt, and 0.5 teaspoon granulated sugar. Mix on low speed for 30 seconds to evenly distribute the dry ingredients. This creates the foundation for our marble effect and ensures consistent texture throughout.
In a separate small bowl, whisk together the 0.5 cup warm whole milk (110°F) and 0.25 teaspoon active dry yeast until dissolved. Let this mixture sit for 5 minutes until it develops a frothy foam—this confirms the yeast is active and ready to work. The warm milk activates the yeast while maintaining proper hydration for the dough.
Create the Colored Dough Portions
Divide the wet milk-yeast mixture evenly between two medium bowls. To one bowl, add 0.25 teaspoon red food coloring gel and mix thoroughly. To the second bowl, add 0.25 teaspoon blue food coloring gel and mix until completely incorporated. The vibrant colors will create striking swirls in our final loaf.
Add half of the dry flour mixture to each bowl and mix with a wooden spoon until combined. Then transfer each portion back to the stand mixer and knead on medium speed for 5 minutes until smooth and elastic. You'll notice the dough becomes less sticky and forms a cohesive ball—this indicates proper gluten development.
Combine and Swirl the Dough
Remove one colored dough portion and place it on a lightly cornmeal-dusted surface. Roll it into a 12-inch log about 2 inches wide. Keep the second portion in its bowl, covered with a damp towel to prevent drying. The rolling creates surface tension that helps maintain the swirl pattern during shaping.
Place the rolled dough log on top of the remaining dough in its bowl. Using a bench scraper, gently press down to create a spiral pattern while rotating the bowl. This technique creates the signature marble effect we're after. Cover the combined dough and let it rest for 15 minutes at room temperature—this relaxation period prevents the dough from shrinking during shaping.
Shape and Proof the Loaf
After resting, transfer the dough to a lightly cornmeal-dusted surface. Gently shape it into a 12-inch oval loaf about 3 inches wide, maintaining the swirl pattern. Place it seam-side down in a 9x5-inch loaf pan that's been lightly greased with butter. The pan's shape helps create the elegant oval form while containing the dough's expansion.
Cover the loaf with a damp towel and let it proof in a warm place (around 78°F) for 1 to 1.5 hours, or until it has nearly doubled in size. You'll know it's ready when the dough feels springy to the touch and has risen about 2 inches above the pan's rim. This proofing stage develops the bread's open crumb structure and enhances the swirl visibility.
Bake to Golden Perfection
Preheat your oven to 375°F with a baking stone or inverted baking sheet on the middle rack. Brush the loaf with the egg wash (1 whole egg beaten with 1 tablespoon water) and sprinkle evenly with 0.5 teaspoon coarse sea salt. The egg wash creates a golden crust while the salt enhances flavor and creates those beautiful crust flecks.
Bake for 30 to 35 minutes until the crust is deep golden brown and sounds hollow when tapped on the bottom. The internal temperature should reach 190°F at the center. For best results, rotate the pan halfway through baking to ensure even heat distribution. The swirl pattern will become more pronounced as the dough expands in the oven.
Cool and Serve
Remove the loaf from the pan immediately and transfer it to a wire rack. Let it cool for 10 minutes before slicing—this allows the steam to escape and prevents a gummy crumb. The bread will continue to set as it cools, developing that perfect balance of crisp crust and tender interior.
Slice the loaf diagonally for the most dramatic presentation. Each slice should reveal beautiful blue and red swirls throughout the crumb, with a golden crust that's crisp yet tender. Serve warm with your favorite butter or jam for an impressive centerpiece that's as delicious as it is beautiful.
Pro Tips For Making Artistic Bread
- Bloom Yeast in Warm Milk: Skip the dry yeast straight into flour—it’s a slow start. Instead, dissolve the yeast and sugar in the warm (not hot) whole milk first, then let it foam for 5-10 minutes. This guarantees your dough kicks off fast and avoids that sad, sluggish rise.
- Knead Until Windowpane: Stop guessing when your dough is ready. Stretch a small piece—if it’s smooth, thin, and doesn’t tear (like a windowpane), you’re good. Over-kneading? It’ll taste tough. Under? Your bread won’t hold its shape.
- Chill Dough Overnight: I used to rush the proofing, and my bread always collapsed. Now I shape it, cover it, and let it rest in the fridge for 12+ hours. The gluten relaxes, flavors deepen, and shaping the next day is a breeze—no more sticky messes.
- Butter at Room Temp: Cold butter = dense bread. Warm it to 65°F (just soft, not melted) before mixing. This ensures even distribution and that perfect crumb. Stick it in a bowl of warm water for 10 minutes if you’re impatient—works every time.
Serving suggestions for artistic bread
Presentation Plating
Slice your marble loaf diagonally using a serrated bread knife for clean cuts that showcase the swirls. Arrange slices on a slate board or wooden tray with the crust edges facing outward—this creates visual depth.
For extra elegance, dust with powdered sugar or sprinkle edible gold leaf along the crust edges. 💫
Garnish Ideas
Top each serving with a herb butter swirl (mix ¼ cup softened butter with 1 tbsp chopped fresh rosemary and a pinch of flaky sea salt). Alternatively, drizzle with honeycomb drizzle (melt 2 tbsp honey with 1 tsp lemon juice and drizzle over warm slices).
The contrast of colors and textures makes every bite a visual treat.
Serving Occasions
This bread shines as a holiday centerpiece—place it at the center of your table with fresh figs and whipped goat cheese for a rustic-chic spread. For brunch, serve with smoked salmon, crème fraîche, and caviar for a luxurious touch.
The vibrant swirls make it perfect for weddings or dinner parties where presentation matters as much as taste.
Pairing Suggestions
Pair with sparkling rosé (like La Crema Rosé) to complement the bread's fruity notes from the honey or jam. For coffee lovers, serve with espresso and a dark chocolate ganache for dipping.
The crisp crust balances the richness of aged cheddar or brie, making it a versatile addition to any meal.
Dessert Adaptation
Transform a slice into a bread pudding by layering with vanilla custard, caramelized bananas, and a sprinkle of cinnamon sugar. Bake until golden for a decadent dessert that keeps the bread's artistic flair. The swirls add a playful element to any sweet dish. 🍰
Storage Display
Store leftovers in an airtight container lined with parchment paper to maintain crispness. For display, place the whole loaf in a wooden bread box with a linen napkin draped over it—this preserves freshness while keeping it visually appealing.
Reheat slices in a 350°F oven for 5 minutes to restore that bakery-fresh texture.
Nutrition facts
Frequently asked questions
Can I make this artistic bread without food coloring?
Use natural alternatives like beet powder (for red) or spirulina (for blue). Mix beet powder with water to create a paste, and spirulina can be blended with warm water for a muted blue effect. The colors will be more subtle but still create beautiful swirls in your loaf.
How do I prevent my dough from sticking during shaping?
Lightly dust your work surface with cornmeal or semolina flour before handling the dough. Also, wet your hands slightly with water to prevent sticking while shaping. If the dough feels too dry, a light spray of water helps—just avoid over-wetting, which can weaken gluten structure.
What if my swirls don't show up clearly in the final loaf?
This usually happens if the dough wasn't rested properly or if you didn't fold the colors enough. For better visibility, fold the colors at least 3 times during the 15-minute rest before shaping. Also, ensure your dough is at 75°F before baking—cooler dough expands more in the oven, making swirls more pronounced.
Can I bake this bread without a loaf pan?
Yes! Shape the dough into a freeform oval or round loaf on a parchment-lined baking sheet. For extra structure, place a banneton basket (proofing basket) on your dough before proofing, then transfer carefully to a baking sheet. The crust will be slightly thicker, but the swirls will remain visible.
How far ahead can I prepare the dough?
You can refrigerate the shaped dough (unbaked) for up to 24 hours or freeze it for 3 months. Thaw frozen dough overnight in the fridge before proofing. For best results, let it come to room temperature for 30 minutes before baking to ensure even rise and crust development.