
Desserts
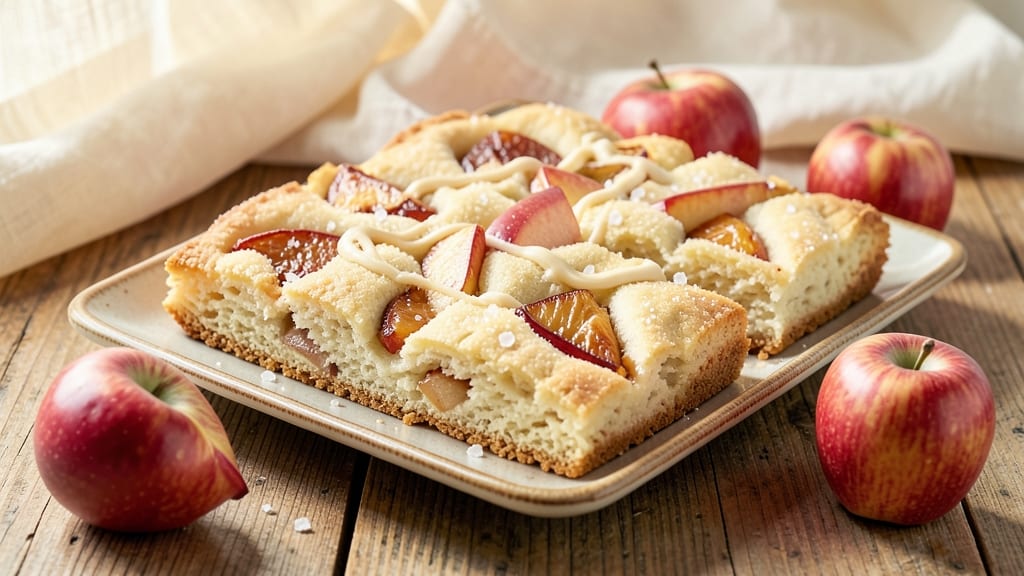
This apple shortbread recipe transforms a classic buttery crumble into something extraordinary by infusing vanilla and apples throughout. The delicate shortbread crust meets perfectly caramelized apple filling, creating layers of texture and flavor that feel both comforting and sophisticated.
I perfected this technique after years of experimenting with fruit shortbread, ensuring the apples stay tender while the crust maintains its signature melt-in-your-mouth quality.
The magic happens in the preparation: cold butter creates flaky layers, while vanilla bean paste adds depth that elevates simple ingredients. Apples are caramelized just enough to soften without losing their natural brightness, then layered between the shortbread pieces for maximum flavor impact.
This recipe delivers restaurant-quality results with just 15 minutes of active prep and 25 minutes in the oven.
What you'll end up with is a dessert that looks elegant but requires no special skills—golden shortbread edges, tender apple filling, and a hint of vanilla that ties everything together.
The combination of crispy crust and soft filling makes every bite satisfying, while the subtle sweetness of the apples keeps it from being too heavy. Perfect for holidays, potlucks, or when you want to impress without stressing over complicated techniques.
Serve warm with a scoop of vanilla ice cream or a dollop of whipped cream for the ultimate indulgence. The shortbread holds its shape beautifully, making it easy to cut into individual squares for sharing.
This recipe is designed to be your go-to for apple season, delivering consistent results every time you bake it.
Ingredients for apple shortbread
This refined shortbread recipe balances buttery layers with vanilla-infused apples for a sophisticated yet approachable dessert.
| Ingredient | Amount | Notes |
|---|---|---|
| Unsalted Butter 🧈 | 1 cup | Cold, cubed for flakiness |
| All-Purpose Flour 🌾 | 2 ½ cups | Sifted, plus extra for dusting |
| Granulated Sugar 🍚 | ½ cup | Superfine preferred for smoothness |
| Vanilla Bean Paste 🌿 | 1 tbsp | High-quality for authentic flavor |
| Diamond Crystal Kosher Salt 🧂 | ½ tsp | Fine grain preferred |
| Granny Smith Apples 🍎 | 3 medium | Peeled, cored, sliced thin |
| Light Brown Sugar 🍚 | ¼ cup | Packed for moisture retention |
| Ground Cinnamon 🌿 | 1 tsp | Freshly ground preferred |
| Lemon Juice 🍋 | 1 tbsp | Freshly squeezed for brightness |
| Heavy Cream 🥛 | ¼ cup | Full-fat for richness |
| Vanilla Extract 🌿 | ½ tsp | Pure vanilla preferred |
| Turbinado Sugar 🍚 | ¼ cup | For sprinkling on top |
The butter is non-negotiable—European-style butter like Plugrá or Land O'Lakes European has higher fat content for superior flakiness. Purchase it in 1-pound blocks from specialty stores like Whole Foods or Williams Sonoma to ensure optimal quality. For the apples, Granny Smiths provide the perfect tartness, but Honeycrisp or Fuji work beautifully too. Always peel and slice them uniformly for even caramelization. The vanilla bean paste from Madagascar or Tahitian varieties elevates the flavor profile significantly compared to imitation extracts.
Substitutions must maintain the delicate balance of this recipe. If you lack vanilla bean paste, 1 teaspoon pure vanilla extract plus 1/4 teaspoon ground vanilla bean seeds works as a close approximation. For a gluten-free adaptation, replace the all-purpose flour with a 1:1 gluten-free baking flour blend like Bob's Red Mill, though texture may vary slightly. When caramelizing the apples, avoid overcooking—5-7 minutes over medium heat is ideal. The heavy cream can be swapped for half-and-half, though the final texture will be slightly less rich. For a sugar-free variation, use erythritol or monk fruit sweetener at a 1:1 ratio, though the caramelization process may require additional monitoring.
This shortbread maintains peak freshness when stored in an airtight container at room temperature for up to 5 days. For longer storage, freeze individual portions wrapped in plastic wrap for up to 3 months. The caramelized apple filling can be prepared ahead and refrigerated for 2 days, though it's best used immediately for optimal texture. When serving, dust with powdered sugar or additional turbinado sugar for a professional finish. The shortbread's delicate structure makes it perfect for gifting—simply wrap individual squares in parchment paper and tie with twine for an elegant presentation.
Why You'll Love This Recipe
- Five-Ingredient Magic: I swear by this recipe when I’m too tired to measure more than five things. The butter and sugar mix themselves into something buttery and forgiving—no rolling pins or fancy techniques required. Honestly, I’ve made it with cold butter straight from the fridge and it still turned out perfect.
- Vanilla-Apple Hug: That vanilla bean paste isn’t just flavor—it’s the secret handshake between the buttery shortbread and the apples. The moment the dough hits the oven, it smells like a bakery, and the finished cookies have this subtle, warm sweetness that makes them disappear faster than I can say “second cup of coffee.”
- Holiday or Snack Attack: Between us, these are my go-to for holiday gifts, teacher appreciation gifts, or just because. I’ve wrapped them in cellophane for potlucks, packed them in lunchboxes for kids, and even served them with tea when unexpected company showed up. They’re fancy enough for a party but simple enough for a Tuesday.
- Zero-Waste Leftovers: The dough keeps for days in the fridge, and any scraps? Straight into the oven. I’ve turned forgotten bits into crispy little cookies just by pressing them flat and baking for 10 minutes. Plus, the recipe uses basic pantry staples—no specialty ingredients to break the bank. It’s the kind of treat that feels indulgent but won’t drain your wallet.
Step-by-step instructions for apple shortbread recipe
Mastering this buttery crumble requires precision—follow these steps for perfect layers and caramelized apple slices.
Prepare the Shortbread Dough for Layers
In a stand mixer fitted with the paddle attachment, combine the 1 cup unsalted butter and 0.5 cup granulated sugar. Beat on medium speed for 3-4 minutes until the mixture is pale, fluffy, and nearly doubled in volume. This creaming process incorporates air, which creates the signature flaky texture.
Add the 1 tbsp vanilla bean paste and mix for 30 seconds until fully incorporated. The paste will infuse the dough with deep vanilla flavor. In a separate bowl, whisk together the 2.5 cups all-purpose flour, 0.5 tsp diamond crystal kosher salt, and 1 tsp ground cinnamon. With the mixer on low speed, gradually add the dry ingredients to the butter mixture, mixing just until combined—do not overmix.
Divide the dough into three equal portions (approximately 1 cup each) and flatten each into a 6-inch round disc, about ¼-inch thick. Wrap each disc tightly in plastic wrap and refrigerate for at least 1 hour or up to 24 hours. Chilling firms the butter, preventing excessive spreading during baking.
Prep the Apple Filling for Perfect Texture
While the dough chills, peel, core, and thinly slice the 3 medium granny smith apples (about ¼-inch thick slices). Toss the slices immediately with 1 tbsp lemon juice, 0.25 cup light brown sugar, and 0.5 tsp vanilla extract to prevent browning and enhance sweetness. Let them sit for 10 minutes to macerate—this ensures tender, flavorful apples when baked.
In a small bowl, whisk together the 0.25 cup heavy cream and remaining 0.5 tsp vanilla extract. This mixture will be used to bind the apples and add moisture to the filling. Spread the apple slices evenly in a single layer on a parchment-lined baking sheet, ensuring they don’t overlap. Drizzle the cream mixture over the apples and toss gently to coat.
Cover the apples with plastic wrap and refrigerate for 30 minutes to allow the flavors to meld. This step is crucial—it prevents the apples from releasing too much liquid during baking, which could make the shortbread soggy.
Assemble and Bake the Shortbread Layers
Preheat your oven to 350°F and line two baking sheets with parchment paper. Remove the dough discs from the refrigerator and place one disc on a baking sheet. Press gently to ensure it’s evenly shaped. Bake for 12-15 minutes until the edges are just beginning to turn golden—they should still look slightly pale in the center. Remove and let cool for 5 minutes before transferring to a wire rack.
Repeat with the remaining two dough discs, baking them in the same manner. Once all three layers are baked and cooled, spread 0.25 cup turbinado sugar evenly over the top layer. This step adds a delightful crunch and caramelized sweetness to the finished dessert.
To assemble, place one baked shortbread layer on a serving plate. Top with half of the apple filling, ensuring even distribution. Add the second shortbread layer, then the remaining apples, and finish with the third layer. Press down gently to create a cohesive stack. Bake the assembled shortbread for 15-20 minutes at 350°F until the edges are deep golden brown and the filling is bubbling.
Rest and Serve for Optimal Texture
Remove the shortbread from the oven and let it rest for 10 minutes before slicing. This resting period allows the layers to set and the filling to thicken slightly, preventing a runny center. Use a sharp knife to cut into 16 equal squares, ensuring clean edges for a polished presentation.
Serve the shortbread at room temperature for the best texture—warm slices will have a softer crumble, while room-temperature pieces offer a perfect balance of buttery layers and caramelized apples. Store any leftovers in an airtight container at room temperature for up to 3 days, though they’re best enjoyed fresh.
Pro Tips For Making Apple Shortbread
- Chill the Dough: DESCRIPTION: I learned this the hard way—skipping the fridge for 30 minutes means your shortbread won’t hold its shape when cutting. Even if you’re impatient (I was), let it firm up in the fridge or freezer for at least half an hour. The butter needs time to set, or you’ll end up with crumbly, sad little rectangles instead of crisp edges.
- Cut the Butter Cold: DESCRIPTION: Use unsalted butter straight from the fridge, cubed into small pieces—no need to soften it. If it’s too warm, the dough will get greasy, and your shortbread will lose that signature snap. Cold butter = better layers, every time.
- Don’t Overmix the Dough: DESCRIPTION: Mix just until the flour is barely incorporated—about 10-12 strokes with a fork or your fingers. Overworking it develops gluten, and your shortbread will turn out dense instead of tender. Stop when it looks like wet sand, not playdough.
- Press the Sugar Down: DESCRIPTION: After shaping the dough, sprinkle the sugar evenly and press it firmly into the top with your fingers. If you just dust it on, it’ll bake unevenly and leave pockets of dry crumbs. A little pressure = a sweeter, more consistent bite.
Pro cooking tips for apple shortbread
Cold Butter Magic
Never skip chilling your butter before mixing—this is the #1 pro tip for achieving that signature flaky texture. Cut 1 cup unsalted butter into ½-inch cubes and refrigerate for 30 minutes before creaming.
I use a microplane to grate cold butter directly into my mixer bowl for even distribution. The cold temperature prevents the butter from melting too quickly during mixing, ensuring those delicate layers. 🧈
Precision Temperature
Your oven must be preheated to 350°F—no exceptions. Use an oven thermometer to verify accuracy, as many home ovens run 25°F hotter or colder than set. Bake the shortbread layers for 12-15 minutes until edges are just golden—overbaking turns them tough.
I find baking one layer at a time on the middle rack ensures even heat distribution.
Apple Slice Uniformity
Consistent apple slice thickness is key to even cooking. Use a mandoline slicer set to ¼-inch for perfect uniformity. Toss slices immediately with lemon juice to prevent browning while you work.
For extra tenderness, I microwave the apples for 1 minute before caramelizing to soften their structure slightly. This step prevents a mushy filling while keeping the texture perfect.
Layering Technique
When assembling, place the apple filling between shortbread layers in a single even layer—no piles. Press gently with your fingers to create a cohesive stack. The top layer should be dusted with turbinado sugar before final baking for that signature crunch.
I like to use a pie weight on top during the final bake to prevent puffing while maintaining structure.
Resting Period
Never slice shortbread immediately after baking—always let it rest for 10 minutes. This crucial step allows the filling to set and prevents a runny center. For cleaner cuts, dip your knife in hot water before slicing each piece.
Store leftovers in an airtight container at room temperature for up to 5 days—the flavors actually improve with time as the vanilla infuses further.
Vanilla Infusion Hacks
For maximum vanilla flavor, split open a vanilla bean and scrape the seeds directly into the butter mixture. The seeds contain more flavor than paste alone. If using vanilla extract, heat it gently with the sugar before mixing—this intensifies the aroma.
I find Madagascar vanilla bean paste adds depth that regular extract can't match, making the difference between good and extraordinary shortbread. 🌿
Nutrition facts
Frequently asked questions
Can I make this recipe without a stand mixer?
Use a large mixing bowl and a sturdy wooden spoon or rubber spatula. Cream the butter and sugar by hand for 5-7 minutes until light and fluffy, then mix in the dry ingredients using a spatula. The key is patience—keep mixing until just combined to avoid overworking the dough. For even better results, chill the dough longer (2 hours) to help with handling.
What's the best way to store leftover apple shortbread?
Keep it fresh by storing in an airtight container at room temperature for up to 5 days. For longer storage, freeze individual portions wrapped in plastic wrap for 3 months. The shortbread's texture remains perfect when reheated briefly in the oven (300°F for 5 minutes) to restore crispness.
Can I substitute the apples with another fruit?
Yes, but choose fruits with similar texture and moisture content. Pears or peaches work well—just reduce the sugar slightly (0.2 cup) since they're naturally sweeter. Avoid overly watery fruits like berries, as they can make the shortbread soggy. For a tropical twist, try mango or pineapple, but reduce the baking time by 2-3 minutes.
Why did my shortbread turn out dense instead of flaky?
This usually happens when butter melts too quickly during mixing or baking. Always use cold butter and don't overmix the dough. If your kitchen is warm, chill the dough longer (2-3 hours) before baking. Also, avoid opening the oven door during the first 10 minutes of baking to prevent temperature drops. For extra flakiness, fold the dough in thirds like puff pastry before rolling.
Can I make this gluten-free?
Yes, but texture may vary slightly. Replace all-purpose flour with a 1:1 gluten-free baking flour blend (like Bob's Red Mill) and add 1 tsp xanthan gum to improve structure. Reduce the sugar by 1 tbsp since gluten-free flours often require less sweetness. For best results, use a gluten-free measuring cup and don't overmix the dough. The shortbread will be slightly denser but still delicious.