
Desserts
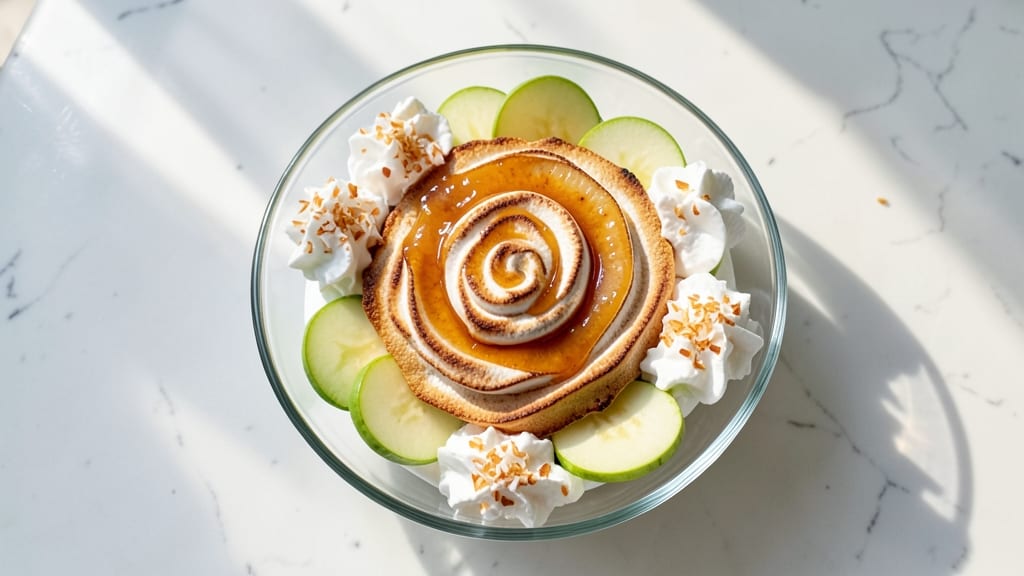
This apple pavlova recipe delivers a showstopping dessert with a crisp meringue shell and a vibrant kiwi-citrus filling that brightens every bite. The secret lies in baking the meringue at the perfect temperature—just 325°F—to achieve that signature crispy exterior while keeping the center light and airy.
I developed this version after years of experimenting, and it’s now my go-to for holidays or special occasions when I want to impress without stressing over complicated techniques.
The tangy kiwi-citrus filling is what truly elevates this classic dessert, cutting through the sweetness of the meringue and apples with a refreshing zing. You’ll start by whipping egg whites to stiff peaks, then carefully folding in sugar to create the signature crunch.
The apples are caramelized just enough to soften their texture while retaining a hint of tartness, balancing the creamy whipped cream topping. Every layer works together to create a dessert that’s both elegant and foolproof.
By the time you’re done, you’ll have a crispy meringue shell with golden edges and a tender interior, topped with glossy caramelized apples, bright kiwi slices, and fluffy whipped cream. The contrast of textures—crunchy, creamy, and juicy—makes this dessert unforgettable.
It’s the kind of showstopper that feels like a restaurant-quality creation but comes together with simple, professional techniques anyone can master.
Serve this pavlova at room temperature for the best texture, and don’t forget to garnish with fresh mint or a sprinkle of citrus zest for extra flair. The recipe scales easily for parties, and leftovers (if there are any) keep well for up to 24 hours in the fridge.
Here’s how to make it perfectly every time.
Ingredients for apple pavlova
Six ingredients for the meringue, eight for the filling—just enough to create restaurant-worthy dessert magic.
| Ingredient | Amount | Notes |
|---|---|---|
| Large Egg Whites 🥚 | 6 whole | Room temperature, no yolks |
| Granulated Sugar 🍚 | 1 ½ cups | Superfine preferred for smoothness |
| Cornstarch 🌾 | 1 tbsp | For meringue stability |
| White Vinegar 🍶 | ½ tsp | Stabilizes egg whites |
| Honey 🍯 | ¼ cup | Wildflower for depth |
| Granny Smith Apples 🍎 | 3 medium | Firm, unpeeled, cored |
| Unsalted Butter 🧈 | 2 tbsp | Full-fat for caramelization |
| Ripe Kiwis 🥝 | 4 whole | Bright green, peeled |
| Lemon Juice 🍋 | 2 tbsp | Freshly squeezed |
| Heavy Whipping Cream 🥛 | 1 ½ cups | Cold, full-fat preferred |
| Powdered Sugar 🍚 | ½ cup | For whipped cream |
| Fresh Mint Leaves 🌿 | ¼ cup | Chopped, for garnish |
| Orange Zest 🍊 | 1 tsp | Bright citrus flavor |
| Vanilla Extract 🌸 | ½ tsp | Pure vanilla preferred |
| Salt 🧂 | ¼ tsp | Fine sea salt |
The egg whites are non-negotiable. Room temperature is key—cold whites won’t whip properly. I always grab mine from Whole Foods for the freshest quality, but any store’s large carton works. The Granny Smith apples need to be firm—Red Delicious gets too mushy when caramelized. Look for bright green kiwis at Trader Joe's; they’re sweeter and riper than the regular grocery store ones. The honey? Wildflower has the most complex flavor profile—Manuka if you’re splurging. Store all fresh produce in the fridge until ready to use, but let the eggs sit out for 30 minutes before whipping.
No Granny Smith apples? Fuji or Honeycrisp work in a pinch, but they’ll caramelize faster. Short on kiwis? Mango puree at half the amount adds similar sweetness. The vinegar is crucial—apple cider vinegar works too, but white keeps the meringue crispier. For the whipped cream, Trader Joe's heavy cream is my go-to—it whips up fluffier than most brands. The powdered sugar should be 10X for best results, but regular works if that’s what you’ve got. The orange zest can be swapped for lemon zest, but orange has that extra brightness the pavlova needs.
The meringue keeps best in a cool, dry place for up to 2 days, but honestly it’s best eaten fresh. Store the filling components separately—whipped cream in an airtight container, fruit in sealed containers. If prepping ahead, assemble the pavlova just before serving to maintain that signature crisp. Leftover meringue shells? Crush them into crispy meringue cookies—trust me, they’re delicious. The fruit filling stays fresh for 1 day in the fridge, so plan accordingly.
Why You'll Love This Recipe
- No Whisk Arm Fatigue: I swear by this method—just egg whites, a splash of vinegar, and steady hands. No stand mixer required (though it helps if you’re feeling fancy). The meringue comes together faster than I can finish my morning coffee, and that crisp shell? Worth every minute of standing at the counter.
- Honey-Caramel Crunch Magic: That drizzle of honey isn’t just decoration—it’s the star. When it sets into a glossy, buttery caramel on top of the warm apples, it’s like dessert got a glow-up. Honestly, the first time I tasted it, I nearly dropped the plate. (Yes, even on a Tuesday night.)
- Weekend Crowd Pleaser: This isn’t your basic dessert. It’s the showstopper that actually feeds people—no one leaves hungry, and no one asks for seconds (okay, fine, they do). Perfect for brunch, potlucks, or when your in-laws drop by unexpectedly. Plus, the apples keep it fresh-tasting longer than store-bought pies.
- Meringue Leftovers Hack: Between us, the meringue shell lasts forever if you store it right. I’ve had mine sit in an airtight container for days—just add fresh fruit or a dollop of whipped cream when ready. And the best part? The sugar and cornstarch combo means it stays crisp, not soggy. Budget win, and zero waste.
Step-by-step instructions for apple pavlova recipe
Here's how to build that signature crispy shell with a luscious, tangy filling—every detail matters.
Prepare the Meringue Base for Maximum Crisp
Preheat your oven to 250°F with the rack positioned in the lower third. Line a baking sheet with parchment paper and draw a 6-inch circle as a guide using a plate or bowl. This low-and-slow approach ensures your meringue develops that signature crispy exterior without browning too quickly.
In a spotlessly clean mixing bowl, combine the 6 whole large egg whites and the 0.25 tsp salt. Using a stand mixer fitted with the whisk attachment, beat on medium speed until soft peaks form. Gradually add the 1.5 cups granulated sugar and the 1 tbsp cornstarch, adding 1 tablespoon at a time while mixing on high speed. This gradual addition prevents graininess and ensures a silky texture.
Once all sugar is incorporated, increase speed to high and whip for 8-10 minutes until the meringue forms stiff, glossy peaks that hold their shape when the whisk is lifted. The meringue should be thick enough to hold its shape when you lift the bowl—this is your crispy shell's foundation. Here's the thing—don't rush this step. The meringue needs proper aeration to develop that signature crisp texture.
Shape and Bake the Crispy Shell
Using a spatula, carefully transfer the meringue to the parchment circle you drew earlier. Shape it into a nest with slightly higher edges, creating a well in the center for the filling. This shape ensures even baking and proper support for the filling. Gently tap the baking sheet on the counter a few times to release any air bubbles that might have formed during transfer.
Bake for 1 hour 15 minutes at 250°F, then increase the temperature to 300°F and bake for another 15 minutes. The meringue is done when it's completely dry to the touch with a crisp exterior. Real talk: don't open the oven door during baking—temperature fluctuations can cause cracking. If you're unsure, gently press the top: it should spring back immediately without leaving an indentation.
Let the meringue cool completely on the baking sheet for 30 minutes before removing it. This gradual cooling prevents cracking and ensures structural integrity. The shell should be crisp enough to hold its shape when you lift it—this is your crispy promise delivered.
Prepare the Tangy Kiwi-Citrus Filling
While the meringue cools, prepare the filling by peeling and slicing the 4 whole ripe kiwis into thin rounds. Core and dice the 3 medium Granny Smith apples into ¼-inch pieces. Toss the fruit with 2 tbsp lemon juice and 1 tsp orange zest to prevent browning and enhance brightness. This acidity is key to balancing the sweetness of the meringue.
In a small saucepan, combine the 2 tbsp unsalted butter, 0.25 cup honey, and 0.5 tsp white vinegar. Cook over medium-low heat for 5-7 minutes until the butter melts and the mixture thickens slightly into a glossy sauce. Stir in the fruit mixture and let it simmer for 3 minutes to meld flavors. The sauce should coat the back of a spoon—this ensures perfect adhesion to the meringue.
Remove from heat and stir in the 0.5 tsp vanilla extract. Let the filling cool completely before assembling—this prevents melting the meringue shell. The filling should be at room temperature when you spread it, ensuring clean layers without soggy bottoms.
Assemble the Pavlova with Perfect Layers
Once the meringue shell is completely cool, carefully spread the kiwi-citrus filling into the center well, mounding it slightly. The filling should fit snugly without overflowing the edges. This is where precision matters—too much filling can cause the meringue to crack under pressure.
In a separate bowl, whip the 1.5 cups heavy whipping cream with the 0.5 cup powdered sugar until soft peaks form. Fold in the 0.25 cup chopped fresh mint leaves using a spatula, being careful not to deflate the cream. Spread this mint-infused cream over the fruit filling, creating an even layer that covers all exposed surfaces.
Chill the assembled pavlova in the refrigerator for at least 2 hours before serving. This chilling time allows the flavors to meld and the cream to set slightly, creating that perfect balance of textures. The final result should be a crispy meringue shell with a luscious, tangy filling that holds its shape beautifully.
Pro Tips For Making Apple Pavlova
- Whip Egg Whites Cold: Grab your bowl and place it in the freezer for 10 minutes before starting—yes, even if you’re impatient. Cold surfaces help stabilize the meringue, and I learned this the hard way after my first collapsed pavlova. Room-temperature egg whites? Skip it. You want structure, not sad pudding.
- Sift That Sugar: Don’t just dump the sugar into the egg whites—sift it first. Cornstarch clumps like a stubborn guest at a party if you don’t, and those lumps mean a grainy, uneven meringue. A fine sieve or even a clean tea strainer works. Trust me, your pavlova’s texture depends on this.
- Bake Low and Slow: Preheat your oven to 275°F (135°C), not the 350°F most recipes suggest. High heat makes the outside crisp before the inside sets, leading to cracks. Bake for 1 hour, then turn off the oven and let it cool inside with the door slightly ajar. This guarantees a crisp shell and a marshmallow center.
- Vinegar First, Then Honey: Mix the white vinegar into the egg whites before adding the sugar—this stabilizes the meringue from the start. After baking, drizzle the honey while the pavlova is still warm (but not hot), so it soaks in instead of pooling like syrup. Patience here makes all the difference.
Flavor customization for this recipe
Citrus Twist Variations
Swap the kiwi for 1 cup blood orange segments and 1 tbsp blood orange zest—the deep red hue and tart-sweet flavor create a stunning visual contrast. I also add 1 tsp cardamom to the honey butter sauce for a Middle Eastern-inspired twist. 🍊
For a zesty lemon-lime version, replace the orange zest with 1 tbsp lime zest and add 1 tbsp lime juice to the fruit mixture. Top with blueberries for a pop of color and extra tartness that cuts through the meringue's sweetness.
Spiced Apple Options
Infuse the caramelized apples with ½ tsp cinnamon and ¼ tsp nutmeg while cooking for a classic autumnal flavor. The spices deepen the apple's natural sweetness and pair beautifully with the meringue's crisp texture. 🍂
For a smoky depth, add ¼ tsp smoked paprika to the honey butter sauce. The subtle smokiness complements the crispy meringue and adds complexity to the filling without overpowering it.
Tropical Fruit Fusion
Replace the kiwi with 1 cup mango chunks and 1 tbsp lime juice. The tropical sweetness balances the tart Granny Smith apples perfectly. Garnish with toasted coconut flakes for added crunch and texture contrast.
For a passion fruit twist, blend 2 passion fruit with 2 tbsp honey and strain to create a vibrant sauce. Drizzle this over the whipped cream layer for a tangy, exotic finish that pairs beautifully with the meringue's crispness.
Herbal Infusions
Incorporate 1 tbsp fresh basil or mint into the whipped cream for a fragrant herbal note. The bright, fresh flavors elevate the dessert and add a sophisticated touch that guests will love.
For a more earthy profile, fold 1 tsp finely chopped rosemary into the honey butter sauce. The piney aroma adds depth to the caramelized apples and creates a unique flavor combination that surprises and delights.
Nutrition facts
Frequently asked questions
Why does my meringue crack during baking?
Meringue cracks most often from temperature fluctuations or humidity. Keep your kitchen at 60-70°F and avoid opening the oven door during baking. Also, make sure your egg whites are at room temperature and your bowl is completely free of grease. Tap the baking sheet gently before baking to release air bubbles.
Can I make this pavlova ahead of time?
Bake the meringue shell 1 day ahead and store it in an airtight container at room temperature. Assemble the filling just before serving to maintain the crisp texture. The meringue keeps well for up to 2 days this way, while the fruit filling should be made fresh.
What's the best way to store leftovers?
If you have leftovers, store the meringue shell and filling separately. Keep the shell in an airtight container at room temperature for up to 2 days. The fruit filling stays fresh in the fridge for 1 day—just reassemble before serving. Never refrigerate the meringue shell directly, as condensation will make it soggy.
Can I substitute the Granny Smith apples?
Yes! Fuji or Honeycrisp apples work well, but they'll caramelize faster. For a sweeter option, try Braeburn. If using softer apples, reduce the cooking time by 1-2 minutes to prevent mushiness. The key is firmness—avoid varieties like Red Delicious that get too soft when cooked.
How do I make this recipe gluten-free?
This recipe is naturally gluten-free! Just ensure your cornstarch is certified gluten-free and check that your vanilla extract and citrus zest have no additives. The meringue and filling components remain safe for gluten-free diets as written. Always verify ingredient labels when in doubt.