
Desserts
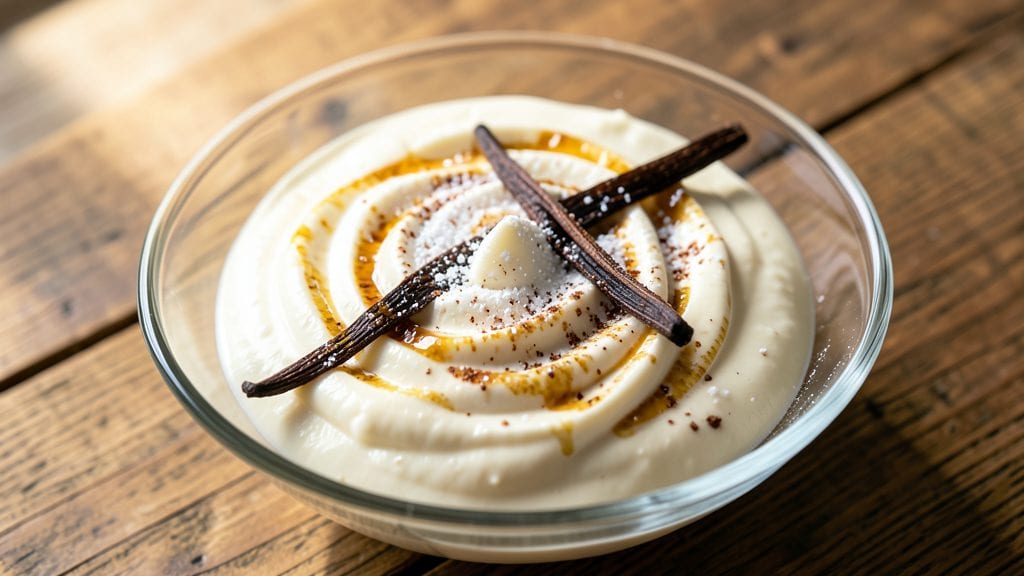
This Amish ice cream recipe brings back the simple, creamy magic of homemade dessert that tastes like childhood memories. The secret lies in churning heavy cream and milk with sugar until it reaches that signature thick, velvety texture—just like the old-fashioned recipes passed down through generations.
I’ve perfected this method to deliver restaurant-quality results in your own kitchen, using basic ingredients and a few key techniques.
The beauty of this recipe is its simplicity: no fancy equipment needed, just a few pantry staples and patience. The vanilla swirls add a touch of elegance, but the real star is the creamy base that melts perfectly on the tongue.
Whether you’re making it for a family gathering or a quiet weeknight treat, this ice cream is foolproof and always a crowd-pleaser.
What makes this recipe stand out is the texture—rich, smooth, and impossibly creamy without being overly sweet. The churning process ensures every bite is velvety, while the vanilla swirls add a delicate contrast.
It’s the kind of dessert that feels special but doesn’t require hours of work, making it perfect for both beginners and seasoned bakers.
Once you try this homemade version, you’ll never go back to store-bought. The flavor is deeper, the texture is superior, and the satisfaction of making it from scratch is unmatched. Let’s get started on creating your own batch of creamy, dreamy Amish ice cream.
Ingredients for amish ice cream
Just nine ingredients for creamy, dreamy ice cream that tastes like nostalgia.
| Ingredient | Amount | Notes |
|---|---|---|
| Heavy Whipping Cream 🥛 | 2 cups | Full-fat for best texture |
| Whole Milk 🥛 | 1 cup | Warmed slightly for smooth churning |
| Granulated Sugar 🍚 | 1 ½ cups | White or raw, no substitutes |
| Vanilla Extract 🌿 | 2 tbsp | Pure, high-quality extract |
| Salt 🧂 | ½ tsp | Fine sea salt preferred |
| Vanilla Bean Paste 🌿 | 1 tbsp | For swirls, optional but recommended |
| Vanilla Sugar 🍚 | 2 tbsp | Or 1 extra tbsp vanilla extract |
| Corn Syrup 🍯 | 1 tbsp | Prevents ice crystals, optional |
| Egg Yolks 🥚 | 4 whole | Large eggs, room temperature |
The heavy cream is non-negotiable here—full-fat only for that signature Amish texture. Store-brand works fine, but organic or grass-fed gives extra richness. Warm the milk slightly (just until it steams) before mixing—never boiling. The sugar? White or raw both work, but avoid powdered. Egg yolks are the secret to ultra-smooth texture—room temperature is key. I grab mine from Costco for bulk, but any grocery store has them. Skip the vanilla bean paste if you're on a budget, but trust me, it's worth it for those little specks of flavor.
No corn syrup? Honey or maple syrup at half the amount works in a pinch. Vanilla sugar? Make your own by mixing vanilla extract with sugar (1 tsp extract per 1 cup sugar), or just add extra extract. The vanilla extract matters—imitation smells like perfume. If you're using vanilla bean, scrape the seeds for maximum flavor. For a dairy-free version, swap the cream and milk for full-fat coconut milk (though texture will differ). The salt? Don't skip it—balances sweetness. And if you're worried about raw eggs, pasteurized yolks work too.
Store-bought mix-ins? Toss them in after churning so they stay fresh. This ice cream keeps 1-2 weeks in an airtight container. For best texture, freeze for 4-6 hours before scooping. I like to portion it into silicone molds for easy serving—looks fancy, no extra work. Leftovers? Thaw in the fridge overnight for creamy scoops. And if you make extra? Freeze portions for up to 3 months—it's the perfect make-ahead dessert.
Why You'll Love This Recipe
- No-Fuss Churn: I swear, this takes less effort than microwaving leftovers. Just heat the milk and cream, stir in sugar and vanilla, then let it cool before churning—no special tools, no stress.
- Creamy Vanilla Bliss: That perfect balance of rich heavy cream and smooth whole milk? It’s like biting into a cloud with a whisper of caramelized sugar. Honestly, my kids fight over the last scoop.
- Weeknight Crowd-Pleaser: Serve it after dinner when everyone’s still at the table, or pack it in jars for school lunches. The simplicity means I can make it when I’m too tired for anything fancy—yet it still feels special.
- Budget-Friendly Luxury: Five ingredients, all pantry staples, and it costs a fraction of store-bought. The salt? Just a pinch to make the sweetness pop—no waste, no fuss, and it keeps for days in the freezer.
Instructions for Amish ice cream recipe: homemade vanilla swirls with creamy churned perfection
Here's the straightforward method to create rich, velvety ice cream with those classic Amish swirls.
Prepare the Egg Yolk Base
In a heatproof bowl, whisk together the 4 whole egg yolks, 1.5 cups granulated sugar, and 0.5 teaspoon salt until smooth and pale. Place this bowl over a pot of simmering water (double boiler method) and whisk constantly for about 8-10 minutes until the mixture thickens to a pudding-like consistency.
You'll know it's ready when it coats the back of a spoon and leaves a clear path when you run your finger through it. Remove from heat immediately and stir in the 2 tablespoons vanilla extract and 1 tablespoon corn syrup. Let this base cool completely to room temperature before proceeding.
Warm and Mix the Cream Mixture
In a separate saucepan, gently warm the 2 cups heavy whipping cream and 1 cup whole milk over medium heat until it reaches 160°F. This temperature is crucial—it's hot enough to pasteurize but not boil. Remove from heat and let it cool to 100°F before mixing.
Once cooled, slowly pour the warm cream mixture into the cooled egg yolk base while whisking constantly. This tempering step prevents the eggs from scrambling. Transfer the combined mixture to a clean bowl and refrigerate for at least 4 hours or overnight until completely chilled and thickened.
Churn the Ice Cream Base
Pour the chilled mixture into your ice cream maker and churn according to the manufacturer's instructions, typically 20-25 minutes. The ice cream will thicken and become creamy as it chills. During the last 2 minutes of churning, add the 2 tablespoons vanilla sugar and 1 tablespoon vanilla bean paste.
Here's the thing—don't over-churn or you'll get ice cream instead of soft-serve. You want it thick but still scoopable at this stage. Transfer the churned mixture to a freezer-safe container and freeze for at least 4 hours to firm up.
Create the Classic Swirls
When the ice cream is partially frozen but still soft (about 2-3 hours after removing from freezer), use a spoon to create swirls on the surface. For extra flavor, sprinkle additional vanilla sugar on top. Return to the freezer and let it set for another 2-3 hours until completely firm.
This freezing method creates those beautiful swirls while keeping the texture creamy. For best results, let it sit at room temperature for 5-10 minutes before scooping—this gives you that perfect creamy consistency straight from the freezer.
Serve with Confidence
Scoop your homemade ice cream immediately and serve in bowls or cones. The texture should be smooth and creamy with those beautiful vanilla swirls throughout. Each bite should deliver rich, velvety perfection with deep vanilla flavor that comes from using both extract and bean paste.
Real talk: This recipe makes about 4 generous servings. If you're making it for a crowd, double the batch—but be prepared to eat it all yourself first! Store any leftovers in an airtight container for up to 2 weeks, though I doubt you'll have any left that long.
Pro Tips For Making Amish Ice Cream
- Whisk the Sugar First: Before adding any liquid, mix the granulated sugar with the heavy cream and milk—this dissolves it faster and prevents grainy ice cream. I learned this the hard way when my first batch had sugar crystals that felt like sand between my teeth.
- Chill the Mix Longer: Stick the custard in the fridge for at least 4 hours, preferably overnight—this makes churning easier and gives you smoother, creamier ice cream. Rushing it means fighting the machine later, and nobody wants that struggle.
- Salt the Cream: Add the pinch of salt to the cream before mixing, not just the finished ice cream—it balances sweetness and rounds out the flavor. I used to skip this, and the vanilla always tasted flat until I tried it.
- Use Cold Equipment: Freeze your ice cream maker bowl for 24 hours beforehand, and keep your mixing bowls ice-cold—this ensures the custard stays thick and doesn’t turn into soup. Sounds paranoid, but it works every time.
Essential equipment for this dish
Ice Cream Maker
An ice cream maker is the cornerstone of this recipe—no shortcuts here! I swear by the Cuisinart ICE-21 for its consistent performance and easy cleanup. The Cuisinart churns the mixture perfectly without overworking it, giving you that signature creamy texture.
If you're on a budget, the Hamilton Beach 51000 is a solid alternative that still delivers great results. 💫
Double Boiler
A double boiler is essential for tempering the egg yolks safely. I use a stainless steel mixing bowl placed over a saucepan with just enough water to create steam (about 1 inch).
The key is keeping the water simmering gently—never boiling—to maintain a steady 160°F temperature. A glass measuring cup works in a pinch, but stainless steel distributes heat more evenly.
Whisk and Spatula
Invest in a high-quality whisk (I love the OXO Good Grips) for blending the egg yolks and sugar into a smooth paste. A heatproof silicone spatula is also a game-changer for scraping every last bit of mixture from the bowl during the double boiler step.
These tools ensure no lumps or uneven texture in your base. 🥄
Thermometer
A candy or instant-read thermometer is non-negotiable for two critical steps: heating the cream mixture to 160°F and ensuring it cools to 100°F before mixing. I use the Thermoworks Thermapen One—it’s fast and accurate.
Skipping this step risks scrambling the eggs or uneven texture. For a budget option, the Taylor Precision Products thermometer works well too.
Freezer-Safe Containers
Use airtight, freezer-safe containers with 1-inch headspace for storage. I prefer glass Pyrex bowls because they’re sturdy and don’t absorb odors. For portioning, silicone ice cube molds add a fun touch and make serving easier. Label containers with the date—this ice cream keeps for 2 weeks at its best. 🧊
Optional: Vanilla Bean Scraper
If you’re using vanilla bean paste, a small offset spatula or vanilla bean scraper helps extract every last drop of flavor. I keep one in my spice drawer for this exact purpose.
It’s not essential, but it elevates the dish from good to next-level. For a free alternative, a butter knife works in a pinch—just scrape the seeds gently from the pod. 🌿
Nutrition facts
Frequently asked questions
Can I make this Amish-style ice cream without an ice cream maker?
Yes! The no-churn method works perfectly. Whip the 2 cups heavy cream to stiff peaks, then fold it into the chilled egg yolk mixture. Freeze in a shallow container, stirring every 30 minutes for 3-4 hours to prevent ice crystals. The texture won't be as silky-smooth, but it'll still be delicious and creamy.
Why does my homemade ice cream get icy after freezing?
Ice crystals form when air gets trapped during freezing. To prevent this, use corn syrup or honey (it lowers freezing point), stir the base occasionally while freezing, or add 1 tablespoon vodka (it lowers the temperature faster). Also, let the ice cream sit at room temperature for 5 minutes before scooping to restore creaminess.
What's the best way to flavor this Amish ice cream?
Classic options include chocolate chunks (melt 4 oz dark chocolate, cool, then fold in), fresh berries (fold in after churning), or spices like cinnamon or nutmeg (add 1 tsp with the vanilla). For a twist, try caramel swirls (make caramel, cool, then drizzle over the base before freezing).
How do I know when the egg yolk mixture is done?
The mixture is ready when it coats the back of a spoon and leaves a clear trail when you run your finger through it. It should thicken to a pudding-like consistency (about 8-10 minutes over a double boiler). If it's too runny, whisk for another minute; if it's too thick, it's overcooked—start over with fresh yolks.
Can I make this recipe ahead of time?
Prepare the egg yolk base and refrigerate it for up to 24 hours before mixing with the cream. The fully assembled mixture keeps in the fridge for 12 hours before churning. For best texture, churn and freeze it the same day, but you can freeze the finished ice cream for up to 3 months in an airtight container.