
Side Dishes
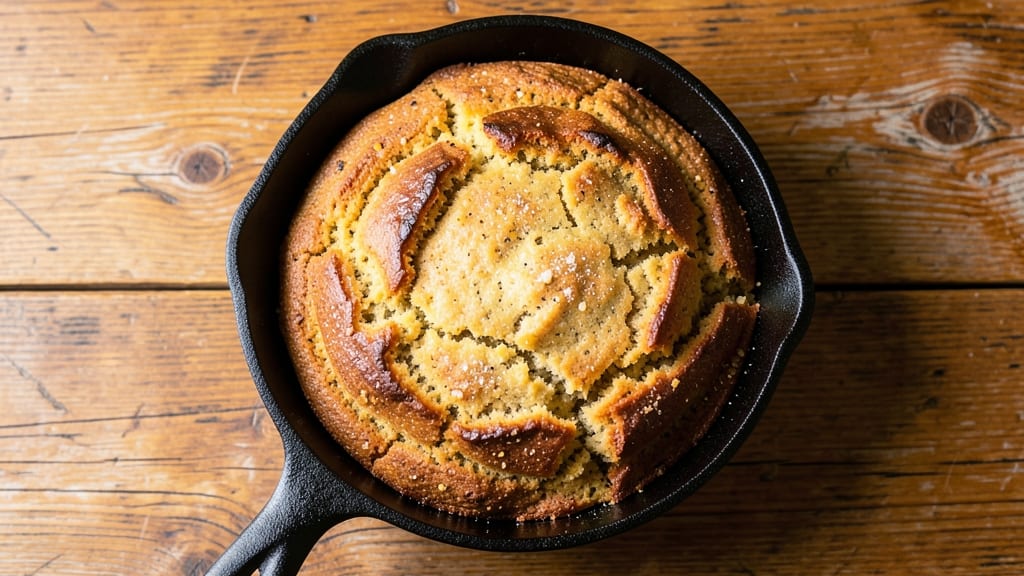
This Amish cornbread recipe delivers the golden crust and buttery crumb texture that makes it a kitchen staple. Rooted in simplicity, it relies on just six ingredients—flour, cornmeal, sugar, baking powder, eggs, and milk—yet transforms them into something extraordinary.
The secret lies in the technique: mixing just until combined, then baking until the edges turn golden and the center springs back when touched. This is the cornbread I grew up with, passed down through generations, perfect for soaking up chili or melting butter.
What sets Amish cornbread apart is its foolproof nature—no precise measurements, no complex steps, just reliable results. The cornmeal gives it that signature texture, while the baking powder ensures a light, airy crumb.
I’ve baked this recipe countless times, and it never fails to impress, whether served warm from the oven or reheated for a comforting side dish. The aroma alone fills the kitchen with nostalgia, making it more than just a side—it’s a piece of tradition.
Baking takes just 25 minutes at 375°F, yielding a loaf with a crisp exterior and tender interior. The edges develop a deep golden hue, while the crumb remains moist and crumbly.
This is the cornbread that pairs perfectly with hearty stews, fried chicken, or even a simple bowl of butter. Every bite delivers that perfect balance of sweetness and savory depth, making it a versatile addition to any meal.
For those who love to experiment, try adding a pinch of jalapeño for heat, a drizzle of honey for sweetness, or fresh herbs for brightness. The beauty of this recipe is its adaptability—yet it remains true to its roots.
Let’s get baking and bring a taste of Amish tradition to your table.
Ingredients for amish corn bread
Six simple ingredients transform into golden, buttery cornbread with the perfect crumb.
| Ingredient | Amount | Notes |
|---|---|---|
| All-Purpose Flour 🌾 | 1 ½ cups | White or whole wheat for texture |
| Cornmeal 🌽 | 1 cup | Fine-ground for smooth crumb |
| Granulated Sugar 🍚 | ¼ cup | White or brown sugar works |
| Baking Powder 🍞 | 1 ½ tsp | Double-acting preferred |
| Large Eggs 🥚 | 1 whole | Room temperature for even mixing |
| Whole Milk 🥛 | 1 cup | Full-fat for richness |
| Unsalted Butter 🧈 | ½ cup | Melted, not watery |
| Salt 🧂 | ½ tsp | Kosher or sea salt |
| Vegetable Oil 🫒 | ¼ cup | For greasing pan |
The cornmeal is non-negotiable for that signature texture—fine-ground is ideal, but medium works in a pinch. Bob’s Red Mill or King Arthur brands are reliable choices, though the bulk bins at WinCo or Aldi offer great prices. For the flour, White Lily (if you can find it) adds a slightly sweet note, but all-purpose works perfectly. The baking powder must be fresh—if it’s older than 6 months, toss it. Arm & Hammer or Clabber Girl are both solid options. The butter should be unsalted (salted works but alters the balance), and Land O’Lakes or Plugrá are my go-tos for consistent quality. Melt it gently over low heat or in the microwave to avoid overheating.
No cornmeal? Polenta or fine-ground grits can substitute in a bind, though the texture will differ slightly. Out of baking powder? Self-rising flour at 1.5 cups plus 0.5 tsp salt works, but you’ll need to adjust other liquids. The milk can be swapped for buttermilk (add 1 tsp vinegar or lemon juice) or even Greek yogurt for extra richness. For the butter, margarine in a pinch (though purists will notice the difference). The oil is just for greasing—canola or vegetable oil are fine, but coconut oil adds a subtle flavor if you’re feeling adventurous. Pro tip: Room-temperature eggs mix more smoothly, so take them out 10 minutes before measuring.
This cornbread keeps well at room temperature for 2 days in an airtight container, though it’s best fresh. For longer storage, wrap tightly in foil and refrigerate for up to 5 days—reheat in a 350°F oven for 10 minutes. Freeze for up to 3 months by slicing and wrapping each piece individually. Butter melts beautifully on warm slices, and it reheats perfectly in the microwave for 15 seconds. Leftovers make great French toast or cornbread stuffing—don’t waste them!
Why You'll Love This Recipe
- No Mixer Needed: I swear by this recipe because it’s the kind of thing you can mix with a fork in a bowl—no stand mixer, no stress. The cornmeal and flour just blend together until it’s just combined, and honestly? That’s the magic.
- Sweet-Savory Balance: That little touch of sugar in the batter? It’s not too sweet, but it’s there—like a whisper of caramel that makes every bite feel special. The eggs bind it just right, so it’s moist without being heavy.
- Weeknight Workhorse: Between us, this is my go-to when I need something fast for dinner. Serve it warm with chili or soup, and suddenly you’ve got a whole meal. Even my kids fight over the last slice—no exaggeration.
- Budget-Friendly Staple: Flour, cornmeal, sugar—these are pantry basics that don’t break the bank. A single batch stretches for days, whether I’m reheating slices for breakfast or using leftovers to top salads. Zero waste, all flavor.
Step-by-step instructions for Amish cornbread
Here's the method that delivers the signature golden crust and tender crumb Amish families have perfected for generations.
Prepare the Dry Ingredients
In a medium bowl, whisk together the 1.5 cups all-purpose flour, 1 cup cornmeal, 0.25 cup granulated sugar, 1.5 teaspoons baking powder, and 0.5 teaspoon salt. Sift the mixture through a fine-mesh sieve directly back into the bowl to aerate the flour and cornmeal—this creates a lighter crumb. Use your fingers to break up any lumps in the cornmeal, which can create dense pockets in the finished cornbread.
I like to press the mixture through the sieve two or three times to ensure everything is evenly distributed. The cornmeal should be uniformly mixed with the flour, and you should see a fine, powdery consistency without any visible specks of cornmeal clumping together. This step is crucial for achieving that signature Amish cornbread texture—smooth yet slightly coarse from the cornmeal.
Mix the Wet Ingredients
In a separate large bowl, combine the 1 whole large egg, 1 cup whole milk, 0.5 cup unsalted butter (melted and slightly cooled), and 0.25 cup vegetable oil. Whisk vigorously until the mixture is completely smooth and all the fat is fully emulsified. The melted butter should be warm to the touch but not hot—if it's too hot, it can cook the egg and create a scrambled texture.
This mixture should be homogeneous, with no visible streaks of fat. If you see any separation, whisk a bit more vigorously. The warmth of the melted butter helps incorporate the milk and egg more easily, creating a batter that's just thick enough to hold its shape when poured into the pan. The oil adds moisture and richness, ensuring the cornbread stays tender even after baking.
Combine Wet and Dry Ingredients
Create a well in the center of the dry ingredient mixture and pour in the wet ingredients. Using a spatula, gently fold the wet mixture into the dry ingredients, being careful not to overmix. Stir just until the batter comes together—you should still see some dry spots, as overmixing develops gluten and can make the cornbread dense.
The batter should be thick and slightly lumpy, resembling a very stiff pancake batter. If it's too thin, add a tablespoon or two more of the dry mixture. The consistency is key here—too thin, and the cornbread will spread too much in the pan; too thick, and it won't rise properly. This batter should hold its shape when dropped from a spoon, but still be pourable.
Grease and Preheat
Preheat your oven to 425°F. Generously grease an 8-inch cast-iron skillet or 9-inch baking dish with a small amount of the vegetable oil—this ensures the cornbread won't stick and develops that coveted crispy crust. Use a paper towel to wipe any excess oil from the pan, leaving just a thin, even coating.
While the oven preheats, let the batter rest for 5 minutes. This brief pause allows the flour to fully hydrate and the baking powder to activate, ensuring a more even rise. The batter will thicken slightly during this time, which helps it hold together better when poured into the hot pan. Don't skip this step—it makes a noticeable difference in texture.
Bake to Golden Perfection
Pour the batter into the prepared pan and smooth the top with a spatula. Bake for 20-25 minutes until the edges are deep golden brown and the top is cracked in places with a slightly crispy texture. The cornbread is done when an instant-read thermometer inserted into the center reads 200°F—this ensures it's fully cooked without being dry.
I like to open the oven door just a crack after 15 minutes to let any steam escape. This helps the top develop that beautiful golden crust without becoming soggy. Once baked, let the cornbread rest in the pan for 5 minutes before transferring it to a wire rack. This resting period allows the internal structure to set, making it easier to slice without falling apart.
Pro Tips For Making Amish Corn Bread
- Measure Cornmeal First: Dump the cornmeal into your mixing bowl before anything else—then cut the butter into it. This keeps those fine grits from floating away when you add liquid later, and your batter stays evenly textured. I learned this the hard way after scraping cornmeal off my counter for the third time.
- Skip Overmixing the Batter: Stir just until the dry ingredients disappear—maybe 15-20 strokes max. Amish corn bread relies on a tender crumb, and overworking it turns it dense. My grandmother used to say, "If you’re tired of stirring, stop." She was right.
- Use a Cast-Iron Skillet: Bake it in a hot cast-iron pan (425°F for 18-22 minutes) for that classic crispy crust and even heat distribution. Nonstick pans work, but they won’t give you that deep, caramelized flavor. Yes, even if you’re impatient like me—wait for the pan to scream hot.
- Whisk the Eggs Separately: Beat the eggs in a separate bowl first, then fold them in last. This keeps them from curdling when mixed with the buttermilk (if your recipe calls for it) and ensures a lighter, more uniform crumb. Sounds weird, but it works—trust me.
Storing and reheating your leftovers
Room-Temp Storage
Keep your cornbread at room temperature in an airtight container for up to 2 days—the crust stays crisp while the crumb remains tender. I use a glass Pyrex dish with a tight lid to maintain freshness.
Store it away from direct sunlight, as heat can dry out the crumb faster. The golden edges will soften slightly but still taste amazing with butter or honey. 🌾
Fridge Preservation
For longer storage, wrap the cornbread tightly in aluminum foil or place it in an airtight container and refrigerate for up to 5 days. The texture holds up well, though the crust may lose some crispness.
To revive it, pop it in a 350°F oven for 10 minutes—this restores the golden crust without drying out the interior. I often reheat slices this way for a quick side dish. ❄️
Freezer Magic
Slice the cornbread before freezing for individual portions—wrap each slice tightly in plastic wrap or place them in a freezer bag with parchment paper between slices. This prevents freezer burn and makes it easy to grab one slice at a time.
Store for up to 3 months. When ready to eat, thaw at room temperature for 30 minutes or reheat directly from frozen in a 375°F oven for 12-15 minutes. 🧊
Microwave Quick Fix
For a fast reheat, wrap a slice in a damp paper towel and microwave on medium power for 20-30 seconds. This adds moisture without making the cornbread soggy. Avoid high power—it can turn the edges rubbery.
I like to finish with a pat of softened butter or a drizzle of honey for extra flavor. Perfect for a quick breakfast or snack! ⏱️
Oven Refresh
For the best texture, reheat the entire loaf or slices in a 350°F oven for 10-15 minutes, covered loosely with foil. This method mimics fresh-baked warmth and crisps the edges beautifully.
If the cornbread feels dry, brush it lightly with melted butter before reheating—it adds moisture and richness. Ideal for serving with chili or soup. 🔥
Butter Melting Hack
No oven? No problem! Spread softened butter on warm cornbread slices and let it melt for 1-2 minutes. The butter soaks into the crumb, making it taste freshly baked.
For extra flavor, mix in a pinch of salt or cinnamon. This trick works wonders for leftovers and turns them into a delicious treat. 🧈
Nutrition facts
Frequently asked questions
Why does Amish cornbread have cornmeal?
The cornmeal gives this bread its signature texture—those tiny, crunchy bits create a delightful contrast to the tender crumb. Traditional Amish recipes rely on cornmeal as a staple ingredient, especially in regions where corn was plentiful. It also adds natural sweetness and a slightly earthy flavor that pairs perfectly with savory dishes like chili or fried chicken.
Can I make this cornbread without butter?
Yes! Substitute the 0.5 cup melted butter with 0.5 cup vegetable oil or 0.5 cup applesauce for a lighter version. If you prefer dairy, margarine works in a pinch, though the flavor will differ slightly. The key is keeping the fat—it’s what creates that rich, moist crumb. For a vegan option, use melted coconut oil or extra oil.
What’s the secret to a crispy crust?
Preheat your oven to 425°F and use a well-greased cast-iron skillet—it retains heat better than other pans. Bake until the edges are deep golden brown and the top has visible cracks. For extra crispiness, broil for 1-2 minutes at the end (watch closely to avoid burning). The high heat caramelizes the sugars in the batter, creating that coveted crust.
How do I fix dense or gummy cornbread?
Dense cornbread usually means overmixing or underbaking. Next time, stir the batter just until combined—lumps are fine! For gummy texture, ensure your baking powder is fresh (test with a small amount of water—it should fizz). Also, bake until an instant-read thermometer reads 200°F at the center. If it’s already baked, try reheating slices in a 350°F oven for 5-10 minutes to crisp them up.
Can I add jalapeños or cheese to this recipe?
For heat, stir in 1-2 diced jalapeños (seeds removed for mild spice) or 0.5 cup shredded cheddar into the batter. The cheese melts beautifully, adding richness, while jalapeños give it a kick. Just reduce the milk slightly (by 2 tablespoons) to maintain the right consistency. This works especially well with savory dishes like BBQ or tacos.